


![A Look at 30 Key Cyber Crime Statistics [2023 Data Update]](https://www.thesslstore.com/blog/wp-content/uploads/2022/02/cyber-crime-statistics-feature2-75x94.jpg)


 (No Ratings Yet)
SSL Installation Guide for AWS Elastic Load Balancer
A Step-by-Step Guide on how to install an SSL Certificate on Amazon Web Services’ Elastic Load Balancer
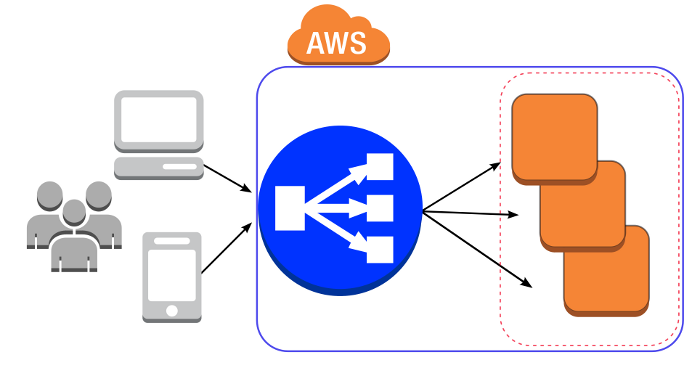
A load balancer is an impressive tool that takes requests from clients and distributes them across back-end instances that are registered with the load balancer.
However, you have to set a load balancer up correctly in order for it work properly with HTTPS. This can be tricky—unless you have a guide that is.
Fortunately, we’re here to do just that—guide you on how to set up an SSL Certificate on an AWS Elastic Load Balancer.
Before we get started, you’ll first need to purchase an SSL Certificate, fill out the CSR and get it issued. After all, it’s hard to install an SSL Certificate if you don’t have one yet.
Installing an SSL Certificate on your AWS Elastic Load Balancer
The first thing you’ll need to do is login to your AWS Console, click on “EC2” and select “Load Balancers” up in the left hand portion of the navigation.
Now, click “Create Load Balancer.”
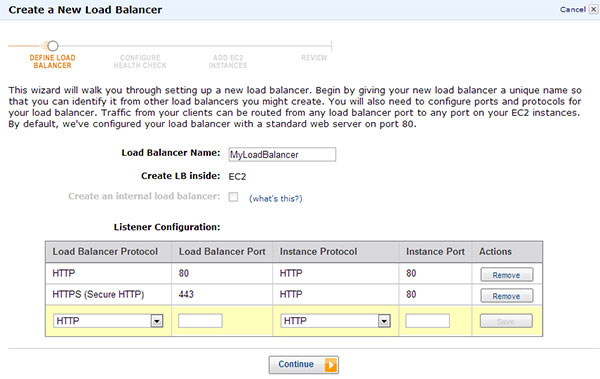
After you’ve named your load balancer, scroll down to “Listener Configuration” and add a new HTTPS load balancer protocol with “HTTP Instance” protocol. Click “continue.”
Now select “Upload New SSL Certificate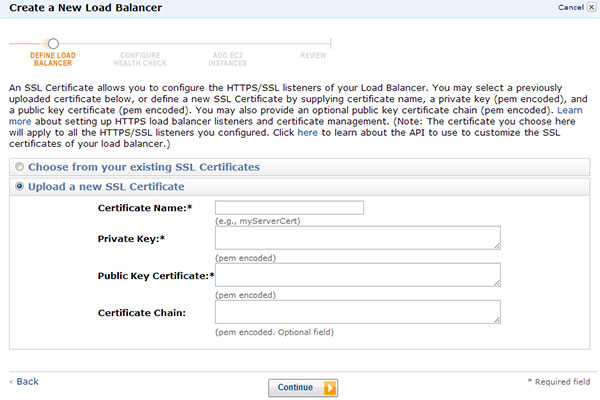 .”
.”
After filling out the appropriate fields, click “continue.”
Select “ELBSample-ELBDefaultNegotiationPolicy” as your SSL cipher policy.
Click “continue.”
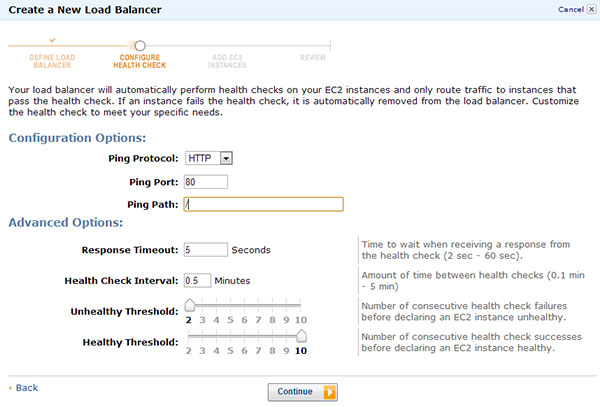
Now configure the “Health Check” to your requirements, set the “Ping Path” to “/.”
Add your EC2 Instance and click “continue.”
Now, the final step, review your setup and click “Create.”
Congratulations! You’ve now installed your SSL Certificate on your AWS Load Balancer.

5 Ways to Determine if a Website is Fake, Fraudulent, or a Scam – 2018
in Hashing Out Cyber SecurityHow to Fix ‘ERR_SSL_PROTOCOL_ERROR’ on Google Chrome
in Everything EncryptionRe-Hashed: How to Fix SSL Connection Errors on Android Phones
in Everything EncryptionCloud Security: 5 Serious Emerging Cloud Computing Threats to Avoid
in ssl certificatesThis is what happens when your SSL certificate expires
in Everything EncryptionRe-Hashed: Troubleshoot Firefox’s “Performing TLS Handshake” Message
in Hashing Out Cyber SecurityReport it Right: AMCA got hacked – Not Quest and LabCorp
in Hashing Out Cyber SecurityRe-Hashed: How to clear HSTS settings in Chrome and Firefox
in Everything EncryptionRe-Hashed: The Difference Between SHA-1, SHA-2 and SHA-256 Hash Algorithms
in Everything EncryptionThe Difference Between Root Certificates and Intermediate Certificates
in Everything EncryptionThe difference between Encryption, Hashing and Salting
in Everything EncryptionRe-Hashed: How To Disable Firefox Insecure Password Warnings
in Hashing Out Cyber SecurityCipher Suites: Ciphers, Algorithms and Negotiating Security Settings
in Everything EncryptionThe Ultimate Hacker Movies List for December 2020
in Hashing Out Cyber Security Monthly DigestAnatomy of a Scam: Work from home for Amazon
in Hashing Out Cyber SecurityThe Top 9 Cyber Security Threats That Will Ruin Your Day
in Hashing Out Cyber SecurityHow strong is 256-bit Encryption?
in Everything EncryptionRe-Hashed: How to Trust Manually Installed Root Certificates in iOS 10.3
in Everything EncryptionHow to View SSL Certificate Details in Chrome 56
in Industry LowdownPayPal Phishing Certificates Far More Prevalent Than Previously Thought
in Industry Lowdown