The following instructions will guide you through the SSL installation process on LiteSpeed. If you have more than one server or device, you will need to install the certificate on each server or device you need to secure. If you still have not generated your certificate and completed the validation process, reference our CSR Generation Instructions and disregard the steps below.
What You’ll Need
1. Your server certificate
This is the certificate you received from the CA for your domain. You may have been sent this via email. If not, you can download it by visiting your Account Dashboard and clicking on your order.
2. Your intermediate certificates
These files allow the devices connecting to your server to identify the issuing CA. There may be more than one of these certificates. If you got your certificate in a ZIP folder, it should also contain the Intermediate certificate(s), which is sometimes referred to as a CA Bundle. If not, download the appropriate CA Bundle for your certificate.
3. Your private key
This file should be on your server, or in your possession if you generated your CSR from a free generator tool. On certain platforms, such as Microsoft IIS, the private key is not immediately visible to you but the server is keeping track of it.
Installation Instructions
1. Add a new Listener
In your LiteSpeed WebAdmin console, click Listeners and then Add.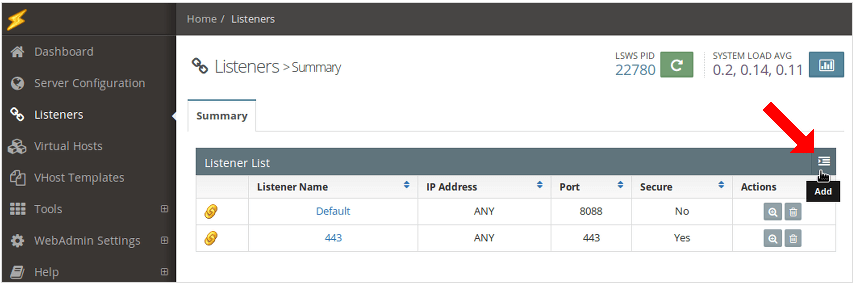
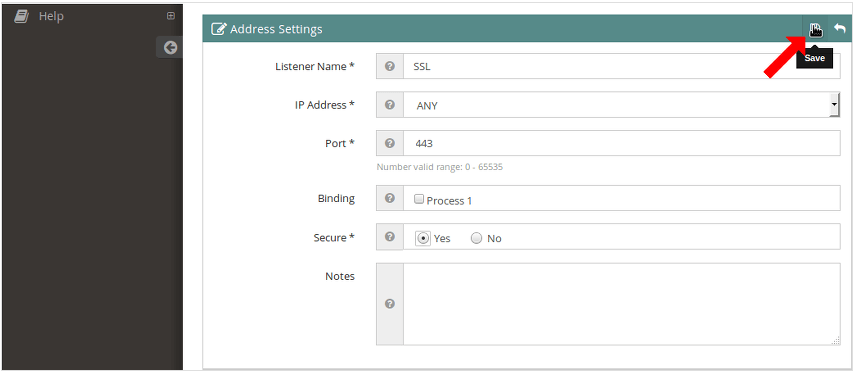
2. Configure the new Listener
Use the following Address Settings to configure the newly created Listener:
- Listener Name – Enter the internal friendly name for your Listener.
- IP Address – Select Any from the dropdown unless you want to bind the Listener to a particular CPU. In that case, enter the unique IP-port combination.
- Port – Most HTTPS connections are managed through port 443 by default. However, if you have other Listeners operating on that port, this may cause an issue and require you to use another port such as 8443.
- Secure – Select Yes.
- Notes – Add any internal notes that will help you distinguish the Listener in the future.
- Click Save.
3. Select your Listener
From your WebAdmin console, click Listeners and select your Listener Name (for our example, we chose to name the Listener “SSL”).
4. Select the SSL tab
Once you’re on the SSL tab under your newly created Listener, click the Edit button on the SSL Private Key & Certificate section.
5. Configure the filepaths
Use the following instructions to properly configure your Certificate filepaths as shown below:
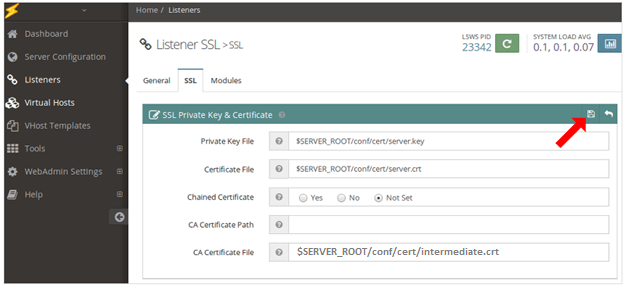 Private Key File – This is the path to your private key that was previously saved on your directory during the generation process via OpenSSL.
- Certificate File – This is the path to your server certificate that the CA sent you. You should already have this saved locally or in your server directory.Only complete one of the two options below to successfully install the intermediate certificates:
- CA Certificate Path – This is the path to the intermediate certificate “file” that the CA sent you.
- CA Certificate File – This is the path to the “directory” holding the intermediate certificates that the CA sent you.
- Click Save.
6. Return to the SSL tab
Once you’re back on the SSL tab under your Listener, click the Edit button on the SSL Protocol section. 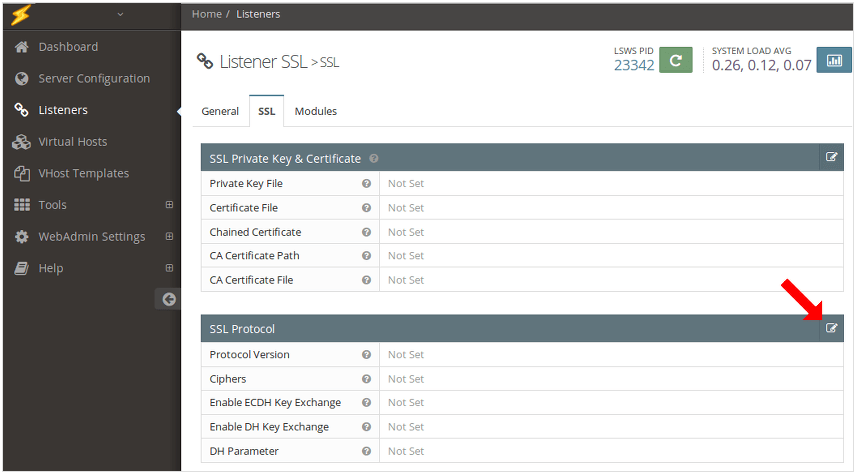
7. Select “Protocol Version”
For Protocol Version, select TLSv1.1 and TLSv1.2 and then click Save. 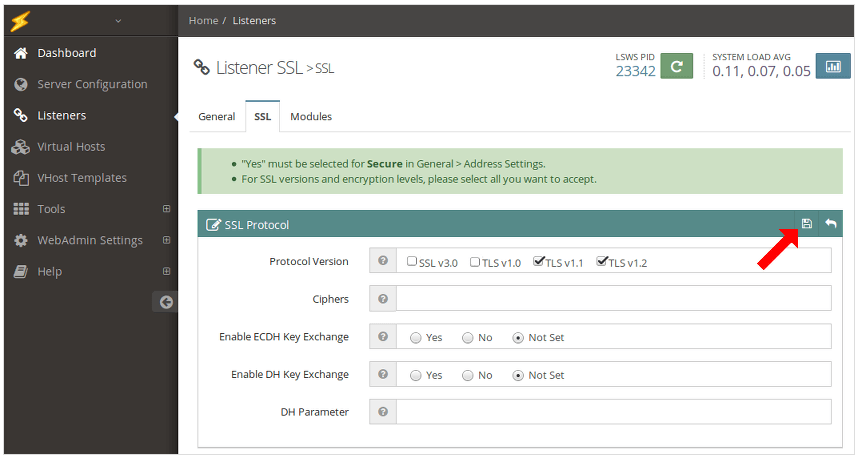
8. Select your Listener
Now, from your WebAdmin console, click Listeners and select your Listener Name (e.g. SSL).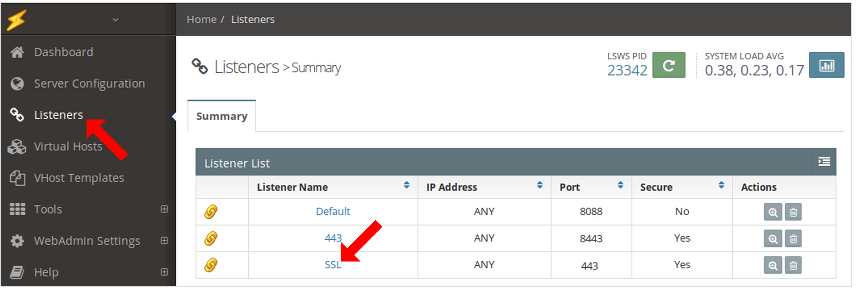
9. Select the General tab
Under your selected Listener, select the General tab and click the Add button on the Virtual Host Mappings section.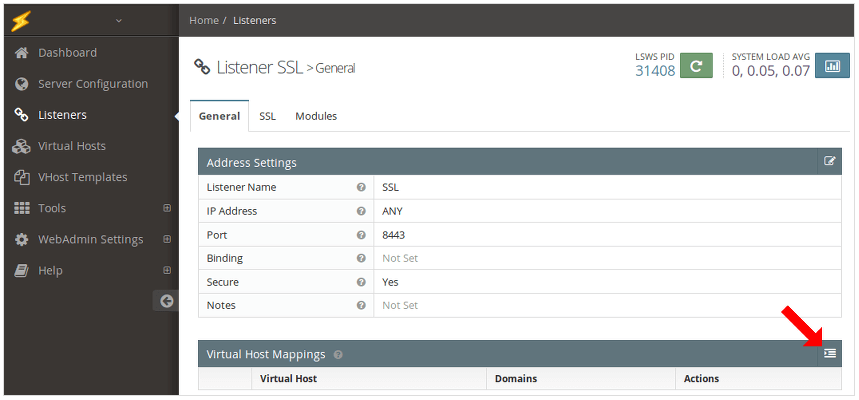
10. Select the Virtual Host
In the Virtual Host Mappings section of your General tab, select the Virtual Host you want to connect the Listener to from the drop-down menu.
11. Enter all the Domains(s)
Once you have the appropriate Virtual Host selected, enter all of the Domains that connect to your vhost(s) – this tells OpenLiteSpeed where to send traffic this listener picks up – and click Save.  Note 1: If you have multiple domains in the certificate that connect to the vhost, use a comma “,” to separate the additional domains. Note 2: If you have one vhost and configured the server to disregard other vhosts, you can enter an asterisk “*” as the domain.
12. Restart
Navigate to your Dashboard by selecting “Dashboard” from the left-hand side menu. Once on your Dashboard, click the green Graceful Restart button.
Congratulations! You’ve successfully installed your SSL certificate! To check your work, visit the website in your browser at https://yourdomain.tld and view the certificate/site information to see if HTTPS/SSL is working properly. Remember, you may need to restart your server for changes to take effect.
To check your server’s configurations more thoroughly, use our SSL Checker Tool or contact our Customer Experience Department for additional assistance.