The following instructions will guide you through the SSL installation process on Mac OS X El Capitan (v.10.11). If you have more than one server or device, you will need to install the certificate on each server or device you need to secure. If you still have not generated your certificate and completed the validation process, reference our CSR Generation Instructions and disregard the steps below.
What You’ll Need
1. Your server certificate
This is the certificate you received from the CA for your domain. You may have been sent this via email. If not, you can download it by visiting your Account Dashboard and clicking on your order.
2. Your intermediate certificates
These files allow the devices connecting to your server to identify the issuing CA. There may be more than one of these certificates. If you got your certificate in a ZIP folder, it should also contain the Intermediate certificate(s), which is sometimes referred to as a CA Bundle. If not, download the appropriate CA Bundle for your certificate.
3. Your private key
This file should be on your server, or in your possession if you generated your CSR from a free generator tool. On certain platforms, such as Microsoft IIS, the private key is not immediately visible to you but the server is keeping track of it.
Installation Instructions
1. Launch the server app
Launch and access the Mac OS El Capitan (v10.11) Server App.
2. Select Keychain Access
From the Finder window, under Favorites, select Applications, then Utilities, and click
Keychain Access. 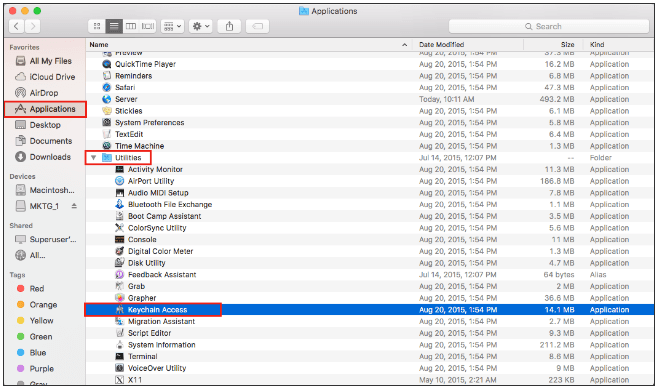
3. Select system
From the Keychain Access window, under Keychains, select System.
4. Move the Intermediate Certificates
Drag-and-drop the Intermediate Certificates (.cer or .crt) file into the System folder.
5. Modify Keychain
Enter the Administrator’s Password and click Modify Keychain.
6. Open the Server application
From the Finder window, under Favorites, select Applications and then Server.
7. Choose the correct server name
From the Server App window, under Choose a Mac, select one of the following options to determine which server to install the SSL Certificate on:
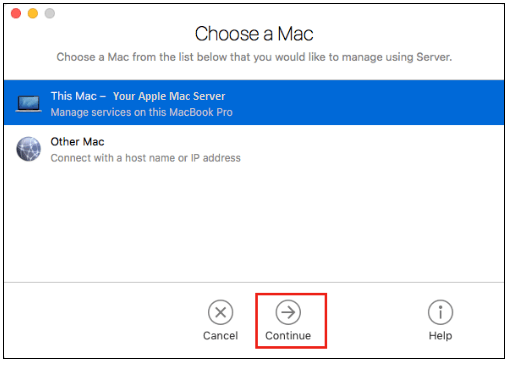
- To install the SSL Certificate on the current server:
- Click This Mac – YourServerName and click Continue.
- Enter the Administrator Name and Password and click Allow.
- To install the SSL Certificate on another server:
- Click Other Mac – YourOtherServerName and click Continue.
- Enter your Host Name and IP Address.
- Enter the Administrator Name and Password and click Allow.
8. Access your Certificates section
From the Server App window, under the Server section, click Certificates.
9. Select your Pending certificate
From the Certificate page, select the Pending certificate that you created during the CSR generation process.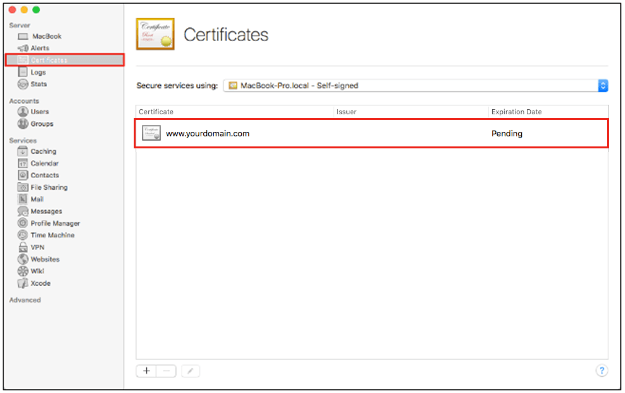
On the resulting Certificates page, you will see a box titled “Drag files received from your certificate vendor here”, drag-and-drop Your Server Certificate (.crt or .cer) into this box and click Ok. 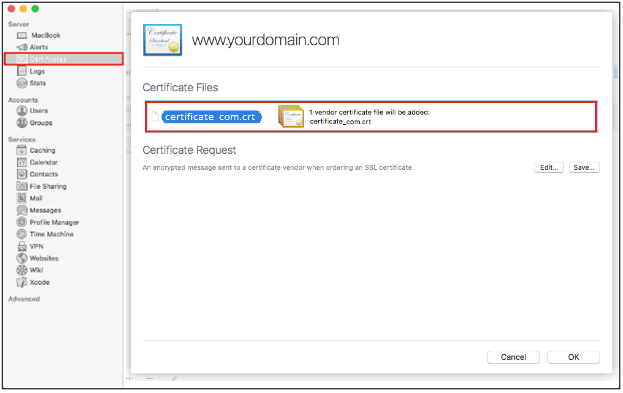
10. Go back to the main Certificates page
From the Server App window, under Server, click Certificates.
11. Select the Custom option
On the Certificates page, click the Secure services using drop-down menu, and select Custom.
12. Assign Your Server Certificate
From the Service Certificates window, in your Certificate List, choose Your Server Certificate for each service you’d like to use the SSL Certificate for. It is recommended that you select all services that are used for communications (e.g. file sharing, mail, websites, etc.), then click OK.
Congratulations! You’ve successfully installed your SSL certificate! To check your work, visit the website in your browser at https://yourdomain.tld and view the certificate/site information to see if HTTPS/SSL is working properly. Remember, you may need to restart your server for changes to take effect.
To check your server’s configurations more thoroughly, use our SSL Checker Tool or contact our Customer Experience Department for additional assistance.