The following instructions will guide you through the CSR generation process on FileZilla. To learn more about CSRs and the importance of your private key, reference our Overview of Certificate Signing Request article. If you already generated the CSR and received your trusted SSL certificate, reference our SSL Installation Instructions for FileZilla server and disregard the steps below.
1. Log in
First, log in to your FileZilla server using terminal (ssh).
2. Enter Command
Now you must enter the following command. Don’t forget to replace ‘server’ with the name of your server.
openssl req –new –newkey rsa:2048 –nodes –keyout server.key –out server.csr
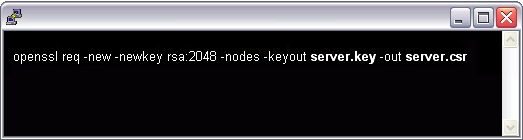
The above command begins the generation process for the private key and CSR.
3. Enter Details
After you’ve entered the command, you’ll be prompted to enter the common name (domain name). Enter your fully qualified domain name (FQDN) of the website for which you want to generate CSR. If you want to secure sub-domains using a Wildcard SSL certificate, you must include an asterisk (*) in front of the FQDN. For example, *.yourdomainname.com.
Once you’ve entered your common name, you’ll be asked to enter your organization details and geographical details. Enter the details as below:
- C: 2-digit country code
- ST: Write the full name of the state. For example, Florida.
- L: Write the full name of the city. For example, New York
- O: Write the full name of your organization without any special characters. If you want to issue an OV or an EV SSL certificate, you must write the legal name of your organization.
- OU: Name of the department (e.g., Marketing Department)
4. CSR File Generated
Once you’ve entered the details, your CSR file named OpenSSL.csr will be generated. Copy the contents starting from —–BEGIN CERTIFICATE REQUEST—— and ending with —–END CERTIFICATE REQUEST—– and paste it into an editor such as Notepad.
Upon generating your CSR, your order will enter the validation process with the issuing Certificate Authority (CA) and require the certificate requester to complete some form of validation depending on the certificate purchased. For information regarding the different levels of the validation process and how to satisfy the industry requirements, reference our validation articles.
After you complete the validation process and receive the trusted SSL Certificate from the issuing Certificate Authority (CA), proceed with the next step using our SSL Installation Instructions for FileZilla.