The Payment Card Industry Data Security Standards (PCI DSS) mandates that all organizations, regardless of size or level, must perform quarterly ASV scans.
What does all of this mean? It entails:
- going through an approved PCI ASV scanning vendor,
- running both internal and external vulnerability scans, and
- submitting reports to your acquiring bank.
All of this can be a considerable headache if you don’t have the right tools. The problem? Some PCI scanners cost hundreds or thousands of dollars per year — and they don’t even take care of all the work! They’re also nowhere near as a comprehensive or user-friendly as other scanners.
So, what’s the best solution at the best price point? Without a doubt, in terms of both price and efficiency, Sectigo’s HackerGuardian PCI Scanner is the best option available anywhere.
Sectigo scans for vulnerabilities on your network and produces actionable remediation reports that can be used to triage any issues. Once you’ve cleaned things up, simply perform the scan again and submit the report it generates to your acquiring bank. It literally takes all the work — save a few mouse clips — directly off your shoulders.
So, how do you run a PCI DSS external vulnerability scan? Let’s break it down.
Run a PCI DSS External Vulnerability Scan in 12 Steps
This guide assumes you’ve already purchased the HackerGuardian PCI scanner. If you haven’t, take a few minutes and do it now. We sell it the cheapest you’ll find it anywhere. In fact, we’re so confident in that statement we back it up with a low-price guarantee. Find a cheaper price, just show us and we’ll match it. Or maybe even beat it. Who knows?
Save 67% on PCI Scanning with Sectigo HackerGuardian
Get Sectigo HackerGuardian PCI Scanner for only $81.90/year.
Once you’ve purchased the scanner and set it up, it’s time to run your first PCI external vulnerability scan.
- Make sure the scanner IP addresses are trusted. For some servers, you may need to add the following IPs to your Trusted IP list.
64.39.96.0/20 (64.39.96.1-64.39.111.254)- Next up, let’s specify your in-scope infrastructure:
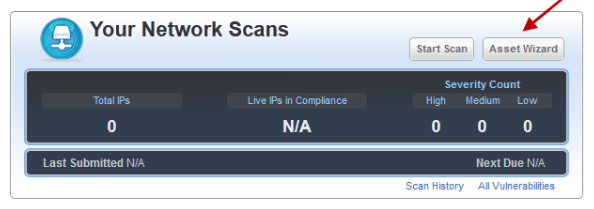
- Click the Asset Wizard button in your dashboard.
- Add your public-facing IP addresses/ranges.

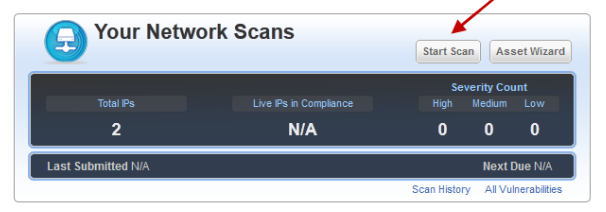
- Click Start Scan.

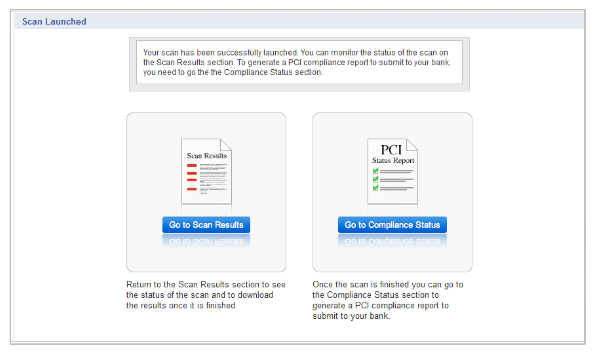
- Now, Sectigo HackerGuardian will start to perform its PCI external scan.

- Click Go to Scan Results.
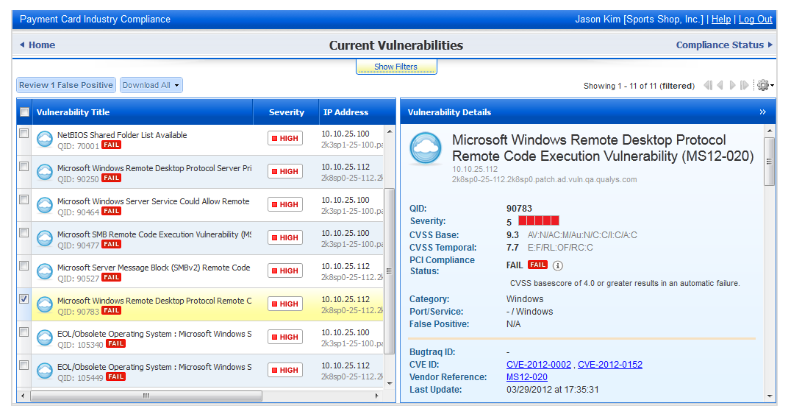
- You will be sent to a page that details each vulnerability by severity.

- Click each vulnerability to see actionable solutions provided by Sectigo’s team of specialists.
- Next, fix each vulnerability to remediate the issue.
- Rescan your IP addresses.

- If the scan returns a “Pass” result, click the Go to Compliance option.

- Follow the instructions, Sectigo HackerGuardian will produce a ready-to-submit report.
- Send the report to your acquiring bank.
Yeah, it really is that simple. So, what are you waiting for? Try Sectigo HackerGuardian out for yourself this quarter and see how easy PCI compliance can be.
Remember, you need to do this process four times each year (quarterly). If you have any questions or need some help, feel free to give us a call or drop us a line on live chat.


