
Wondering how to implement BIMI? It’s not just about knowing how to create a BIMI record on your domain — there’s more to the process. And those steps occur in a specific order.
If you’re looking for a quick-hit overview, check out the table below. Otherwise, keep reading or click on a link in the table below to jump to the specific BIMI implementation step you want to review.
A 20-Second Overview: How to Implement BIMI in 5 Steps
| Steps to Set Up BIMI | What Each Step Entails |
| 1. Set up your SPF and/or DKIM records | SPF: Specify authorized sender domains and IP addresses DKIM: Generate a key pair and publish the public key |
| 2. Set DMARC enforcement | Set up DMARC monitoring and ensure the DNS record to p=reject or p=quarantine |
| 3. Format your brand’s logo file | Ensure it’s an SVG Tiny 1.2 profile and meets BIMI compliance |
| 4. Get a Mark Certificate for your domain | You’ll need to purchase either a Common Mark Certificate (CMC) or a Verified Mark Certificate (VMC), both of which require business and domain validation |
| 5. Set up your BIMI record | This means specifying the BIMI version tag value, logo file URL, and the Mark Certificate’s file URL |
Related Resource: How to Set Up BIMI and a Mark Certificate to Display Your Email Logo
How to Set Up BIMI — Step #1: Set Up SPF or DKIM Records
Setting up your sender policy framework (SPF) and/or domainkeys identified mail (DKIM) records means identifying and specifying the domains and the email addresses that are authorized to send mail for them.
| How to Set Up an SPF Record | How to Set Up a DKIM Record | |
| Step One | Identify the domains you’ll send emails from | Generate the key pair that’s used to create digital signatures |
| Step Two | Identify authorized sender IP addresses | Publish the public key (i.e., create the DKIM DNS TXT record) |
| Step Three | Set up and configure your SPF record | Enable the DKIM record in your ESP’s hosting account |
| Step Four | Test to ensure your SPF record is configured correctly | Validate your DKIM DNS record to ensure it’s set up properly |
How to Set Up BIMI — Step #2: Set DMARC Enforcement
Pro tip: Set your DMARC to reporting-only mode first to ensure you didn’t neglect to include any additional authorized email services or other senders.
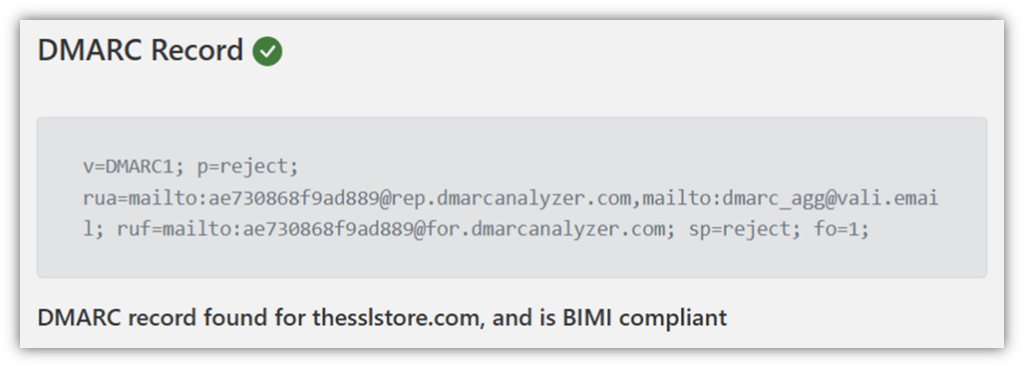
Ensure that your domain is compliant with domain-based message authentication, reporting and compliance (DMARC) requirements. You can do this by setting your DNS’s DMARC record to p=reject or p=quarantine.
Here’s a quick example of how a DMARC record can look:
How to Set Up BIMI — Step #3: Format Your Logo SVG File
The next part in the process of implementing BIMI involves setting up your brand’s logo SVG image to meet the standard’s compliance. This is because BIMI logos must meet very specific requirements.
However, we won’t get into the specifics of that here, as we’ve already covered how to format your BIMI SVG logo file in detail in a separate blog post. However, it’s crucial that you store the logo file at a secure (HTTPS) URL.
How to Set Up BIMI — Step #4: Buy the Right Mark Certificate
Next, you’ll need to buy a Mark Certificate. And no, in case you’re wondering, there aren’t any free VMCs or Common Mark Certificates. However, you can get a break on the BIMI certificate cost with a coupon.
Get Up to 10% Off Your New CMC or VMC
Use one of the following promo codes to get a 10% discount on your new Common Mark Certificate or Verified Mark Certificate (or simply click one of the links below to add it to your cart automatically):
| Common Mark Certificate Promo Codes | Verified Mark Certificate Promo Codes |
| 1-year certificate: CMC1save10 | 1-year certificate: VMC1save10 |
| 2-Year certificate: CMC2save10 | 2-Year certificate: VMC2save10 |
| 3-year certificate: CMC3save10 | 3-year certificate: VMC3save10 |
There are two types of Mark Certificates to choose from:
Verified Mark Certificate (VMC)
Is your organization’s logo a registered trademark? Then a Verified Mark Certificate is for you, as it’s recognized by major email service providers and clients. NOTE: For some ESPs (e.g., Gmail), using a VMC is a requirement to make your logo display with the verified checkmark in recipients’ inboxes.
Get 10% Off Your Purchase of a New Verified Mark Certificate
Add a verified checkmark to your outbound emails using a VMC so recipients know they’re legitimate and can feel safe opening your messages.
Common Mark Certificate (CMC)
A Common Mark Certificate is great for brands that have logos that lack registered trademarks or are considered modified trademarks. You’ll just need to prove that you’ve used the logo for the last 12 or more consecutive months.
Get 10% Off Your Purchase of a New Common Mark Certificate
Add your organization’s verified brand logo to your outbound emails without needing to have a trademarked logo.
NOTE: Both of these certificates require your organization to undergo business and domain validation. However, VMCs do require a more extensive validation process.
DigiCert Can Host Your SVG Logo and Mark Certificate Files for You
Much like the SVG logo file, your Mark Certificate must be hosted securely using an HTTPS URL. You have the option of hosting the file yourself or having DigiCert do it for you. Why DigiCert? Because they’re the only trusted BIMI Mark Certificate provider trusted by Apple.
How to Set Up BIMI — Step #5: Set Up & Check Your DNS’s BIMI Record
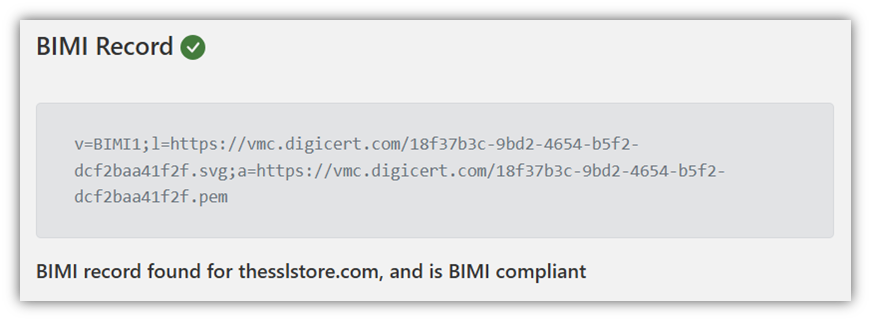
Alright, you’ve reached the final step in the process regarding how to implement BIMI. This part involves creating the DNS TXT file that comprises your BIMI record and double-checking that everything is working as intended.
Here’s a quick example of what a BIMI record looks like:
Of course, we’ve covered this in more detail in a step-by-step article: How to Set Up (Create) a BIMI Record in 3 Easy Steps.
Want to save time setting up your BIMI record? The BIMI Group has a free tool you can use to generate one for your domain.
We’ve also put together a handy list of 5 free BIMI checker or inspector tools that you can use to check your BIMI records.