


 (1 votes, average: 5.00 out of 5)
How to Set Up BIMI and a Mark Certificate to Display Your Email Logo
This step-by-step guide walks you through the process that will display your brand avatar in email recipients’ inboxes using a BIMI certificate
Having up-front brand recognition is everything when you consider that email recipients spend an average of 11 seconds on an email.
This research, from the Data & Marketing Association’s (DMA) 2023 Email Consumer Tracking report, also indicates that three in five email recipients view brand recognition as the top factor when making a decision about whether to open an email. The third most important factor for opening emails? Seeing the brand’s recognizable logo.
This comprehensive how-to article will walk you through everything you need to know — configuring your BIMI and DNS records, handling the specifics of your logo, selecting the right type of Mark Certificate (i.e., a BIMI certificate), and all that’s needed to start sending emails with your brand’s logo in the sender field.
Let’s hash it out.
BIMI Certificate TL;DR — Everything to Know in 60 Seconds or Less

- BIMI displays your logo in the email sender field. Recipients will see your logo in their inbox (before they even open the email), which improves email open and engagement rates. Like this (see image).
- Set up DMARC on your domain. This includes setting up SPF, DKIM and DMARC DNS records. You can set the DMARC policy to either p=quarantine or p=reject.
- Ensure your logo is saved using a supported format. A BIMI-compliant image is a square image that’s saved as an SVG Tiny PS file.
- Validate your brand logo by getting a Mark Certificate. This requires validation checks and approval by a trusted Mark Verifying Authority (MVA) such as DigiCert. You can get a Common Mark Certificate (CMC) for a non-trademarked logo or a Verified Mark Certificate (VMC) for one that has a trademark.
- Configure the BIMI record on your domain. The BIMI Group’s inspector and generator tool simplifies the process of generating a new BIMI record, a DNS record that includes links to your SVG logo file and BIMI Mark Certificate.
Here’s a quick comparison that shows the difference of what it looks like when you do (or don’t) use BIMI and a Mark Certificate:

Now that you know why businesses should use BIMI and have a basic idea of the implementation process, let’s go through everything step by step!
Step 1: Ensure Your Domain Is DMARC Compliant
Before you can start setting up your logo to display, there’s one prerequisite you’ll need to have in place: the BIMI standard requires that your domain have a DMARC record (a type of DNS record) set to p=reject or p=quarantine.
DMARC works hand-in-hand with Sender Policy Framework (SPF) and Domainkeys Identified Mail (DKIM), two other types of DNS records, to block unauthorized senders from sending emails using your domain. DMARC tells email servers what to do with emails from your domain that fail SPF and/or DKIM authentication.
Before Setting Up Your DMARC Record…
First, you’ll need to ensure that you have SPF and/or DKIM records on your domain that cover every place you send emails from (when the from address is @yourdomain.com). For example: MailChimp, AWS SES, your own email server, Microsoft 365, etc. Each email service provider should give you instructions for setting up an SPF and/or DKIM record (you don’t need both, just one for each email service is fine).
NOTE: If you don’t create an SPF or DKIM record for an email service, emails sent from that email service will be blocked after you implement DMARC. There are a few tricks you can use to be sure you’ve covered everything — more on that in a moment.
Set Up DMARC Monitoring
After you’ve got your SPF and SKIM records set up, you’ll want to set up DMARC in reporting-only mode. This way, you can check that you’ve covered all of the email services/senders you need to before you turn on enforcement.
To set up DMARC for monitoring, use the following example but replace the email info with your domain:
v=DMARC1; p=none; rua=mailto:account@itsatest.siteThis will give you a chance to identify any messages falsely flagged by SPF and DKIM. Give it a bit of time, as you’ll want to ensure you have a chance to identify all the legitimate senders you might have missed in your SPF/DKIM records.
To make this process easier, we recommend using a DMARC reporting service (for example, Valimail) that collects and displays the reports in a more readable format.
Set Up DMARC Enforcement
Once you’ve figured out whether there are senders not accounted for in your SPF record, it’s time to set DMARC enforcement.
You can set DMARC to enforcement by setting it to one of the following options:
- p=reject
- p=quarantine
Step 2: Format Your Logo File
Your logo’s image file must be an SVG file and meet certain formatting criteria to be BIMI compliant. Adhere to the following guidelines for the best results:
- Use a 1:1 (square) aspect ratio
- Center your graphic, as it’ll display either in a circle or a round-edged square
- Use a solid, non-transparent background such as white
- Ungroup any layers so all paths display in a single column
- Don’t include any linked files within the graphic
- Keep it small: your image should be no larger than 32 kilobytes (KB)
Start by Converting Your File to SVG Format in Illustrator
For starters, you must format your logo as a Scalable Vector Graphic (SVG) file that meets the SVP Portable/Secure (SVG-P/S) profile. For this example, I’m using Adobe Creative Cloud’s Illustrator program version 29.0.1.
Save the File in Illustrator Using the SVG Tiny 1.2 Profile
This part of the process involves exporting your vector graphic as an SVG Tiny 1.2 format SVG image file. To do this, go to File > Save as. Here, you’ll select the .svg file option in the menu.
This will bring up a new window (SVG Options) where you can select the SVG Profile “SVG Tiny 1.2”, as shown below:
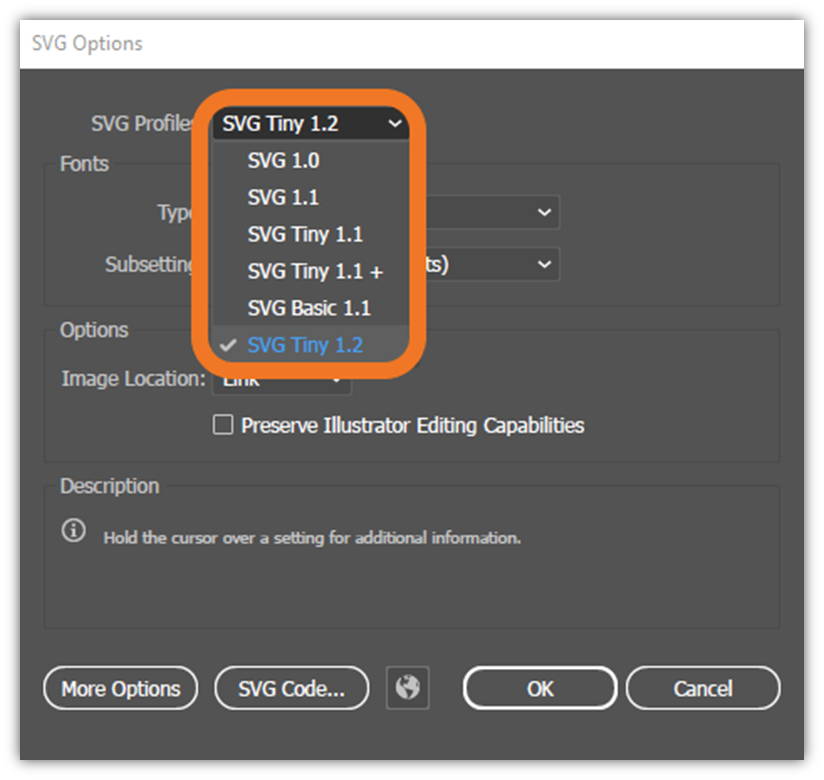
This is as close as you’ll get in Illustrator’s native settings because Illustrator doesn’t have a conversion tool for the tiny-ps profile specifically. (Maybe this will change in the future — who knows?)
Next, under Options, click Image Location and select Preserve from the drop-down menu. Click OK to save your selection. The next steps will require manual intervention in the file’s code.
Review the SVG Image Code
Knowing this, open your SVG file in a TXT editor such as Notepad++. (NOTE: Be sure to check that you can open, edit, and re-save the file to a “txt” format while retaining the file extension .svg.)
Using a TXT editor allows you to display the image’s TXT file to see whether the file’s code is displaying the Tiny-PS 1.2 profile info in the baseProfile= and version= elements. This information should be displayed near the top of the file, as shown in the screenshot below.
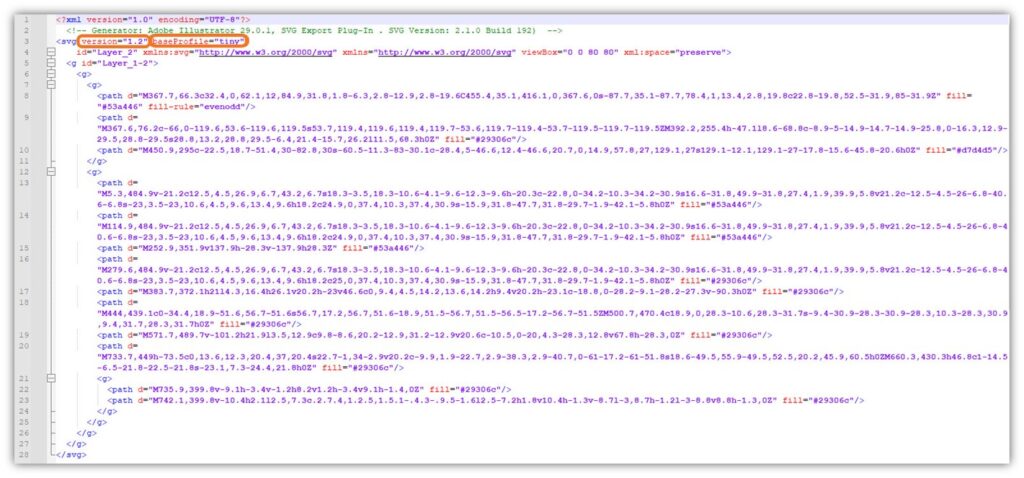
Here’s a closer look at that part of the code:

Does yours just say “tiny” like our illustration above shows? This means you’re not done yet. There are a few more things you’ll need to do to the code to get it into the appropriate format.
Manually Make the Following Changes to the SVG Image Code
- Change the profile info to reflect tiny-ps. You can do this by typing -ps in the existing baseProfile=“tiny” field so it becomes baseProfile=“tiny–ps”.
- Add the required <title> element to your script. Simply hit the return key after the xml:space=“preserve”> text at the end of one of the upper lines of code and insert <title>Tile Goes Here</title>. A good rule of thumb is to put your company’s name in the title area (although that’s not a hard-and-fast rule).
- Remove any x= and y= attributes from the code (if displayed). They’re not allowed in BIMI. So, if you’re using an earlier version of Adobe Illustrator that inserts these attributes, then go ahead and nix ’em.
- Delete any external links or unnecessary elements. Have unnecessary scripts or interactive elements in your code? Delete ’em. Just be sure to not eliminate any specified XML namespaces.
Alright, your code should look something akin to the following example now:
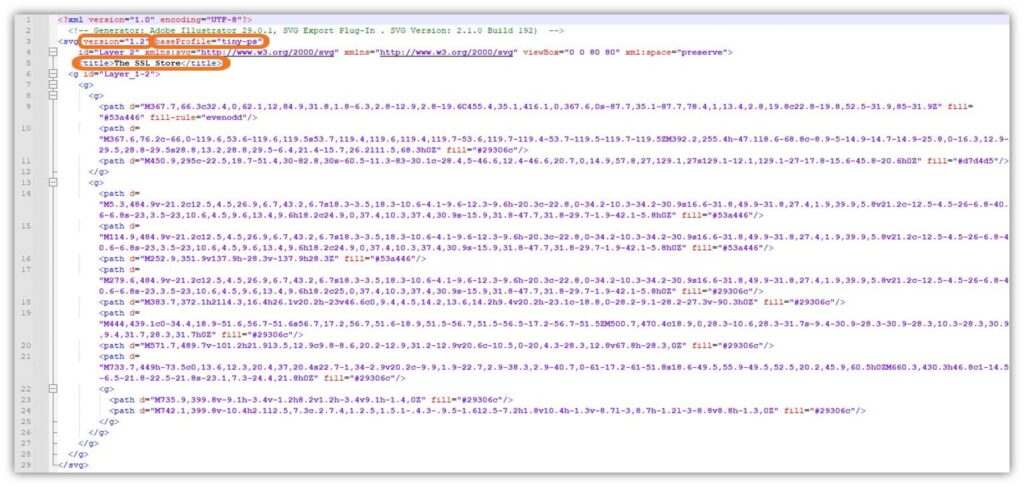
Let’s again take a little closer look:

Does your file code look different from the example shown in the last example above, or are you having other issues with this process? Reach out to our Support Team, who can help walk you through the process.
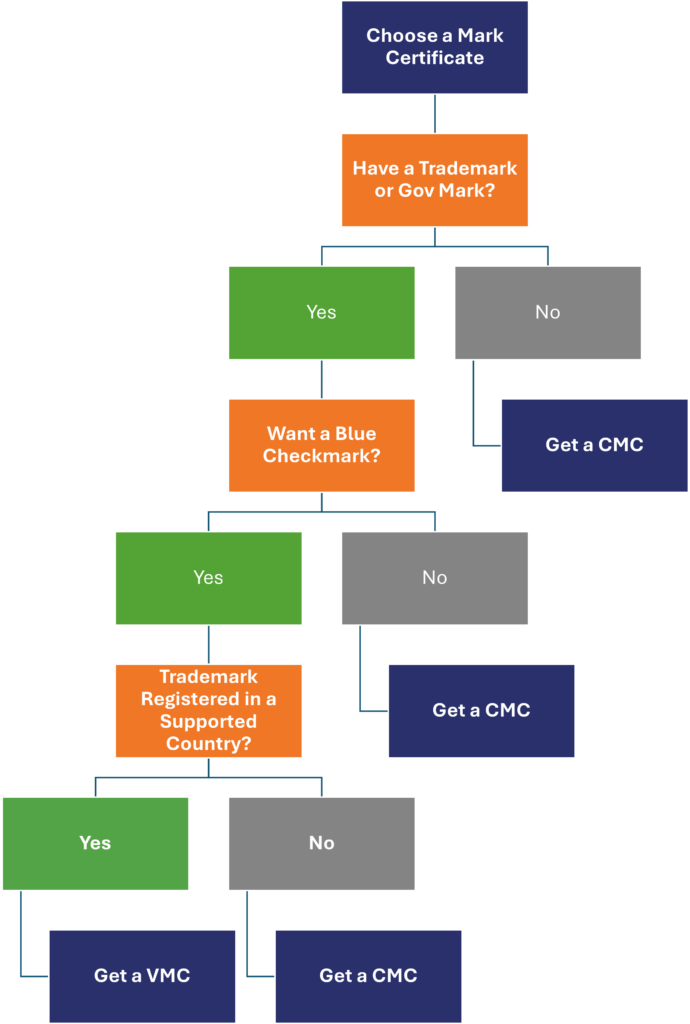
Step 3: Buy a Mark Certificate (BIMI Certificate)
Now that you’ve got a logo that’s properly configured (and trademarked, in the case of organizations that want Google’s verified blue checkmark), it’s time to move on to the digital certificate part of the process.
Gmail and other major email providers require you to have a Mark Certificate, a digital certificate that verifies your logo (otherwise, anyone could upload and display the logo of any brand!)
Common Mark Certificate vs Verified Mark Certificates
There are two different types of BIMI Mark Certificates you can choose from:
- Common Mark Certificate: Choose this certificate if your logo is not a registered trademark or you want to modify a logo that is a registered trademark.
- Verified Mark Certificate: Choose this certificate if your logo is either a registered trademark or a government mark. It’s supported by most major email clients and adds a blue verified checkmark in Gmail.
What to Know When Shopping for a Mark Certificate
When deciding between getting a Common Mark Certificate and a Verified Mark Certificate, there are two important questions you must ask yourself:
- Is your logo a registered trademark or a government mark? (A government mark is a logo that’s established for a government agency by law.) If your business has a trademark registered with one of the 17 authorities mentioned below, you can get a VMC. Otherwise, you’ll be limited to a CMC.
- Do you want your logo to display a blue “verified” checkmark in Gmail? It’s similar to the blue checkmarks you see on social media platforms. You’ll need a VMC to get this.
- Will you display the logo for one email domain or multiple? For example, do you want to use it to display a sender logo in emails from @yourmaincompany.com only, or from @yourmaincompany.com and @oneofyourproductbrands.com? Then you’ll need a separate certificate for each logo.
- Do you have variations of your logo? Some brands like to get festive with their logos during the holidays or use different logos for different geographic regions. If this is the case for your company, then you’ll need to have a separate certificate for each logo variation.
Trademark Requirements for VMCs
If you’ve chosen to get a CMC, you can skip this section. This step is only required for businesses that want to display the VMC’s verified blue checkmark next to the sender name field and accompanying logo in emails to recipients in Gmail and other major email clients.
To get a VMC, your logo must be registered with one of the following 17 trademark offices. (If your logo isn’t registered, we recommend getting a CMC.)
Americas
- United States Patent and Trademark Office (USPTO)
- Canadian Intellectual Property Office (CIPO)
- Brazil’s Instituto Nacional da Propriedade Industrial (INPI)
Europe
- Denmark Ministry of Culture
- European Union Intellectual Property Office (EUIPO)
- France’s Bureau de la propriété littéraire et artistique (INPI)
- Germany’s Deutsches Patent- und Markenamt (DPMA)
- Benelux Office for Intellectual Property (BOIP), which covers the Netherlands, Belgium, and Luxembourg
- Spanish Patent and Trademark Office (SPTO)
- Swedish Intellectual Property Office (PRV)
- Swiss Federal Institute of Intellectual Property (IPI)
- UK Intellectual Property Office (IPO)
Asia-Pacific
- India’s Rajiv Gandhi National Institute of Intellectual Property Management (RGNIIPM)
- IP Australia
- Japan Patent Office (JPO)
- Korean Intellectual Property Office (KIPO)
- Intellectual Property Office of New Zealand (IPONZ)
Step 4: Await the Issuing CA’s Validation Process
Before the Mark Verifying Authority (i.e. DigiCert) can issue a BIMI certificate, it first must vet your organization, logo, and domain. The Mark Certificate issuing authority is going to check the official records and documentation you provide to ensure
- your organization is legitimate,
- you control the sender email domain(s) in question, and
- you can prove ownership of the logo with either 1) a registered trademark or government mark (for VMCs) or 2) a modified trademark or can prove at least 12 months of prior logo usage (for CMCs).
Step 5: Set Up Your BIMI Record
Brand Indicators for Message Identification (BIMI) is the standard that allows you to display your logo(s) in participating email clients. In the practical sense, it’s just a simple TXT record that you must add to your DNS records.
You can easily generate your BIMI record using the free tool provided by the BIMI Group.
The good news is that you’ve already completed most of the preparations needed to set up your BIMI record. But there are still some things to know…
Core Elements of a BIMI Record
A standard BIMI record typically consists of a few components called tags:
- Version tag (v=). This element specifies the version of the BIMI version you’re using.
- Logo URL tag (l=). This tag specifies the secure (HTTPS) URL where your logo’s .svg file is stored.
- Assertion record tag (a=). This tag is used to specify the secure URL where your Mark Certificate’s .pem file is securely stored.
This means that a traditional BIMI record would look like this for either a CMC or VMC:
v=BIMI1; l=https://full/path/to/your/file/logo.svg; a=https://full/path/to/your/certfile/logo_vmc.pemFAQs Regarding BIMI and Mark Certificates
Did you run into some issues when trying to complete one of these steps? No worries — it happens to the best of us!
Q: Can I Set DMARC Enforcement Incrementally?
A: If you’ve had your DMARC in monitoring mode for a while and are sure you’ve identified all legitimate sources, this step shouldn’t be necessary. But if you’re setting things up for the first time, jumping straight to using the quarantine or reject parameter may not be a good idea. In this case, you may want to do so incrementally until you reach the specified parameter (pct=100).
For example, set DMARC at 50% filter enforcement (pct=50) and then increase the percentage until you make your way up to full 100%:
v=DMARC1; p=quarantine; pct=50; rua=mailto:account@itsatest.siteOnce you’ve reached that target percentage, we’ll want to switch to p=quarantine or p=reject. Once you add the DMARC version tag and the policy that specifies how to respond to non-compliant emails, your DMARC record should look something like this:
v=DMARC1; p=quarantine; pct=100; rua=mailto:account@itsatest.sitev=DMARC1; p=reject; rua=mailto:account@itsatest.siteQ: Which Certificate Authorities Are Approved as Mark Verifying Authorities (MVAs)?
A: DigiCert and Entrust are the only two certification authorities (CAs) that are approved to issue Mark Certificates.
Q: Can You Get a VMC in a Country That Isn’t on DigiCert’s Approved List?
A: No. A VMC is only available to businesses and government entities in specific countries (i.e., one of DigiCert’s 17 approved countries). However, CMCs are available to almost all other countries (minus those with U.S. sanctions or other restrictions in place).
Q: Does My Organization Have to Undergo Business Validation to Get a BIMI Certificate?
A: Yes, business validation is part of the process for both VMC and CMC. For example,
- Common Mark Certificate: If you just want to display your logo but don’t care about the blue verified checkmark, then you can get a CMC. Although this doesn’t require having a trademarked logo (although you can use a registered mark), it does require you to undergo organization and domain validation. You’ll also have to prove either 12+ months of logo use or that your logo is a modified trademark.
- Verified Mark Certificate: You must undergo a more extensive validation process to use a VMC and have a government or registered business logo. This means validating your business is a legitimate entity, that you control your domain, and that you have a registered trademark or government mark in order to display your verified logo in most major email clients and the blue verified checkmark in Gmail.
Can I Use One Mark Certificate to Display a Logo Across Multiple Domains?
A: Yes! Let’s say you have multiple sending domains for which you wish to display your logo in emails to customers. You can easily do this using a single CMC or VMC.
Can I Use One BIMI Certificate for Multiple Logos?
A: No, you’ll need a separate Mark Certificate for each individual logo. This is because each BIMI certificate can be associated with a distinct logo and accompanying trademark.
Here’s a quick overview table that will help you determine which type(s) of VMCs or CMCs you need and how many:
| Domain Structure | Number of Logos | Common Mark Certificate | Verified Mark Certificate |
| One Domain | One | One | |
| One Domain | Two or more | One CMC per logo | One VMC per logo |
| Multiple Domains | One | One CMC will cover all of them | One VMC will cover all of them |
| Multiple Domains | Two or more | Multiple: One CMC per logo | Multiple: One VMC per logo |
| Multiple Subdomains | One | One CMC will cover all of them | One VMC will cover all of them |
| Multiple Subdomains | Two or more | Multiple: One CMC per logo | Multiple: One VMC per logo |


5 Ways to Determine if a Website is Fake, Fraudulent, or a Scam – 2018
in Hashing Out Cyber SecurityHow to Fix ‘ERR_SSL_PROTOCOL_ERROR’ on Google Chrome
in Everything EncryptionRe-Hashed: How to Fix SSL Connection Errors on Android Phones
in Everything EncryptionCloud Security: 5 Serious Emerging Cloud Computing Threats to Avoid
in ssl certificatesThis is what happens when your SSL certificate expires
in Everything EncryptionRe-Hashed: Troubleshoot Firefox’s “Performing TLS Handshake” Message
in Hashing Out Cyber SecurityReport it Right: AMCA got hacked – Not Quest and LabCorp
in Hashing Out Cyber SecurityRe-Hashed: How to clear HSTS settings in Chrome and Firefox
in Everything EncryptionRe-Hashed: The Difference Between SHA-1, SHA-2 and SHA-256 Hash Algorithms
in Everything EncryptionThe Difference Between Root Certificates and Intermediate Certificates
in Everything EncryptionThe difference between Encryption, Hashing and Salting
in Everything EncryptionRe-Hashed: How To Disable Firefox Insecure Password Warnings
in Hashing Out Cyber SecurityCipher Suites: Ciphers, Algorithms and Negotiating Security Settings
in Everything EncryptionThe Ultimate Hacker Movies List for December 2020
in Hashing Out Cyber Security Monthly DigestAnatomy of a Scam: Work from home for Amazon
in Hashing Out Cyber SecurityThe Top 9 Cyber Security Threats That Will Ruin Your Day
in Hashing Out Cyber SecurityHow strong is 256-bit Encryption?
in Everything EncryptionRe-Hashed: How to Trust Manually Installed Root Certificates in iOS 10.3
in Everything EncryptionHow to View SSL Certificate Details in Chrome 56
in Industry LowdownA Call To Let’s Encrypt: Stop Issuing “PayPal” Certificates
in Industry Lowdown