


 (No Ratings Yet)
Re-Hashed: How to Trust Manually Installed Root Certificates in iOS 10.3
Apple Tweaked Trust Settings for Profiles, Here’s How to Trust Manually Installed Root Certificates in iOS 10.3.
Apple has introduced a change to how root certificates manually installed via profiles are trusted, requiring an additional explicit action.
Users on iOS 10.3 (and later) who install custom profiles will need to dive into the settings menu to manually turn on trust for any included root certificates. Because it’s rather easy to install a profile, this is an important security measure that makes it slightly harder for a user to inadvertently trust a new root which could then issue device-trusted certificates for any website or service.
Roots installed with Apple Configurator or Mobile Device Management (dedicated tools for enterprise deployment) will still be automatically trusted.
The Security Risk of Profiles
Profiles are configuration files which make it easy to deploy custom settings to an iPhone or iPad. These profiles can contain information needed to access a network or configure email accounts.
Corporations and universities use profiles to easily deploy the settings needed to get a new device onto their network. Consumer-facing services like Xfinity Wifi and Manhattan’s LinkNYC use profiles to allow users to get on their public wifi.
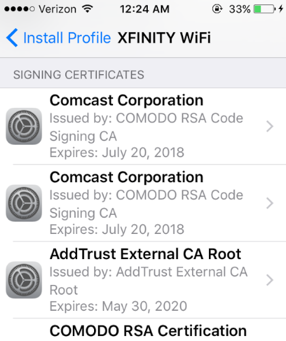 But many users may not realize how powerful profiles can be. Many profiles, such as this one used by Comcast’s Xfinity Wifi, contain root certificates which can be used to establish secure connections.
Trusting a malicious root is one of those nuclear-level “game over” scenarios. In fact, Chromium (the open-source project Google’s Chrome is based on) acknowledges that if an attacker can install a root onto your device, there is nothing the browser can do to protect you.
On Windows and OSX, that is a reasonable. Trusting a root on Windows, for instance, takes quite a few steps including downloading the root, opening the file on your computer, and then going through an import wizard.
On iOS, it is a different story. In Safari, just clicking a button on a webpage can prompt a system dialog to install a custom “profile” which can include root certificates for your device to trust. While this still requires explicit user action, the simplicity of iOS makes it much easier for a user to naively follow this process thinking its the normal or proper thing to do.
This could be used maliciously. After a user installs a profile, the new certificates could be used in a man-in-the-middle attack. This has always been a known vulnerability, but has not been of major concern because while feasible, it’s impractical in most attack scenarios.
While this was not a serious security risk, it’s still good to see Apple adding one more level of ‘are you sure’ checks before allowing a root certificate to run wild.
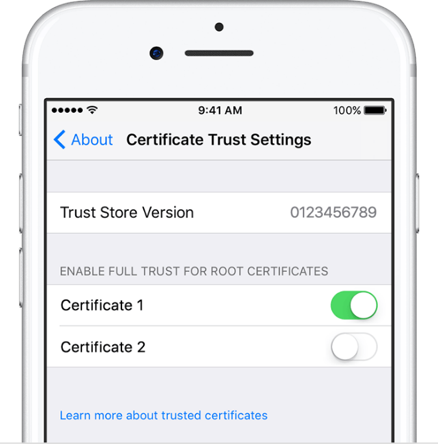
How Do You Trust Manually Installed Root Certificates in iOS?
If your users are on iOS 10.3, they will need to follow the following steps to trust a certificate included in a profile
- Ensure they have installed the profile on their device.
- Open Settings.
- Navigate to General and then About.
- Select Certificate Trust Settings.
- Each root that has been installed via a profile will be listed below the heading Enable Full Trust For Root Certificates. Users can toggle on/off trust for each root.
If you are dealing with a large number of organization-controlled devices, you may want to consider using Apple Configurator or Mobile Device Management. Both of these tools are geared towards enterprise, and will automatically trust any included certificates.
Re-Hashed is a regular feature on Hashed Out where we feature an older article that some of our newer readers may not have had an opportunity to read yet. We also take a few minutes to update it as needed. We hope you enjoy, and thanks for reading!


5 Ways to Determine if a Website is Fake, Fraudulent, or a Scam – 2018
in Hashing Out Cyber SecurityHow to Fix ‘ERR_SSL_PROTOCOL_ERROR’ on Google Chrome
in Everything EncryptionRe-Hashed: How to Fix SSL Connection Errors on Android Phones
in Everything EncryptionCloud Security: 5 Serious Emerging Cloud Computing Threats to Avoid
in ssl certificatesThis is what happens when your SSL certificate expires
in Everything EncryptionRe-Hashed: Troubleshoot Firefox’s “Performing TLS Handshake” Message
in Hashing Out Cyber SecurityReport it Right: AMCA got hacked – Not Quest and LabCorp
in Hashing Out Cyber SecurityRe-Hashed: How to clear HSTS settings in Chrome and Firefox
in Everything EncryptionRe-Hashed: The Difference Between SHA-1, SHA-2 and SHA-256 Hash Algorithms
in Everything EncryptionThe Difference Between Root Certificates and Intermediate Certificates
in Everything EncryptionThe difference between Encryption, Hashing and Salting
in Everything EncryptionRe-Hashed: How To Disable Firefox Insecure Password Warnings
in Hashing Out Cyber SecurityCipher Suites: Ciphers, Algorithms and Negotiating Security Settings
in Everything EncryptionThe Ultimate Hacker Movies List for December 2020
in Hashing Out Cyber Security Monthly DigestAnatomy of a Scam: Work from home for Amazon
in Hashing Out Cyber SecurityThe Top 9 Cyber Security Threats That Will Ruin Your Day
in Hashing Out Cyber SecurityHow strong is 256-bit Encryption?
in Everything EncryptionRe-Hashed: How to Trust Manually Installed Root Certificates in iOS 10.3
in Everything EncryptionHow to View SSL Certificate Details in Chrome 56
in Industry LowdownA Call To Let’s Encrypt: Stop Issuing “PayPal” Certificates
in Industry Lowdown