


 (2 votes, average: 5.00 out of 5)
How to Create a Custom Digital Signature in Adobe Acrobat Reader
A digital signature proves to users that your PDF document is legitimate and unaltered since it was signed. But we’ll admit — the default display looks a little boring. This step-by-step guide will show how to add and customize a digital signature in Adobe Acrobat.
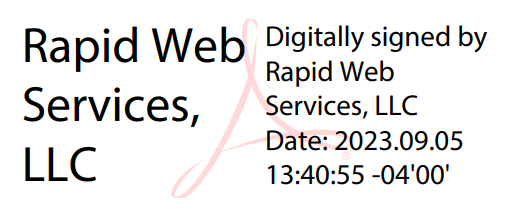
A digital signature is an unspoofable, cryptographic signature. Just to clarify, it differs from a normal signature or e-signature (i.e., an electronic version of your name written out) because it proves your signature is legitimate and prevents alterations from occurring to it in transit. To make it easy to use, there’s a visual display of the digital signature in Adobe Acrobat Reader that looks like this:
But what if you don’t like how the signature displays by default? If you want to make your digital signature look more traditional, you can do that, and we’ll show you how.
Let’s hash it out.
How to Create a Digital Signature in Adobe Acrobat Reader
Knowing how to create a digital signature in Adobe isn’t a complicated process. We’ve detailed the process, step by step, in a previous article on how to digitally sign a PDF in Adobe Acrobat. For a quick overview, we’ll quickly walk you through the process and then show you how to customize your digital signature.
- Open the file in Adobe Acrobat Reader. To create a digital signature in Adobe, you first must open a document where the signature can be applied.
- Navigate to the digital certificate toolbar. You can do this by navigating to All Tools > Use a Certificate. This will open a new toolbar with a few new options. (NOTE: Only two options may be clickable initially — Digitally Sign and Timestamp.)
- Select the icon marked “Digitally Sign.” Doing this will change your cursor from a traditional mouse arrow to a crosshair-style icon. You can use this tool to click and drag to create a box in a blank space on your document.
- Select the certificate. Choose the certificate you want to use for your digital signature and press Continue. (NOTE: This will require you to have a publicly trusted document signing certificate.)
- Review your info and sign it. Ensure everything looks accurate and then press the Sign button to apply your digital signature to the file.
You’ll be asked to save your PDF as a new file. Do that, and you’re good to go. But what if you want to change how your signature looks?
How to Customize Your Digital Signature in Adobe
Adobe Acrobat is generous when it comes to customizations. The software gives you the option to:
- Change the appearance of the info that displays in the left-hand portion of your digital signature, and
- Select what information you wish to include in your digital signature in the right half of your signature.
We’ve created a video you can follow to quickly walk through the customization process. Otherwise, feel free to follow the written directions with screenshots that we’ve included below.
1. Open a PDF file in Adobe Acrobat. Open any PDF file so you can create the handwritten signature. (It doesn’t have to be the specific PDF file that you’re going to apply your digital signature to.) This is just so you can create the custom signature graphic file you’ll need a little later
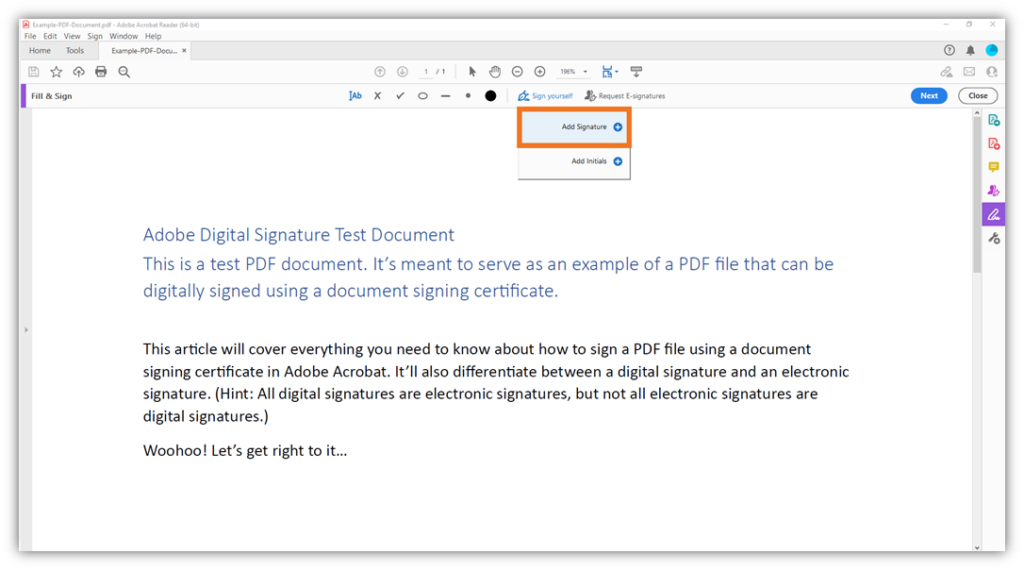
2. Click the Sign tool icon in the top navigation bar and select Add Signature. This is the icon that looks like an old-school quill pen in the top horizontal toolbar. (When you mouse over it, it should say “Sign document by typing or drawing a signature.”) A drop-down menu will appear (as shown below) — select Add Signature. You also have the option of using Initials instead, which will follow the same steps.
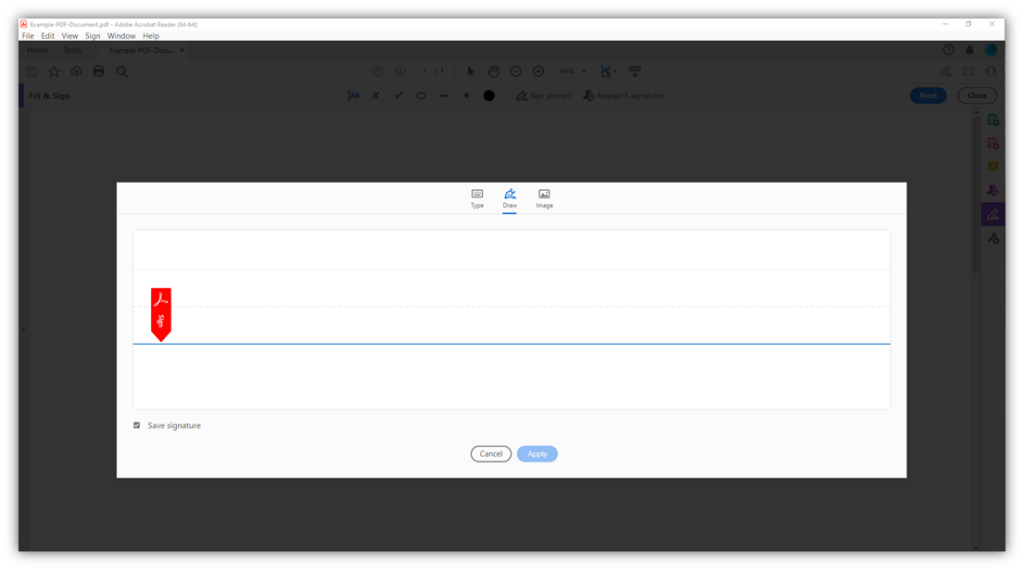
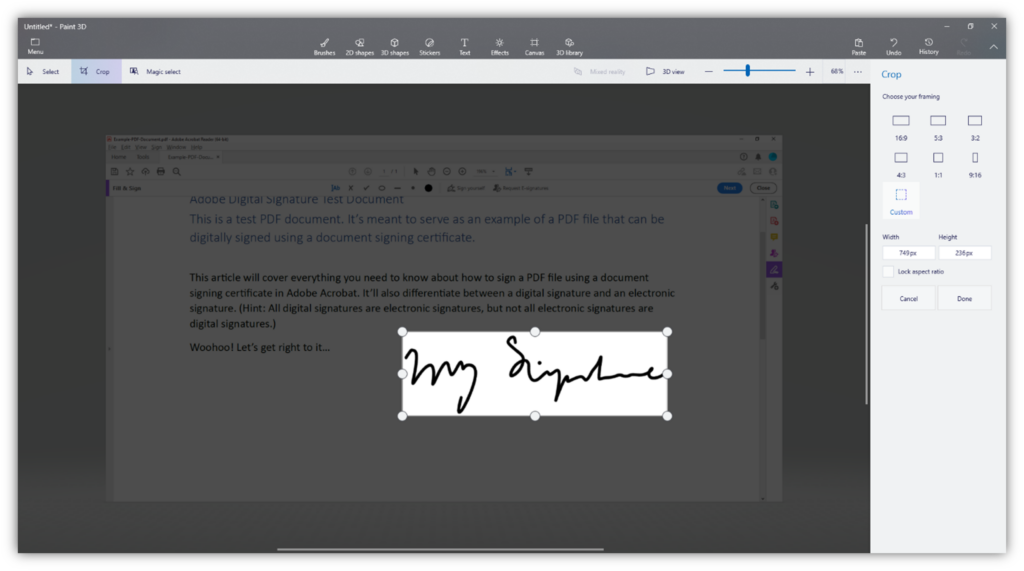
3. Create your handwritten signature. Select the middle option Draw at the top of the window and use your mouse to create your handwritten signature. Once done, hit Apply and click anywhere in the document’s whitespace to paste it so you can get a screenshot in the next step.
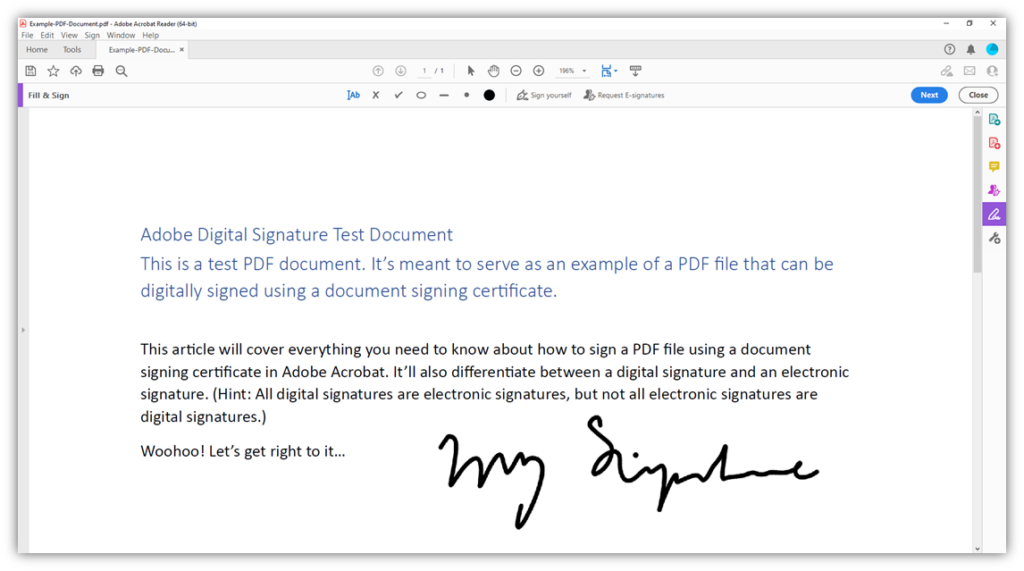
It’ll look like this (below) when you paste it in the document. Be sure to not paste it anywhere where the signature will overlap with other text.
4. Copy-paste the signature screenshot into Paint or Paint 3D. Press the print screen (PrtSc) key or use the snippet tool to get a screenshot of your handwritten signature. Paste (CTL + V) the screenshot into your image editing software and crop closely around the signature. Save the image file and exit the image software editing program.
5. Convert the signature image file type to PDF. Since Adobe Acrobat won’t allow you to use a .png, .jpg or similar image files, you’ll need to convert it to a .pdf file instead.
Once finished, return to the Adobe Acrobat window.
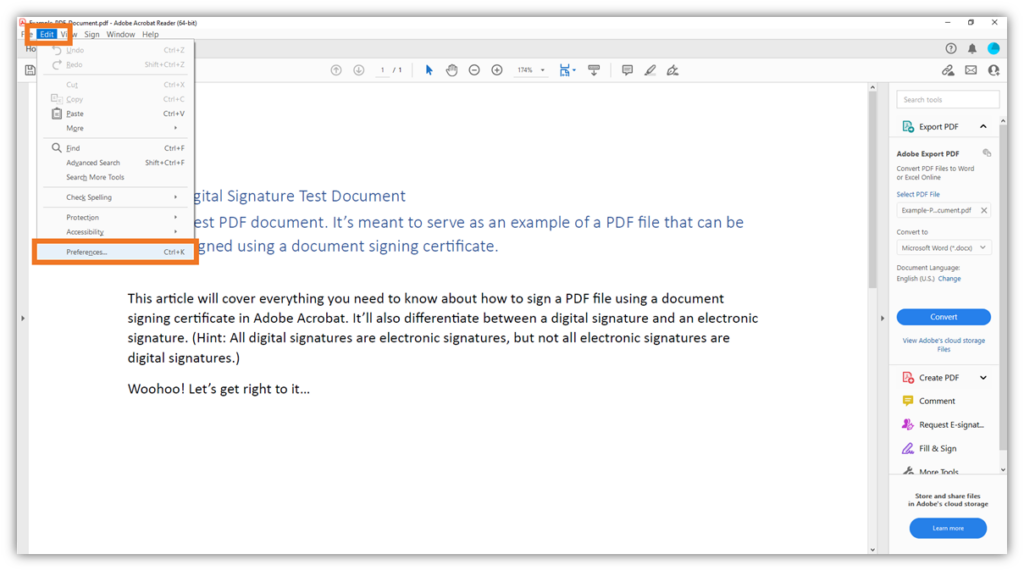
6. Start setting up your custom digital signature. In Adobe Acrobat, navigate to Edit > Preferences. This will open a new popup window.
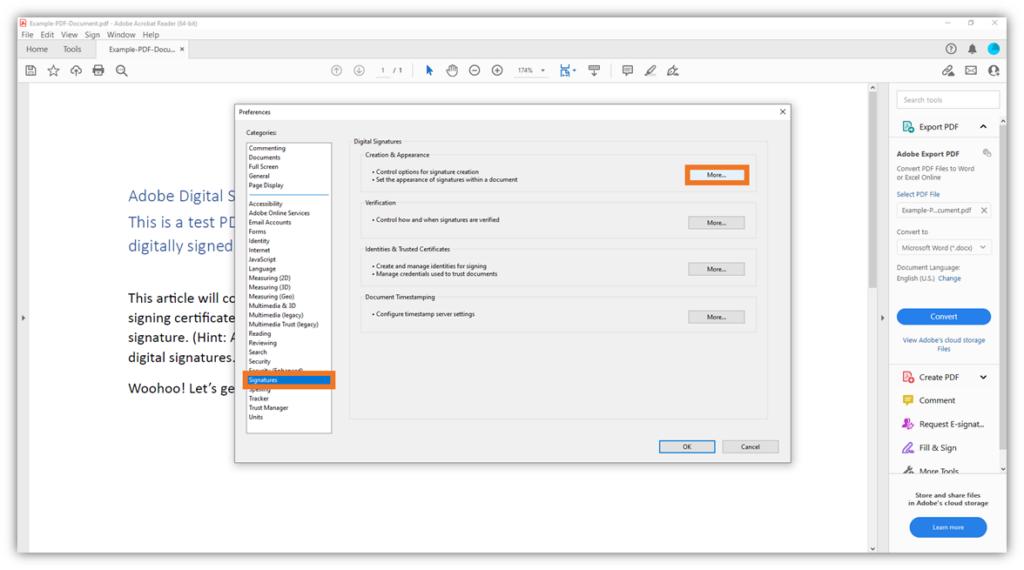
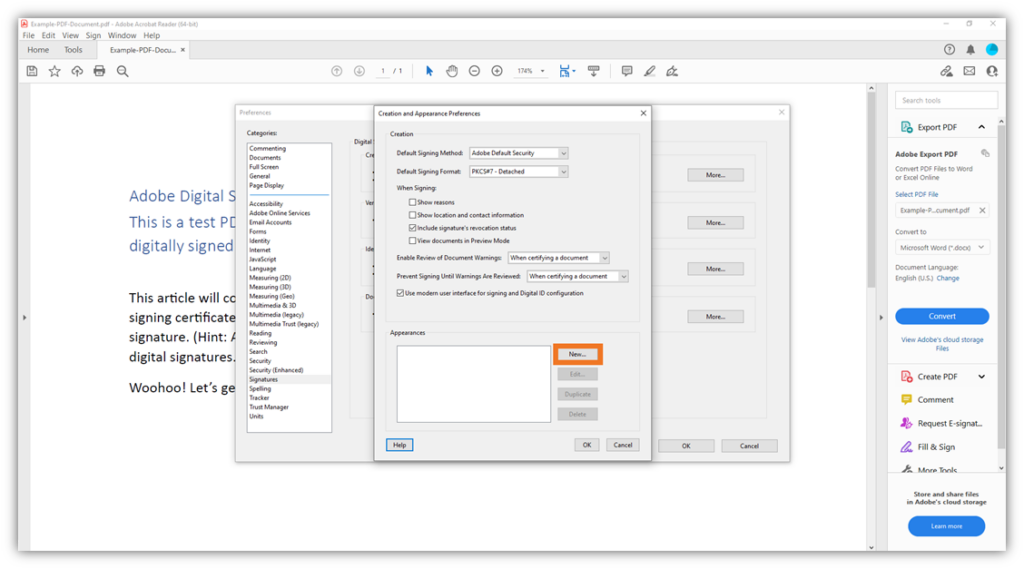
7. Open the Creation and Appearances Preferences screen. To do this, select the Signatures option in the left-hand navigation. Hit the More button in the main window under Creation & Appearance.This will open the window in another popup screen.
8. Under Appearances, select New. This will open the Configure Signature Appearance properties screen. You can leave the default settings as-is unless you have a reason to change them. Under Appearances, select New.
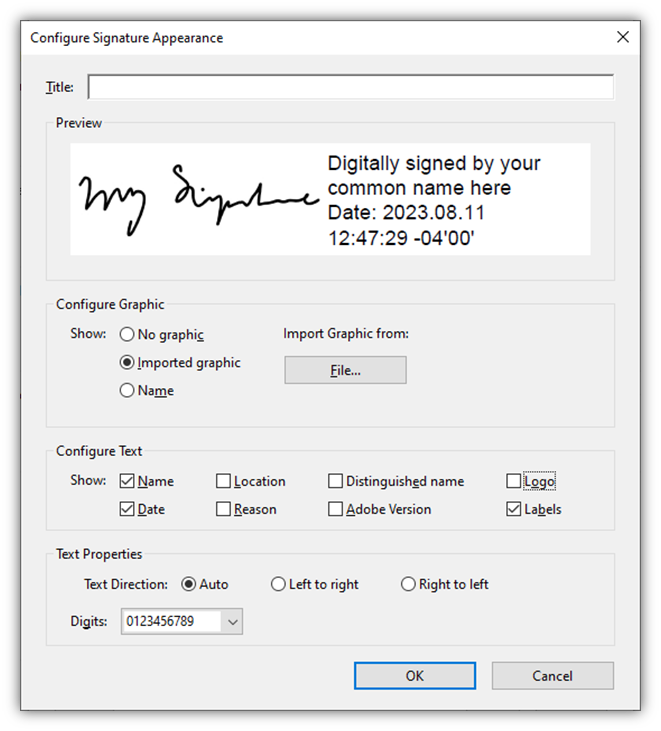
9. Import your PDF signature image file in Adobe Acrobat. Here, you can select Import graphic and File under Configure Graphic to browse and select your handwritten signature image from your file path.
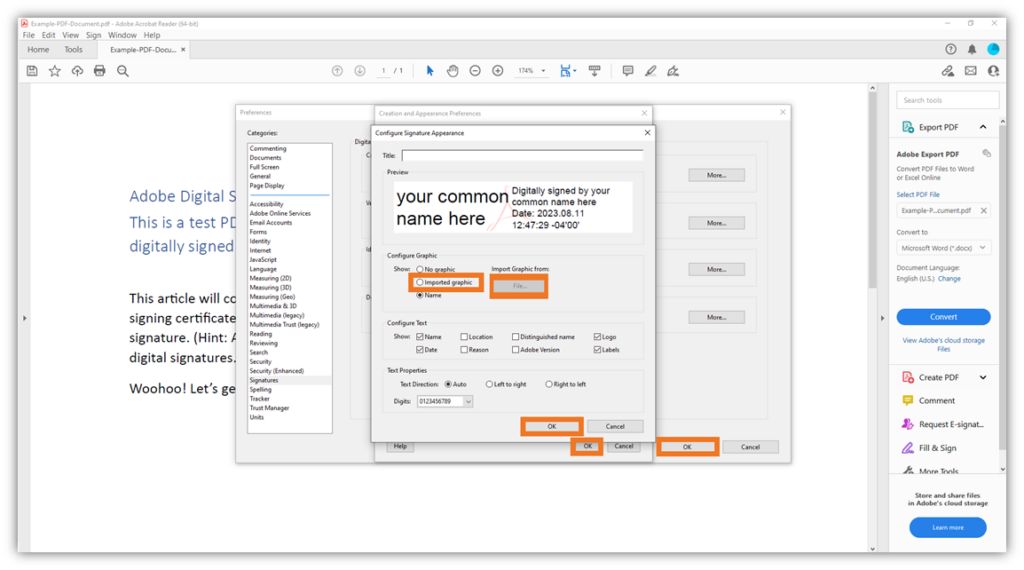
10. Once you’ve selected the image PDF file and see it displaying properly in the sample preview window (as shown below), hit OK.
Hit OK three more times to close out of all the windows and return to your main screen.
That’s it! Now, you can use your custom digital signature the next time you want to digitally sign a PDF file in Adobe Acrobat.
How to Use Your Custom Digital Signature
When you go to insert your digital signature using your PKI document signing certificate, do so using the step-by-step process in the other article we linked to earlier in this blog post. In the “Sign as (Your Name)” window:
- Select your custom digital signature.
- Choose the custom signature you’ve created in the Appearance dropdown selector,
- Hit Sign to apply your custom digital signature.
Now, you’ll be set to complete the rest of the digital signature process.
Have thoughts or questions about a document signing certificate you’ve purchased through TheSSLstore.com? Be sure to reach out to our Support team.


5 Ways to Determine if a Website is Fake, Fraudulent, or a Scam – 2018
in Hashing Out Cyber SecurityHow to Fix ‘ERR_SSL_PROTOCOL_ERROR’ on Google Chrome
in Everything EncryptionRe-Hashed: How to Fix SSL Connection Errors on Android Phones
in Everything EncryptionCloud Security: 5 Serious Emerging Cloud Computing Threats to Avoid
in ssl certificatesThis is what happens when your SSL certificate expires
in Everything EncryptionRe-Hashed: Troubleshoot Firefox’s “Performing TLS Handshake” Message
in Hashing Out Cyber SecurityReport it Right: AMCA got hacked – Not Quest and LabCorp
in Hashing Out Cyber SecurityRe-Hashed: How to clear HSTS settings in Chrome and Firefox
in Everything EncryptionRe-Hashed: The Difference Between SHA-1, SHA-2 and SHA-256 Hash Algorithms
in Everything EncryptionThe Difference Between Root Certificates and Intermediate Certificates
in Everything EncryptionThe difference between Encryption, Hashing and Salting
in Everything EncryptionRe-Hashed: How To Disable Firefox Insecure Password Warnings
in Hashing Out Cyber SecurityCipher Suites: Ciphers, Algorithms and Negotiating Security Settings
in Everything EncryptionThe Ultimate Hacker Movies List for December 2020
in Hashing Out Cyber Security Monthly DigestAnatomy of a Scam: Work from home for Amazon
in Hashing Out Cyber SecurityThe Top 9 Cyber Security Threats That Will Ruin Your Day
in Hashing Out Cyber SecurityHow strong is 256-bit Encryption?
in Everything EncryptionRe-Hashed: How to Trust Manually Installed Root Certificates in iOS 10.3
in Everything EncryptionHow to View SSL Certificate Details in Chrome 56
in Industry LowdownA Call To Let’s Encrypt: Stop Issuing “PayPal” Certificates
in Industry Lowdown