


 (1 votes, average: 5.00 out of 5)
How to Digitally Sign a PDF in Adobe Acrobat (A Step-By-Step Guide with Pics & Video)
Not all e-signatures are created equally. Simple e-signatures (i.e., typing your name into a document) are easy to use, but they’re also easy to fake. Digital signatures, on the other hand, are superior because they allow you to securely and legally sign PDF files over the internet.
PDF documents are found virtually everywhere on the internet and within businesses. They’re used for digital contracts, technical plans, trademark certificates, and a litany of other important documents. As such, organizations need a way to prove that signed files are legitimate and haven’t been tampered with in transit. Knowing how to sign a PDF by adding a digital signature is how you can do it by creating an indelible record of the precise moment it was signed.
In this article, we’ll walk you through the process of how to digitally sign a PDF in Adobe Acrobat and show you how to verify whether a file’s digital signature is legitimate.
Let’s hash it out.
How to Digitally Sign a PDF in Adobe Using a Document Signing Certificate
Before you can digitally sign an Adobe PDF, you’ll first need to purchase a document signing certificate from a third-party certification authority (i.e., a certificate authority or CA). This certificate will be issued on a secure hardware token, for which you’ll need to install a client authentication app onto your computer to use. Every time you sign a file, you’ll need to plug the token into your device beforehand.
But simply buying a certificate isn’t all that’s required; you’ll need to wait while the CA completes the requisite document signing certificate validation process in order for your certificate to be issued. After this process is complete, you’ll just need to wait for your certificate to show up on a secure USB token in the mail.
Why is this necessary? This is because all document signing certificates must be issued on secure hardware and a password must be created to use them (i.e., enabling two-factor authentication). For this article’s example, we’re using a document signing certificate that DigiCert issued on a secure USB token.
To see how to digitally sign a PDF in Adobe Acrobat, be sure to check out our basic tutorial video:
Otherwise, keep reading to get step-by-step directions on how to add a digital signature to your PDF in Adobe Acrobat.
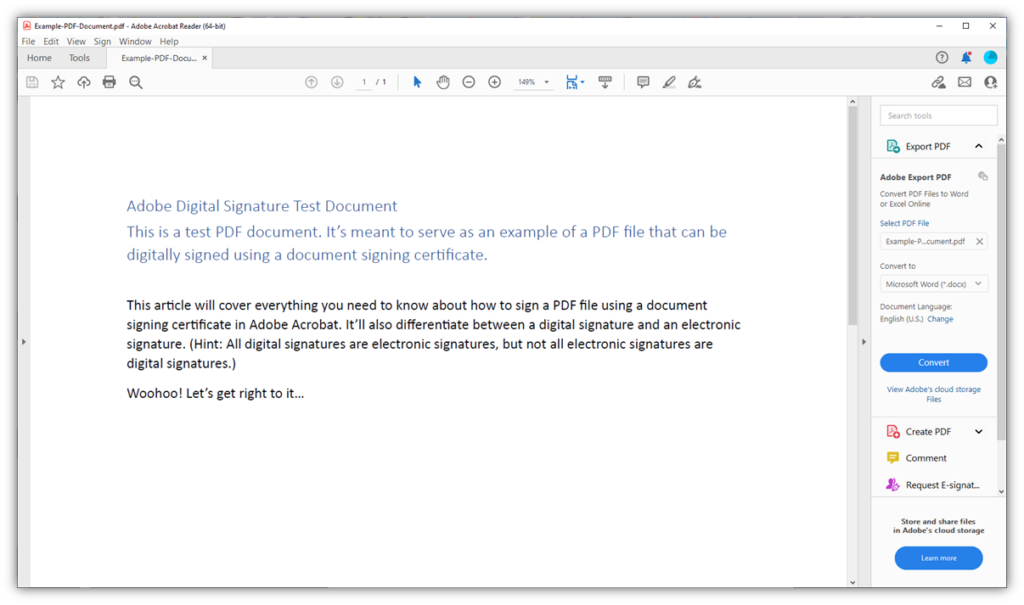
1. Open your file in Adobe Acrobat. You can use Adobe Acrobat or Adobe Acrobat Reader to insert a digital signature in an Adobe PDF file.
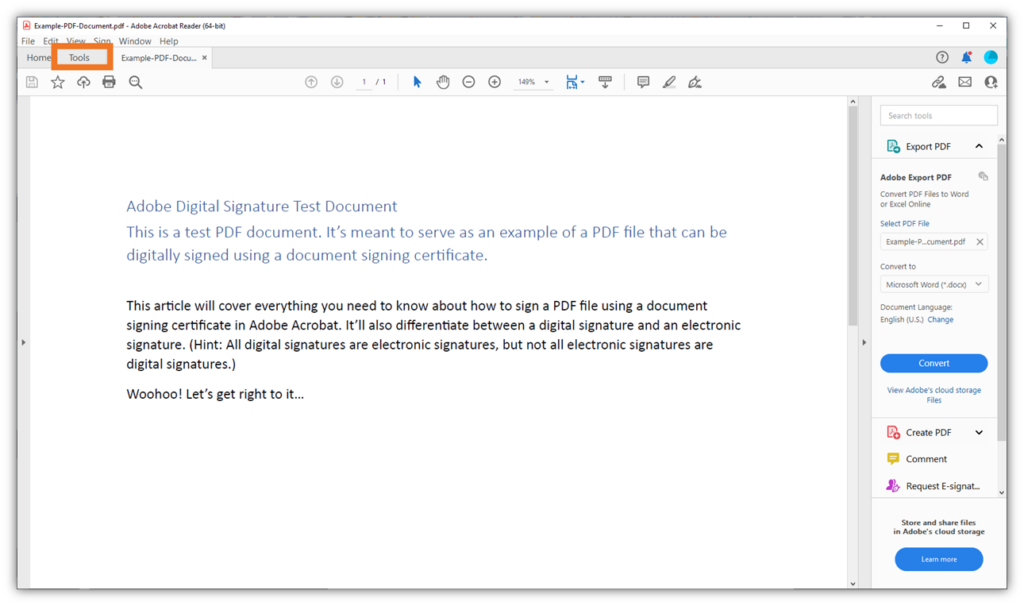
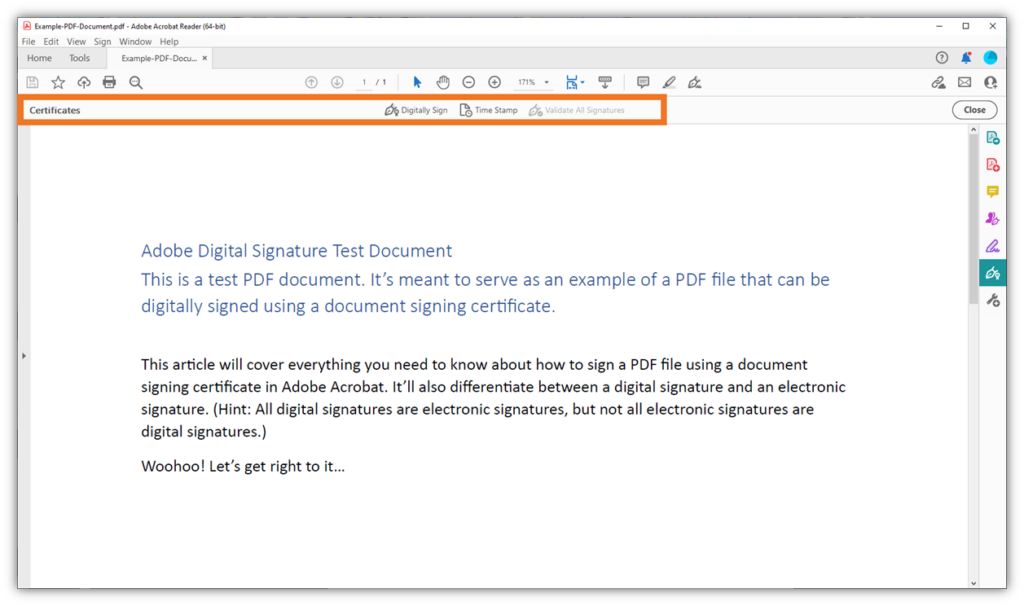
2. Select Tools in the top navigation bar. Navigate to the toolbar just below the top navigation menu and click on Tools.
3. Under Certificates, press Open. This will close out the Tools menu and return you to your document.
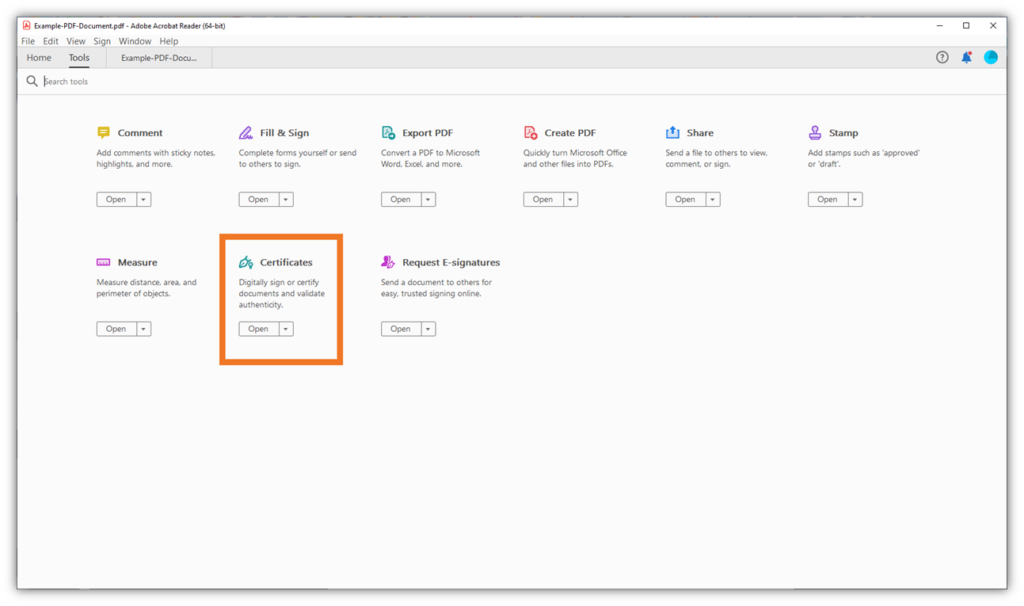
You should see a new horizontal menu displaying labeled Certificates, which should include three options (Digitally Sign, Time Stamp, and Validate All Signatures).
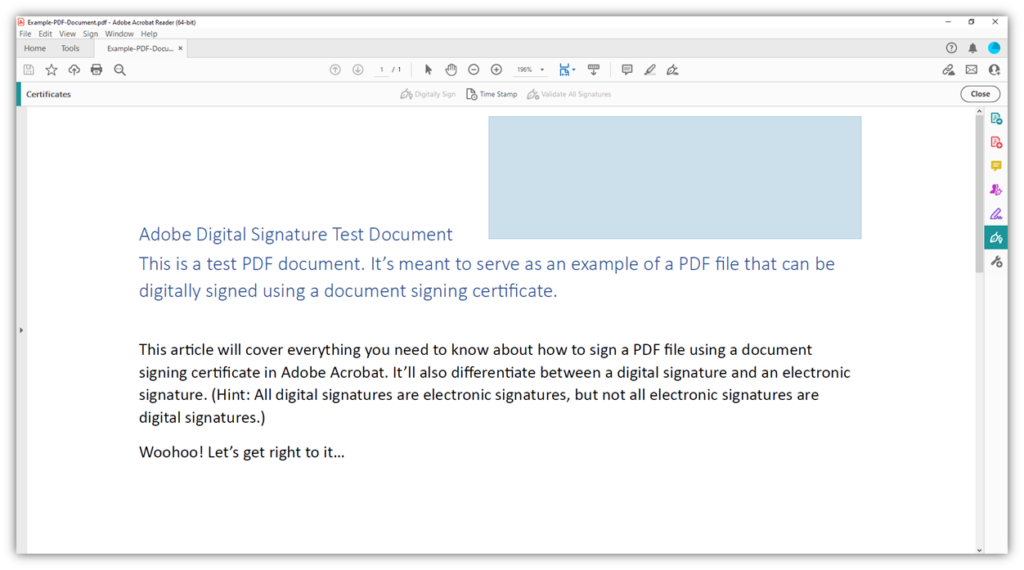
4. Hit “Digitally Sign” to select where to place your signature. Doing this will change your mouse cursor so you can click and drag your mouse to make a selection for where you want to display your digital signature. (This creates the blue box seen in the screenshot below.) Once you’ve done this, wait a few seconds for a new window to appear titled “Sign with a Digital ID.”
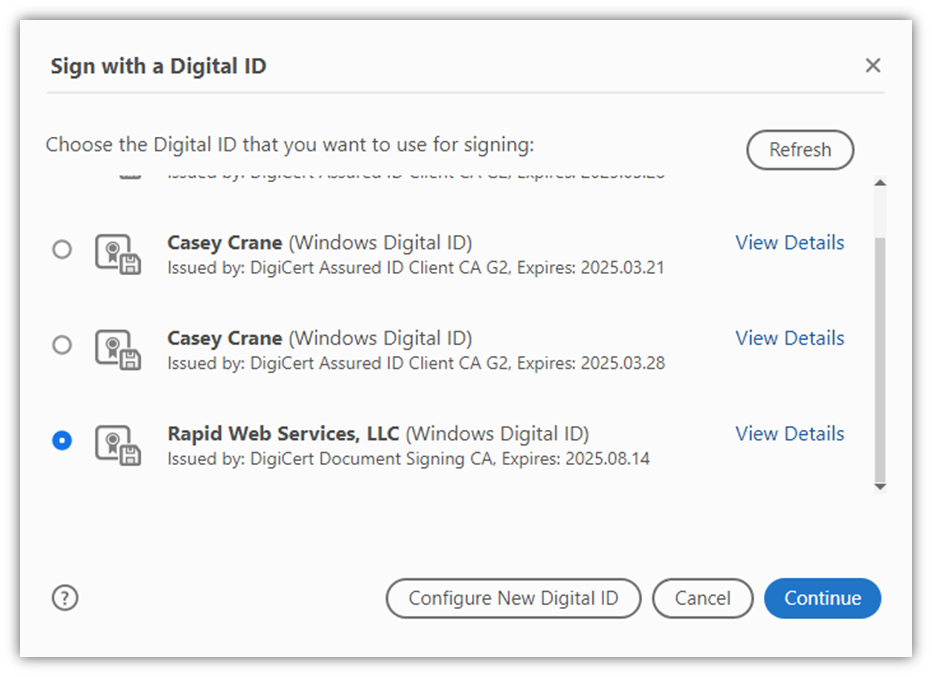
5. Choose the digital signature to sign with. Here, you must select your document signing certificate (as seen in the screenshot below). If you have multiple options displaying, select View Details to learn more about each specific certificate so you can ensure you select the right one. Don’t see the right certificate displaying? Ensure you’ve plugged your token in and have installed the client software and certificate onto your computer. Press Continue to move on to the next step.
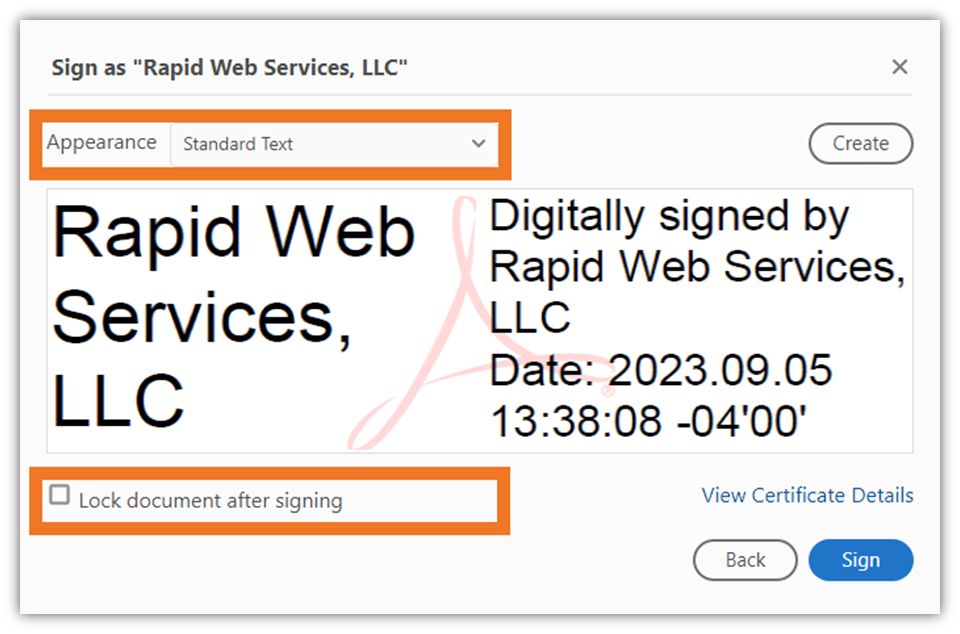
6. Verify your digital signature details. In this next window, ensure all of your digital signature details are correct. To use a standard signature, leave the Standard Text default option selected. Otherwise, you can do one of the following (as shown in the screenshot below):
- Change the appearance of your digital signature. This is where you can select a custom digital signature (if you have one available). Otherwise, it’ll display your digital signature using the default display settings.
- Choose to lock the document. Doing this will prevent changes from being made to the document once you’ve digitally signed it.
7. Press Sign. This will apply your digital signature to the PDF document.
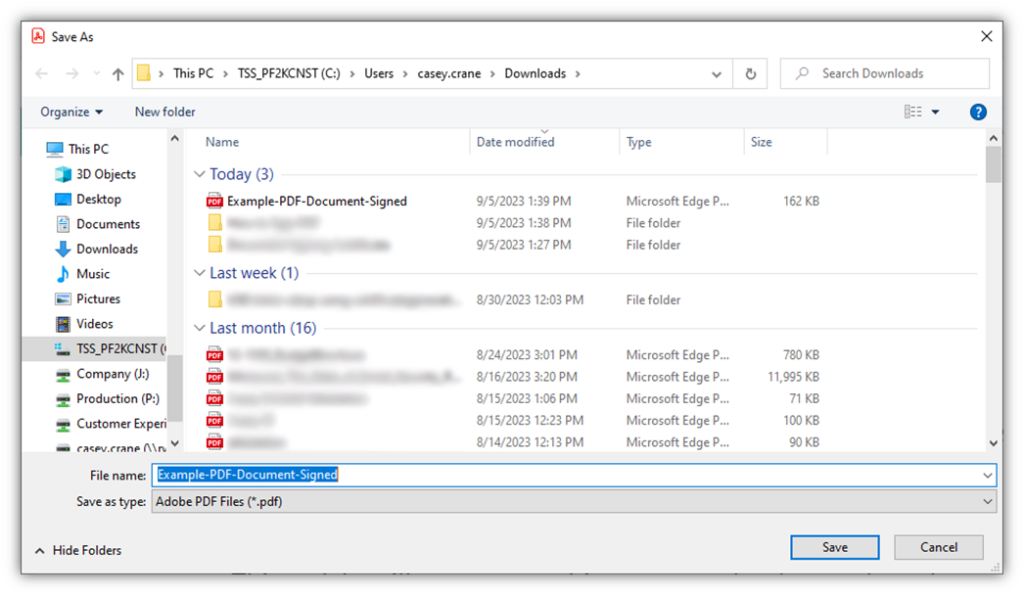
8. Save your file as a new PDF. Adobe Acrobat will automatically ask you to save your digitally signed PDF as a new file.
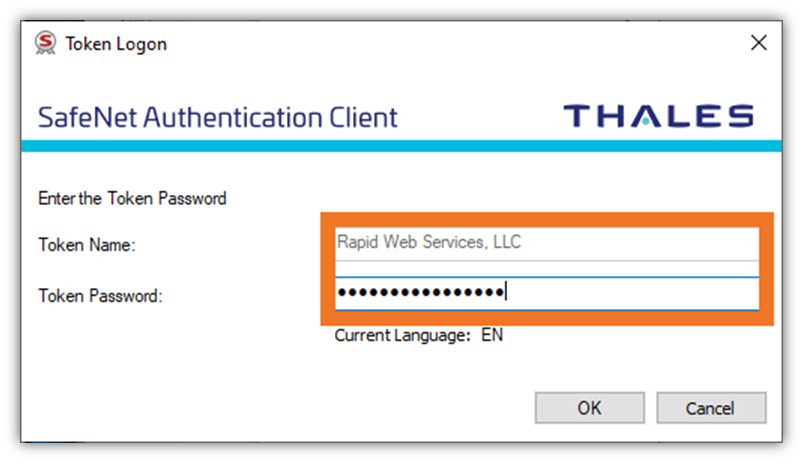
9. Enter your document signing password. Document signing certificates are delivered and stored on secure hardware tokens. To use your document signing certificate to sign the PDF in Adobe Acrobat, you must enter your password when prompted:
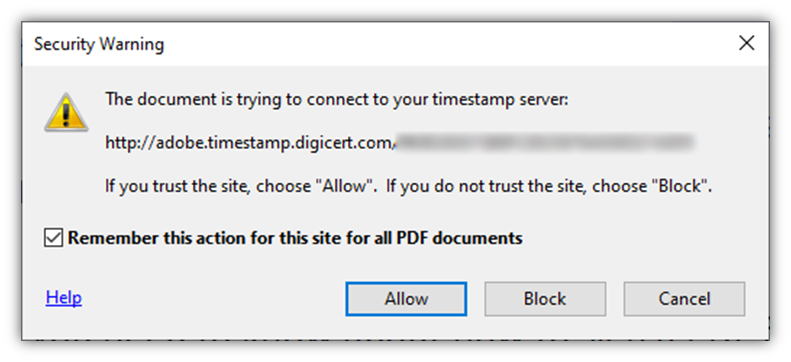
10. Enable the connection to a Timestamp server. As shown below, you’ll want to allow this connection to go through (so long as the timestamp server information appears correct). Hit Allow to continue with the timestamping process.
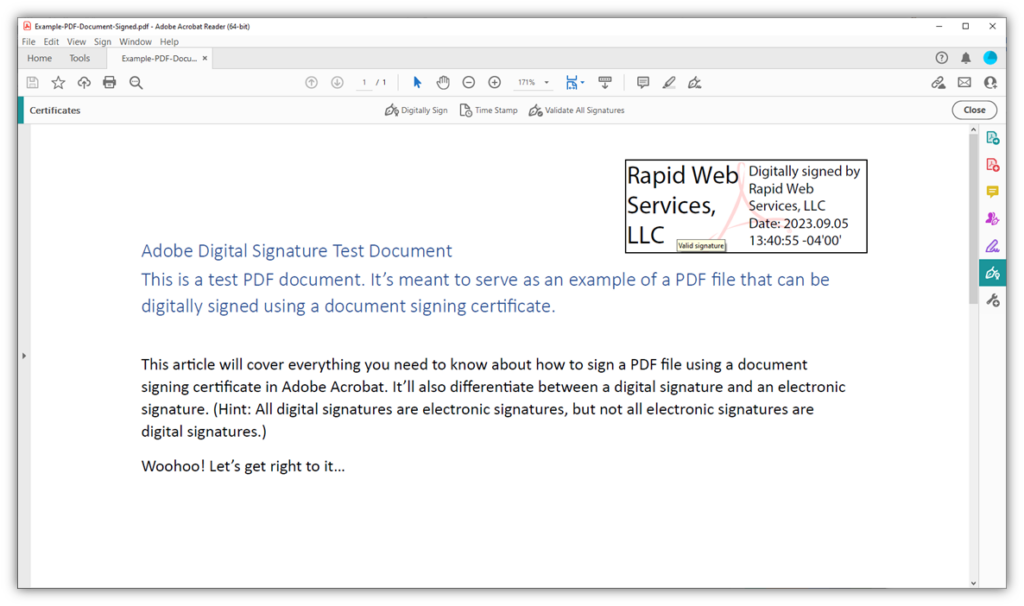
This will insert your digital signature into the document (as shown below).
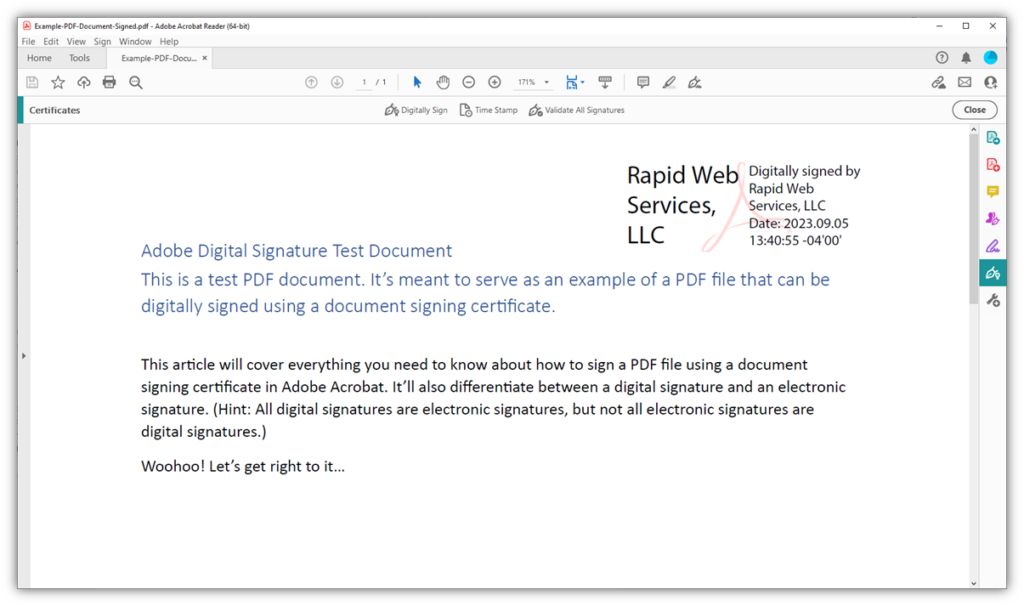
That’s it! You’ve now added your cryptographic digital signature to your PDF file in Adobe Acrobat.
How to Check a PDF File’s Digital Signature
If you want to do your due diligence and ensure it’s working correctly, or if you’re someone who has received a digitally signed document from someone else and you want to verify the signature’s legitimate, then keep reading.
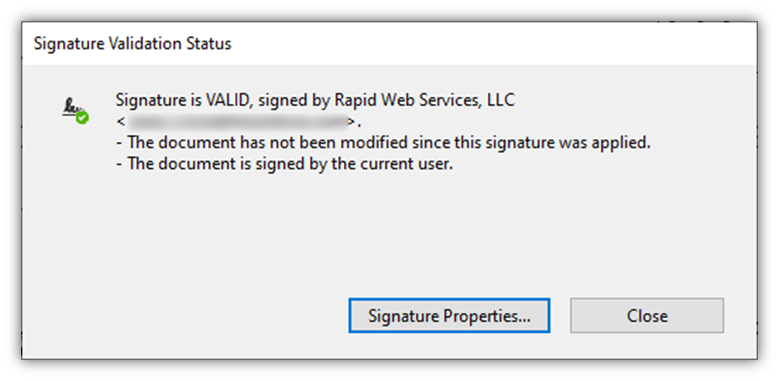
Mouse over your digital signature. It’ll have a small popup that tells you whether the signature is valid:
Want to look under the hood a little more closely? Cool. Click on the signature and you’ll see the following window pop up:
Click on Signature Properties to bring up another window that will provide more in-depth information about your digital signature, as shown below:
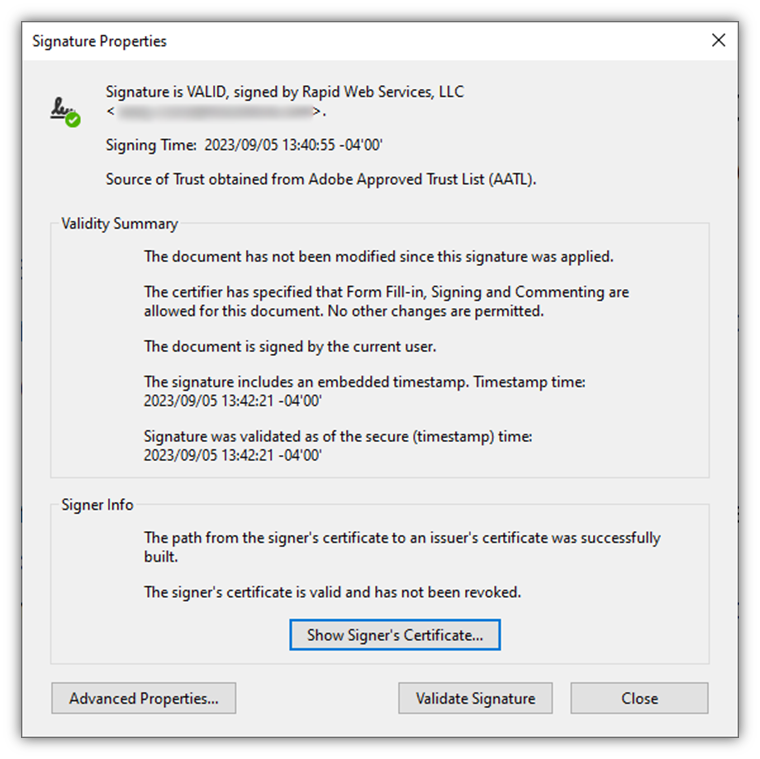
Hit the Validate Signature button to refresh the information to ensure there hasn’t been a change since it was last signed. Otherwise, if you want to view additional info about the document signing certificate that was used to sign the file, click on the Show Signer’s Certificate button.
This will bring up a new screen that provides a summary of the certificate, as shown below:
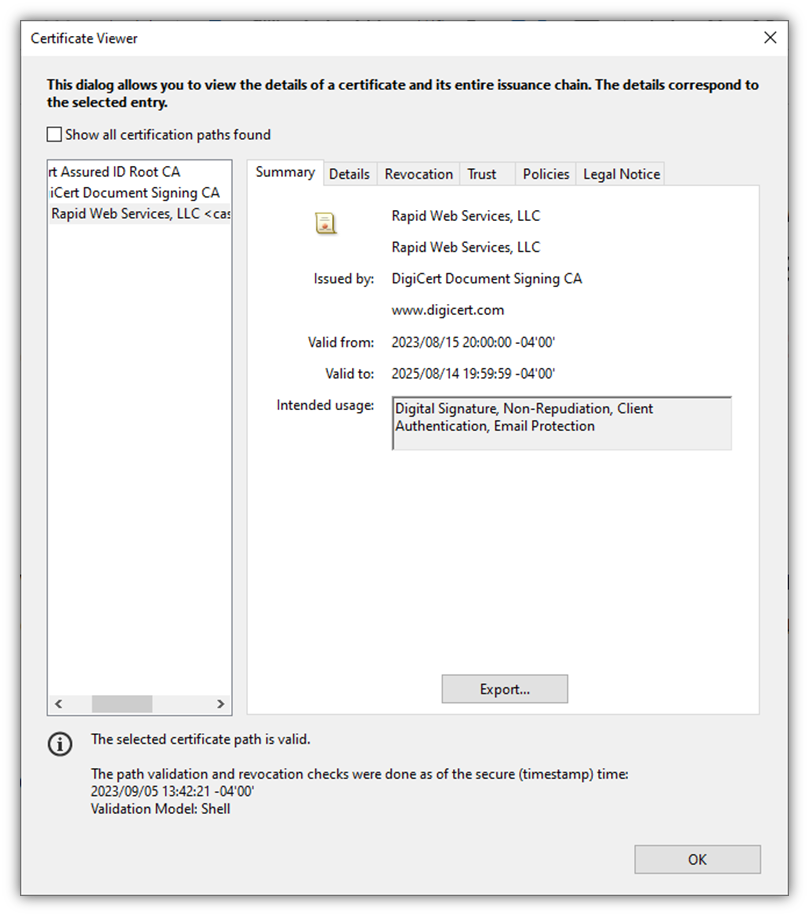
But that isn’t all. This screen has multiple tabs that you can engage with to view additional information, including information regarding the digital certificate:
- General details — Info about the certificate’s validity, Subject and Issuer, signature algorithm, etc.
- Revocation status — Details about whether the certificate has been revoked or is still valid.
- Trusted Capabilities — Information that shares what the certificate is trusted to do (i.e., sign and certify documents).
An Overview of What Digital Signatures Do
Generally speaking, a digital signature is a way to prove that your data is real and hasn’t been altered since it was signed. More technically speaking, it’s a cryptographic method for validating the authenticity and integrity of a file, digital communication, or connection. Digital signatures are used in many aspects of public key infrastructure (PKI):
- Creating secure SSL/TLS connections to protect data in transit (using an SSL/TLS certificate)
- Securing email communications (using an S/MIME certificate)
- Proving the authenticity of documents (using a document signing certificate)
Learn more about other digital signature certificate use cases.
How Digitally Signing a PDF Works
When you digitally sign a PDF file in Adobe, you apply a cryptographic hashing function to it and then use your private key to sign the resulting hash value. This creates a block of data known as a digital signature. When you apply the hash function to your file, you create a fixed-length hash value (i.e., a hash digest) that serves as a type of checksum, meaning that it:
- Attests to your file’s authenticity (so they know it came from you), and
- Informs recipients that your file hasn’t been altered somehow (it protects its integrity).
Want to learn more about hash functions and how they work? Check out our article that looks under the hood at this important cryptographic process.
Why You Should Add a Digital Signature to Your PDFs
Digital signatures allow you to sign documents via the internet, and the recipient can be confident they know:
- Who signed the document,
- When the document was signed, and
- Whether the file has been modified
- What changes to the file, if any, are permitted.
Unlike e-signatures, digital signatures use cryptographic techniques that can’t be faked using a graphic illustration program. They contain interactive elements that a user can comb through to verify information for themselves.
You Can Customize Your Digital Signature
If you don’t like the default appearance of the digital signature and want to customize it, you can. We’ve put together a step-by-step guide and a video to walk you through how to create a custom digital signature in Adobe Acrobat Reader.
Let’s Wrap This Up
As you’ve seen, digitally signing a PDF in Adobe Acrobat is a pretty straightforward process. Although it requires you to purchase a document signing certificate, the process of applying your digital signature to a PDF file is relatively quick.
If there are any other how-to type articles you’d like us to cover on Hashed Out, be sure to share your thoughts or requests in the comments below.


5 Ways to Determine if a Website is Fake, Fraudulent, or a Scam – 2018
in Hashing Out Cyber SecurityHow to Fix ‘ERR_SSL_PROTOCOL_ERROR’ on Google Chrome
in Everything EncryptionRe-Hashed: How to Fix SSL Connection Errors on Android Phones
in Everything EncryptionCloud Security: 5 Serious Emerging Cloud Computing Threats to Avoid
in ssl certificatesThis is what happens when your SSL certificate expires
in Everything EncryptionRe-Hashed: Troubleshoot Firefox’s “Performing TLS Handshake” Message
in Hashing Out Cyber SecurityReport it Right: AMCA got hacked – Not Quest and LabCorp
in Hashing Out Cyber SecurityRe-Hashed: How to clear HSTS settings in Chrome and Firefox
in Everything EncryptionRe-Hashed: The Difference Between SHA-1, SHA-2 and SHA-256 Hash Algorithms
in Everything EncryptionThe Difference Between Root Certificates and Intermediate Certificates
in Everything EncryptionThe difference between Encryption, Hashing and Salting
in Everything EncryptionRe-Hashed: How To Disable Firefox Insecure Password Warnings
in Hashing Out Cyber SecurityCipher Suites: Ciphers, Algorithms and Negotiating Security Settings
in Everything EncryptionThe Ultimate Hacker Movies List for December 2020
in Hashing Out Cyber Security Monthly DigestAnatomy of a Scam: Work from home for Amazon
in Hashing Out Cyber SecurityThe Top 9 Cyber Security Threats That Will Ruin Your Day
in Hashing Out Cyber SecurityHow strong is 256-bit Encryption?
in Everything EncryptionRe-Hashed: How to Trust Manually Installed Root Certificates in iOS 10.3
in Everything EncryptionHow to View SSL Certificate Details in Chrome 56
in Industry LowdownA Call To Let’s Encrypt: Stop Issuing “PayPal” Certificates
in Industry Lowdown