How to add your own root cert via CAB file
This post will explain how to install a root cert on a one tier device via a CAB file. You need to install root cert via CAB file for many tier one mobile. You may need to install certs with Exchange ActiveSync. This method will work for any one-tier prompt device, including the Treo 700W and Motorola Q.
Open up the cert in explorer. You can do this by double clicking the .cer file, using the MMC snapin, or clicking through the SSL lock UI in IE.
If this is a certificate chain, then examine the root cert. adding the leaf cert to the root store will not work.
Look at the thumbprint of the certificate. Save this string because you will need it later.
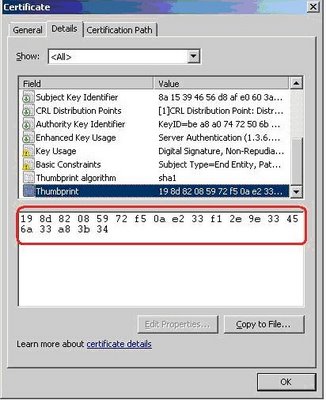
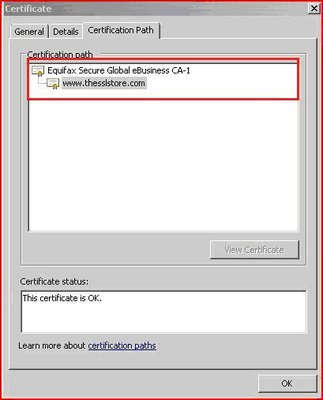
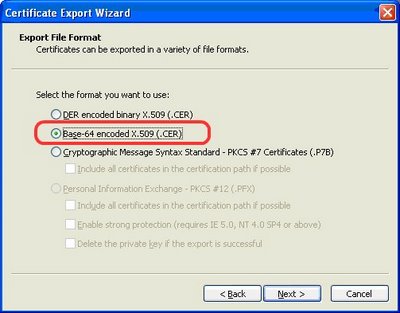
If you don’t have the certificate on disk already, select “Copy Certificate” to export the certificate to the file system in Base-64 format.
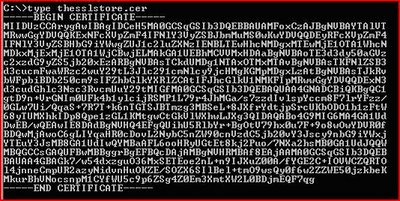
Construct certificate XML using the store, thumbprint, and base64 encoded certificate blob. The XML for our example case would look like this:
<wap-provisioningdoc>
<characteristic type=”CertificateStore”>
<characteristic type=”ROOT” >
<characteristic type=”198d82085972f50ae233f12e9e33456a33a83b34″>
<parm name=”EncodedCertificate” value=”
MIIDUzCCArygAwIBAgIDCeH5MA0GCSqGSIb3DQEBBAUAMFoxCzAJBgNVBAYTAlVT
MRwwGgYDVQQKExNFcXVpZmF4IFNlY3VyZSBJbmMuMS0wKwYDVQQDEyRFcXVpZmF4
IFNlY3VyZSBHbG9iYWwgZUJ1c2luZXNzIENBLTEwHhcNMDgxMTEwMjE1OTA1WhcN
MDkxMjExMjE1OTA1WjCBwjELMAkGA1UEBhMCVVMxHDAaBgNVBAoTE3d3dy50aGVz
c2xzdG9yZS5jb20xEzARBgNVBAsTCkdUMDg1NTAxOTMxMTAvBgNVBAsTKFNlZSB3
d3cucmFwaWRzc2wuY29tL3Jlc291cmNlcy9jcHMgKGMpMDgxLzAtBgNVBAsTJkRv
bWFpbiBDb250cm9sIFZhbGlkYXRlZCAtIFJhcGlkU1NMKFIpMRwwGgYDVQQDExN3
d3cudGhlc3Nsc3RvcmUuY29tMIGfMA0GCSqGSIb3DQEBAQUAA4GNADCBiQKBgQC1
gtD9n+VrGNIm0UFk4b1ylcijRSMP1L79r4JhMGa/s7zzdIvlspYccm8F7lrYFzz/
0GLw7Ui/QqaS+7R7T+k6nTGTSJBTmzg3MBSeL+8JXfrYdtjpSrcUKbODO1b1zFtW
68yTUMXhkIDp8Qpe1zGL1KMtgwCtGkVlWXhwLJXg3QIDAQABo4G9MIG6MA4GA1Ud
DwEB/wQEAwIE8DAdBgNVHQ4EFgQUihU5RlbYr+BgOtV79hx0u7F+9o8wOwYDVR0f
BDQwMjAwoC6gLIYqaHR0cDovL2NybC5nZW90cnVzdC5jb20vY3Jscy9nbG9iYWxj
YTEuY3JsMB8GA1UdIwQYMBaAFL6ooHRyUGtEt8kj2Puo/7NXa2hsMB0GA1UdJQQW
MBQGCCsGAQUFBwMBBggrBgEFBQcDAjAMBgNVHRMBAf8EAjAAMA0GCSqGSIb3DQEB
BAUAA4GBAGk7/w54dxzguO36MxSETEoe2nL+n9IJXuZ00A/fYGE2C+IOVWCZQRTO
l4jnneCmpUR2azyNidvnHuOKZE/SOZX6SIlBel+tmO9wsQy0f6w2ZZWE50jzkbeK
MkurBhVNocsnpM1CYfWU5c9p6ZSg4Z0Em3XmtXW2L0BDjmEQF7qg/”/>
</characteristic>
</characteristic>
</characteristic>
</wap-provisioningdoc>
Save the XML file as _setup.xml and make it into a cab file: makecab _setup.xml rootcert.cab

Now install the cab file on the device. You’re done!


![A Look at 30 Key Cyber Crime Statistics [2023 Data Update]](https://www.thesslstore.com/blog/wp-content/uploads/2022/02/cyber-crime-statistics-feature2-75x94.jpg)



5 Ways to Determine if a Website is Fake, Fraudulent, or a Scam – 2018
in Hashing Out Cyber SecurityHow to Fix ‘ERR_SSL_PROTOCOL_ERROR’ on Google Chrome
in Everything EncryptionRe-Hashed: How to Fix SSL Connection Errors on Android Phones
in Everything EncryptionCloud Security: 5 Serious Emerging Cloud Computing Threats to Avoid
in ssl certificatesThis is what happens when your SSL certificate expires
in Everything EncryptionRe-Hashed: Troubleshoot Firefox’s “Performing TLS Handshake” Message
in Hashing Out Cyber SecurityReport it Right: AMCA got hacked – Not Quest and LabCorp
in Hashing Out Cyber SecurityRe-Hashed: How to clear HSTS settings in Chrome and Firefox
in Everything EncryptionRe-Hashed: The Difference Between SHA-1, SHA-2 and SHA-256 Hash Algorithms
in Everything EncryptionThe Difference Between Root Certificates and Intermediate Certificates
in Everything EncryptionThe difference between Encryption, Hashing and Salting
in Everything EncryptionRe-Hashed: How To Disable Firefox Insecure Password Warnings
in Hashing Out Cyber SecurityCipher Suites: Ciphers, Algorithms and Negotiating Security Settings
in Everything EncryptionThe Ultimate Hacker Movies List for December 2020
in Hashing Out Cyber Security Monthly DigestAnatomy of a Scam: Work from home for Amazon
in Hashing Out Cyber SecurityThe Top 9 Cyber Security Threats That Will Ruin Your Day
in Hashing Out Cyber SecurityHow strong is 256-bit Encryption?
in Everything EncryptionRe-Hashed: How to Trust Manually Installed Root Certificates in iOS 10.3
in Everything EncryptionHow to View SSL Certificate Details in Chrome 56
in Industry LowdownPayPal Phishing Certificates Far More Prevalent Than Previously Thought
in Industry Lowdown