


 (No Ratings Yet)
How to Make SSL Certificates Play Nice with ASP.NET Core
Enabling SSL/TLS on an ASP.NET Core website, as told by an expert
SSL certificates have become important to Google this year (51.8% of the top one million sites now have this enhanced security feature), which means they should be important to you too.
Before publishing an ASP.NET Core site to the public internet, you will need to take digital security into consideration. By default, all web servers handle traffic over port 80 through the HyperText Transfer Protocol (HTTP), which is how web browsers send and receive data.
However, this form of communication comes with certain vulnerabilities that can affect your website’s performance and reputation.
The best practice for software developers is to enable secure sockets layer (SSL) technology on all hosted webpages. Here’s how to do it.
Basics of SSL Certificates
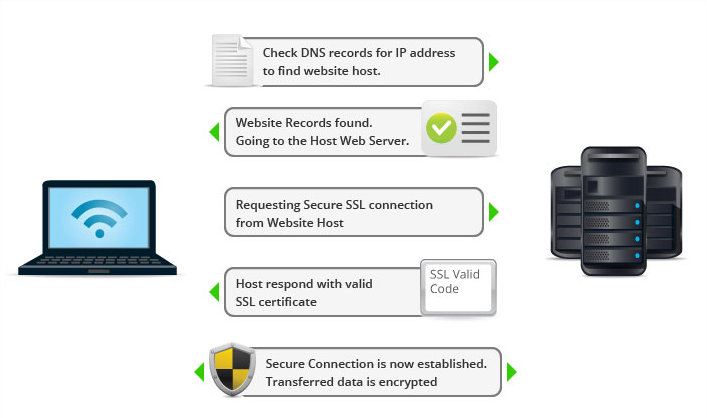
The padlock icon that appears beside the address bar in a web browser is an indication that the current website is secured with an SSL certificate. But what does that really mean? It’s an indication that data requests will be sent over port 443 instead of the normal port 80 for HTTP. Secure data communication over the web is known as HTTPS.
If your ASP.NET CORE project will feature the ability to store usernames and passwords or perform credit card transactions, then support for HTTPS is a must. Otherwise, your visitors and customers will be at risk of having their private information exposed to intruders and hackers.
With basic HTTP requests over port 80, data is transmitted in plain text, meaning that messages can be intercepted by hacking a local wi-fi network. SSL certificates eliminate that risk, as they encrypt all data transfers from the browser to the web server. So even if a hacker tries to parse the message being sent, it cannot be decoded.
SSL certificates are issued by organizations known as certificate authorities who are responsible for verifying the identity of the company or individual requesting a certificate. Once approved and installed, the certificate provides assurance to visitors that the website is secure and encrypted.
Enabling HTTPS Redirects

When an individual types a web address into their browser, the initial request packet will be sent over port 80 with HTTP. To use an SSL certificate with your ASP.NET Core site, you need to immediately have your web server redirect the traffic to port 443 as an HTTPS request. To do so, follow these steps:
- Open your source code in the Visual Basic application
- Edit the “Startup” class
app.UseHttpsRedirection();
- Add the following line within the “Configure” function: app.UseHttpsRedirection();
This will instruct your web server to load the SSL certificate for all incoming requests. Next, you need to add code instructions to open and use the correct network port for HTTPS connections.
- Edit the “Program” class in your ASP.NET Core project
.UseSetting("https_port", "443")
- Add the following line within the “CreateWebHostBuilder” function: .UseSetting(“https_port”, “443”)
If you have a firewall set up on your web or application servers, their policies must also be manually updated to allow external requests through port 443.
Using a Self-Signed Certificate
For ASP.NET Core projects that are in an early stage of development, you may not be ready to acquire a full SSL certificate from a certificate authority, especially given the costs they involve. Instead, you can enable a self-signed certificate on your project for free that can be used for testing in your development environment.
Follow these steps to enable self-signed SSL validation in ASP.NET Core:
- Launch the Windows command prompt utility
dotnet dev-certs https --trust
- Run the following .NET command: dotnet dev-certs https –trust
- Click “Yes” to confirm you want to trust the self-signed certificate
Now when you test your website and use “https” at the beginning of the URL, the web browser will recognize the self-signed certificate and display the padlock symbol to indicate a valid SSL certificate is in place. Be aware that you’ll need to run through this process on all workstations where testing will occur.
Connecting SSL to Azure

If you are deploying your ASP.NET Core project to the Microsoft Azure cloud platform, then you can bind your SSL configuration to your web app instead of having to worry about managing the certificate in a local environment. SSL binding is available for the Basic, Standard, Premium, or Isolated tiers of Azure accounts.
Refer to the following steps to set up an SSL binding to your Azure configuration:
- Navigate to the Azure portal in a web browser and log in with your account credentials
- Click on the “App Services” icon from the menu on the left side of the screen
- Select the name of your ASP.NET Core project from the list of services
- Open all of the individual SSL files you received from the certificate authority and merge them into a single file using a text editor like Notepad
mergedcertificate.crt
- Save the merged SSL certificate file as a new object called mergedcertificate.crt
openssl pkcs12 -export -out myserver.pfx -inkey private-key-file -in merged-certificate-file
- Run the following command in a command prompt window to convert the .crt file into a private key file: openssl pkcs12 -export -out myserver.pfx -inkey private-key-file -in merged-certificate-file
- During the export process, you will be prompted to choose a password to associate with the new .pkf file
- Go to the “SSL Settings” section of the Azure window and click “Upload Certificate”
- Navigate to the location of the .pkf file, enter the certificate password you just set, and click “Upload”
- Click the “Add Binding” link and choose the “IP-based SSL” option
Technology to the Rescue
If it seems that the internet has become a feast for hackers and governments alike to invade privacy and steal personal data en masse, it’s not your imagination. IBM’s chairman recently said, “Cybercrime is the greatest threat to every company in the world.” A bold statement that is arguably true.
With SSL certificates and virtual private networks, we have the technology to encrypt the flow of data between a computer and the internet, which makes it that much harder for a hacker to go about his malicious business. As the estimated cost of dealing with cybercrime creeps towards $1 trillion already for this year, it’s hard to blame Google for pushing hard in favor of locking down websites.
Final Thoughts
Though the transition from HTTP to HTTPS is technically optional, you should realize that it really isn’t. As mentioned, Google is behind a big push to make the entire internet more secure and who can blame them? It’s all about a safer customer experience.
While websites without SSL certificates don’t appear to suffer actual punishment in the form of lower search ranking, Google does reward sites that comply with an SEO boost, which has the same effect. And in the cat-and-mouse game that is today’s battle for top spot on page number one, you can’t afford to give away any chance to gain an advantage.


5 Ways to Determine if a Website is Fake, Fraudulent, or a Scam – 2018
in Hashing Out Cyber SecurityHow to Fix ‘ERR_SSL_PROTOCOL_ERROR’ on Google Chrome
in Everything EncryptionRe-Hashed: How to Fix SSL Connection Errors on Android Phones
in Everything EncryptionCloud Security: 5 Serious Emerging Cloud Computing Threats to Avoid
in ssl certificatesThis is what happens when your SSL certificate expires
in Everything EncryptionRe-Hashed: Troubleshoot Firefox’s “Performing TLS Handshake” Message
in Hashing Out Cyber SecurityReport it Right: AMCA got hacked – Not Quest and LabCorp
in Hashing Out Cyber SecurityRe-Hashed: How to clear HSTS settings in Chrome and Firefox
in Everything EncryptionRe-Hashed: The Difference Between SHA-1, SHA-2 and SHA-256 Hash Algorithms
in Everything EncryptionThe Difference Between Root Certificates and Intermediate Certificates
in Everything EncryptionThe difference between Encryption, Hashing and Salting
in Everything EncryptionRe-Hashed: How To Disable Firefox Insecure Password Warnings
in Hashing Out Cyber SecurityCipher Suites: Ciphers, Algorithms and Negotiating Security Settings
in Everything EncryptionThe Ultimate Hacker Movies List for December 2020
in Hashing Out Cyber Security Monthly DigestAnatomy of a Scam: Work from home for Amazon
in Hashing Out Cyber SecurityThe Top 9 Cyber Security Threats That Will Ruin Your Day
in Hashing Out Cyber SecurityHow strong is 256-bit Encryption?
in Everything EncryptionRe-Hashed: How to Trust Manually Installed Root Certificates in iOS 10.3
in Everything EncryptionHow to View SSL Certificate Details in Chrome 56
in Industry LowdownA Call To Let’s Encrypt: Stop Issuing “PayPal” Certificates
in Industry Lowdown