


 (No Ratings Yet)
How to Secure FTP Server With SSL/TLS for CentOS 7
How to generate a CSR, install an SSL certificate and optimize an FTP Server for HTTPS
FTP servers are, quite unfortunately, not secure by default. Much like HTTP, encryption was never a part of the original design, which means that any data transferred – along with user credentials – is not protected and can easily be stolen or intercepted.
So, it probably goes without saying that if you’re running an FTP server, you’re probably going to need to know how to install an SSL certificate and configure everything properly
We’ve got you covered. This guide will cover:
- How to Configure VSFTPD for SSL/TLS
- How to Install FileZilla to Allow Secure Connections by Default
Let’s get started.
How to Configure VSFTPD for SSL/TLS
We’ll start by assuming that you’ve already purchased your SSL certificate, generated your CSR and have uploaded the files to your server. If you haven’t done so already, take a moment to do it now.
After that, we’ll open up the ports 990 and 40000-50000 with the following command lines:
# firewall-cmd --zone=public --permanent --add-port=990/tcp

# firewall-cmd --zone=public --permanent --add-port=40000-50000/tcp

# firewall-cmd --reload
Next up, we’ll open the VSFTPD config file so that we can specify the SSL details:
# vi /etc/vsftpd/vsftpd.conf
Look for ssl_enable and select “Yes” to active SSL. Additionally, we’re going to enable TLS support instead of old, outmoded SSL versions. TLS was the successor to SSL – though colloquially we still refer to the technology as SSL – so we need to make sure that we’re only supporting the latest, most secure versions of the protocol.ssl_enable=YES
ssl_enable=YES
ssl_tlsv1_2=YES
ssl_sslv2=NO
ssl_sslv3=NO
Next add these lines to define the location of the certificate and private key:
rsa_cert_file=/etc/ssl/private/vsftpd.pem
rsa_private_key_file=/etc/ssl/private/vsftpd.pem
Next up, we’ll disallow anonymous users and force all non-anonymous users to make secure connections:
allow_anon_ssl=NO
force_local_data_ssl=YES
force_local_logins_ssl=YES
After that, we’re going to turn off the require_ssl_reuse setting off:
require_ssl_reuse=NO
Now it’s time to set your SSL ciphers:
ssl_ciphers=HIGH
Set the port range:
pasv_min_port=40000
pasv_max_port=50000
Enable debugging:
debug_ssl=YES
And finally, let’s save all of the changes and close the file:
# systemctl restart vsftpd
How to Install FileZilla to Allow Secure Connections by Default
You’re going to run into an issue with our current configuration, that’s because VSFTPD will only allow users to log in to via clients that support encryption. We recommend you use FileZilla as your FTP client.
Here’s how you install and enable it.
To install Filezilla in Linux, run this command:
On CentOS/RHEL/Fedora:
# yum install epel-release filezilla
On Debian/Ubuntu:
$ sudo apt-get install filezilla
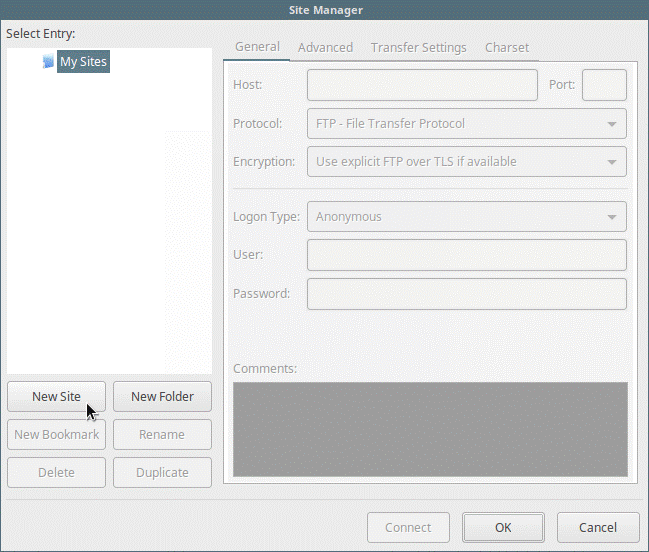
After it’s installed, you’ll want to open it. Go to File > Sites Manager (alternatively, press Control + S). Click on the New Sitebutton.
Next up, configure everything as needed, replacing the information in the command line below with the relevant data:
Host: 192.168.56.10
Protocol: FTP – File Transfer Protocol
Encryption: Require explicit FTP over #recommended
Logon Type: Ask for password #recommended
User: username
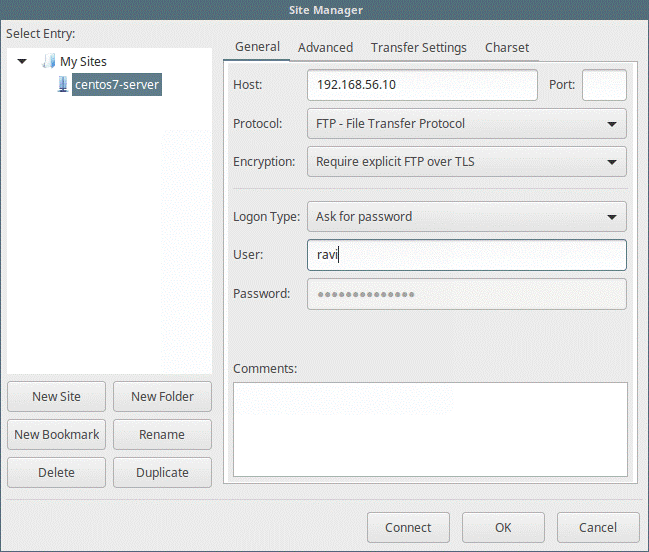
Finally, click Connect and enter your password again. After this you will verify the certificate being used and select OK
Congratulations! You’ve now secured your FTP server!

5 Ways to Determine if a Website is Fake, Fraudulent, or a Scam – 2018
in Hashing Out Cyber SecurityHow to Fix ‘ERR_SSL_PROTOCOL_ERROR’ on Google Chrome
in Everything EncryptionRe-Hashed: How to Fix SSL Connection Errors on Android Phones
in Everything EncryptionCloud Security: 5 Serious Emerging Cloud Computing Threats to Avoid
in ssl certificatesThis is what happens when your SSL certificate expires
in Everything EncryptionRe-Hashed: Troubleshoot Firefox’s “Performing TLS Handshake” Message
in Hashing Out Cyber SecurityReport it Right: AMCA got hacked – Not Quest and LabCorp
in Hashing Out Cyber SecurityRe-Hashed: How to clear HSTS settings in Chrome and Firefox
in Everything EncryptionRe-Hashed: The Difference Between SHA-1, SHA-2 and SHA-256 Hash Algorithms
in Everything EncryptionThe Difference Between Root Certificates and Intermediate Certificates
in Everything EncryptionThe difference between Encryption, Hashing and Salting
in Everything EncryptionRe-Hashed: How To Disable Firefox Insecure Password Warnings
in Hashing Out Cyber SecurityCipher Suites: Ciphers, Algorithms and Negotiating Security Settings
in Everything EncryptionThe Ultimate Hacker Movies List for December 2020
in Hashing Out Cyber Security Monthly DigestAnatomy of a Scam: Work from home for Amazon
in Hashing Out Cyber SecurityThe Top 9 Cyber Security Threats That Will Ruin Your Day
in Hashing Out Cyber SecurityHow strong is 256-bit Encryption?
in Everything EncryptionRe-Hashed: How to Trust Manually Installed Root Certificates in iOS 10.3
in Everything EncryptionHow to View SSL Certificate Details in Chrome 56
in Industry LowdownA Call To Let’s Encrypt: Stop Issuing “PayPal” Certificates
in Industry Lowdown