


 (2 votes, average: 5.00 out of 5)
How to Get a Verified Mark Certificate (VMC) – The Ultimate Guide
We take you step-by-step through the process of acquiring and implementing your VMC, so you can start showcasing your logo in customers’ inboxes as quickly and easily as possible
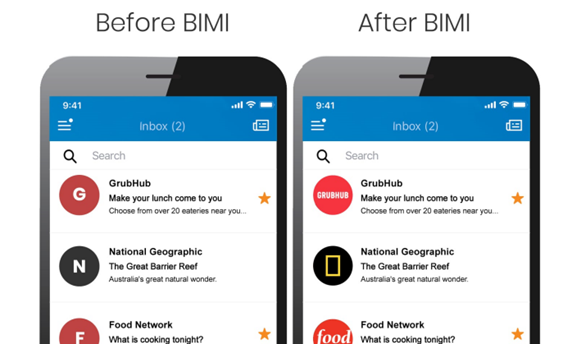
Google recently announced their adoption of the Brand Indicators for Message Identification (BIMI) standard within Gmail, and became the highest-profile mail service to provide support for Verified Mark Certificates (VMCs). Yahoo Mail (as part of Verizon Media) and Fastmail have also joined in on the new initiative, signifying the first major step towards mass adoption. With other top providers like Comcast, Seznam, and Valimail either in the planning or pilot stages of support, BIMI and VMCs will soon be live in a significant number of inboxes around the world.
To recap, the BIMI standard allows for logos to be displayed next to the “sender” field within an email. VMCs work in conjunction with BIMI by providing a verification mechanism that confirms that the specific logo actually belong to that particular sender. They work together to help companies boost brand recognition and helps increase email engagement rates by an average of 10%. There’s security benefits as well, as they help stop phishing attempts by preventing attackers from inappropriately using logos they don’t own in order to trick their targets.
In our previous article on Gmail’s VMC support, we touched on the process for acquiring and implementing a VMC certificate. The goal was to give readers an overview of how to get a verified mark certificate, what was involved, and to help determine whether or not VMCs were right for them. Today, we’re going to go a step further. If you plan on moving forward with VMCs, then you’ll need a higher level of detail to actually make it all happen and ultimately get your logo displayed on your customer’s machines.
So, what are the prerequisites for your email server? How about the specifics regarding your logo? How do you configure BIMI settings? And how to get a verified mark certificate itself?
Let’s hash it out.
(Editor’s Note: There’s been an important update since this blog post was originally published! BIMI now works with Common Mark Certificates (CMCs), which are a second type of Mark Certificate. A CMC enables companies to display their brands’ logos next to their “sender” field info in emails to Gmail recipients.
Learn how Common Mark Certificates make it easy to display your logo in Gmail.)
Step 1 – Be DMARC Complaint
The first step in preparing for your VMC is becoming DMARC compliant. What is DMARC exactly? It stands for Domain-based Message Authentication, Reporting & Conformance and acts as a means for controlling domain-level policies and settings for message validation, disposition, and reporting.
The DMARC requirement for VMCs benefits the entire email ecosystem as a whole because it forces messages to undergo validation checks, createing a higher level of baseline security. DMARC also dictates what is done with emails when they fail the aforementioned checks, such as quarantining or rejecting/deleting them.
Not sure where you stand at the moment when it comes to DMARC? There’s plenty of free tools available that help you check if you currently have DMARC in place for your domain, like this one from MxToolbox. Below is an example of what the results should look like if your DMARC record and associated settings are good to go:

The most important thing to remember is that your DMARC record must contain “p=quarantine” or “p=reject”, which basically means you aren’t allowing messages that fail authentication to make their way through your email system as if there was nothing wrong.
If your domain is failing any of the above checks, don’t worry – now we’re going to tell you how to set up DMARC for your domain. If you passed the DMARC check, then well done! You can now proceed to step 2 further below.
How to Setup DMARC
1. Sender Policy Framework (SPF) must be configured. It prevents spoofing by letting domain owners automatically approve IP addresses of servers that are permitted to send mail on the domain’s behalf. If a server tries sending mail and its IP address isn’t on the list, it won’t pass the SPF check.
2. Collect IP addresses that are used to send email from your domain including web servers, in-office mail servers, your ISP’s mail servers, and any other third party mail servers.
3. Compile your sending and non-sending domains.
4. Make an SPF record in a .txt file for each domain. For example:
v=spf1 ip4:1.2.3.4 ip4:2.3.4.5 ip4:x.x.x.x -all
v=spf1 ip4:1.2.3.4 ip4:2.3.4.5 include:thirdparty.com -all
Publish your SPF to DNS by adding a new TXT record with your SPF text.
5. Check the record by using an SPF check tool.
6. DKIM must be set up. It’s a standard that uses cryptography to sign emails, verifying the domain it’s coming from and ensuring the email hasn’t been tampered with while in transit.
7. Choose a DKIM selector, which is a user-defined string that’s added to your domain name to identify the DKIM public key. For example:
“standard._domain.example.com” = host name
Then generate a public-private key pair for your domain.
For Windows, you can use PUTTYGen.
For Linux and Mac, you can use ssh-keygen.
8. Create a TXT record that contains the public key from the pair you just generated. Publish it via your DNS console. For example:
v=DKIM1; p=YourPublicKey
You check the record by using a DKIM check tool. As for your private key, store that wherever your email platform specifies. Some email providers will instruct you to setup CNAME records for DKIM authentication. Overall, the DKIM steps can vary based on your provider, so be sure to check with them.
9. Configure the DMARC monitoring mode by creating a DNS record and naming it similar to the following: “_dmarc.your_domain.com. For example:
v=DMARC;p=quarantine;pct=100;rua=mailto:dmarcreports@you_domain.com
10. The example above sets “p=quarantine”. For your VMC, it can be set to either that or “p=reject”. If you aren’t sure which to choose, one approach is to first set it to “quarantine” and then have a period of manual review. Then, you can update your SPF record accordingly and ultimately change the setting to “reject” once your filtering is where it needs to be. Reject means emails that fail DMARC will be deleted.
The above example also sets “pct=100”. You can start at a lower value (which will only filter a certain percentage of messages) until you are comfortable, eventually working your way up to 100.
A couple other miscellaneous notes – you’ll want to make sure you set up SPF and DKIM authentication for all servers you use to send email. If you skip a server, emails that it sends will not be delivered. Also, you don’t have to wait for DMARC to be set up to start the VMC process – the DMARC check is part of the certificate validation procedure so they can work in tandem to some degree.
Step 2 – Use a Trademarked Logo
Now that your email is properly configured, we can move on to the logo itself. First off, the logo must be trademarked. The reason for this requirement is that a trademarked logo is harder to spoof. After all, it’s been vetted on the federal and/or international level.
If you aren’t sure about your organization’s logo, you can search for it on the World Intellectual Property Organization’s (WIPO) website (https://www3.wipo.int/branddb/en/). It will tell you whether it’s listed as an active registered trademark.
Additionally, only certain trademark offices are approved for VMCs:
- United States Patent and Trademark Office (USPTO),
- Canadian Intellectual Property Office,
- European Union Intellectual Property Office,
- UK Intellectual Property Office,
- Deutsches Patent- und Markenamt,
- Japan Trademark Office,
- Spanish Patent and Trademark Office O.A.,
- IP Australia.
Update: Since publication of this article, DigiCert has added support for:
- Korean Intellectual Property Office
- Instituto Nacional da Propriedade Industrial (Brazil)
- Intellectual Property India
- French Institut National de la Propriete Industrielle
- Benelux Office for Intellectual Property
- Denmark Ministry of Culture
- Swedish Intellectual Property Office
- Swiss Federal Institute of Intellectual Property
- Intellectual Property Office of New Zealand
If your logo isn’t trademarked but you want a VMC to insert your logo next to your sender name in Gmail, then we recommend initiating the process immediately, as it can take a while. The best starting point would be to talk to your legal team. If you don’t have legal representation, it’s not necessarily a requirement depending on your jurisdiction, but we’d highly recommend it.
You need your mark to be in the correct format to be registerable. This video from the USPTO explains how to get your mark ready for filing:
Then, you’ll need to do the following:
- Identify the goods and services your organization provide , which is part of the trademark requirements.
- Search in the appropriate jurisdictions to verify your mark isn’t too similar to any others. Each trademark office should have their own search tool, and you can find the USPTO’s here.
- Gather the information required for the application. Here’s the USPTO’s list of what’s needed.
- Start the filing process. Make sure you’re aware of the deadlines, as they are strict.
After you file, an examiner from the trademark office will review your application and eventually reach out to you. Their requests will vary depending on the specifics of your case, but be sure to reply in a timely manner or else you risk having your application cancelled. At the conclusion of the process, you’ll ultimately receive a notice of approval or denial.
Step 3 – Format Your Logo
Your logo must be in the Scalable Vector Graphics (.SVG) format and must adhere to the SVG Portable/Secure (SVG-P/S) profile. Unfortunately, there’s currently no export template for it in Adobe Illustrator. The good news, however, is that it only requires a few extra steps to get your logo in the proper format, which we outline below:
- Convert your logo to vector format. You can do this by saving your logo as an appropriate filetype such as ‘.ai’, ‘.eps’, ‘.pdf’, or ‘.svg’. Note – if your logo has complex art, you may need to do some tweaking to get it to display properly.
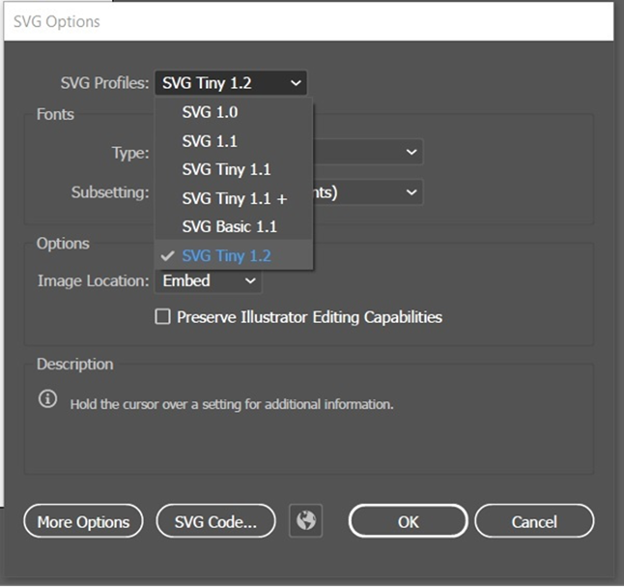
- Export as SVG Tiny 1.2.
- Open your file in Adobe Illustrator
- Select “Save As”, then pick SVG from the “Format” dropdown menu.

Click “Save”.
3. Another dialog box should appear. Choose “Tiny 1.2” from the “SVG Profiles” dropdown menu and click “OK”.
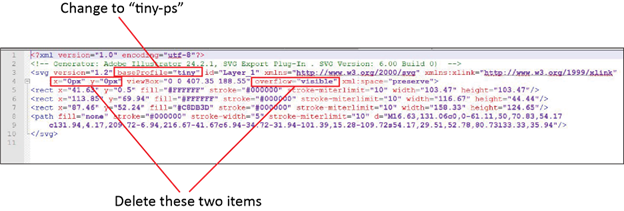
Open your SVG file using a text editor such as Notepad. You can also use a code editor.
- Verify that you see the following somewhere in the header:
xmlns=http://www.w3.org/2000/svg, version=”1.2, baseProfile=”tiny-ps“
For example, you may see a string like this:
<svg version=”1.2″ baseProfile=”tiny-ps” id=”Layer_1″ xmlns=”http://www.w3.org/2000/svg” xmlns:xlink=”http://www.w3.org/1999/xlink” viewBox=”0 0 1080 1080“ xml:space=”preserve”>
If you exported from Illustrator, you’ll need to change the baseProfile to tiny-ps, and delete the x=, y= and overflow items.
- Add the title element. Hit return after xml:space=”preserve” and put the title element with your company name there. Make sure that you don’t put the title inside the graphic code itself.
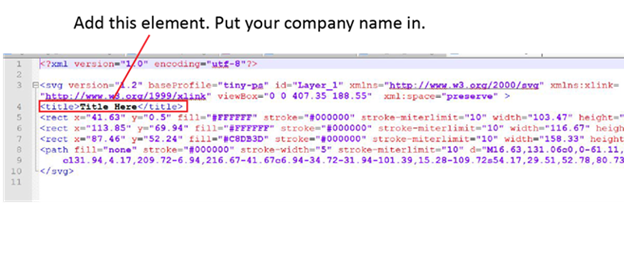
- Save the file while making sure to keep it in SVG format.
There’s also another option available that requires less legwork. The BIMI working group has released an Adobe illustrator Export Script that lets users automatically convert an SVG Tiny 1.2 file into SVG P/S format
.
Finally, no matter which method you use, we recommend adhering to the following guidelines in order to get your logo to display optimally:
- Use a 1:1 aspect artio
- Center your image
- Use a non-transparent background
Next, we’ll cover how to get a verified mark certificate.
Step 4 – Purchase Your VMC
Next, you’ll go about purchasing your VMC. The SSL Store is among the first trusted vendor’s to offer VMCs, and for a limited time we’re offering special introductory pricing on DigiCert VMCs.
Most organizations will only need a single VMC for their domain. Multi-SAN VMCs are available for those securing multiple domains. If you are using multiple logos, however, you’ll need a VMC for each one. You can find more details about using multiple domains with VMCs here.
After buying the VMC, you’ll go through a validation process that’s similar to that of EV SSL certificates. There’s a few extra steps though for added security, such as:
- Confirming your logo is a registered trademark
- Providing notarized copies of ID documents pertaining to the individual from your organization that’s applying for the VMC
- An in-person or video call with a member of the certificate authority’s validation team in order to confirm your identity matches the provided ID documents
Once those steps are completed, your VMC will be issued.
Step 5 – Upload the VMC to Your Web Server
Now that we’ve gone over how to get a verified mark certificate, the next step is to upload the certificate to your server. After your VMC is issued, you’ll receive an email containing your entity certificate Privacy Enhanced Mail (PEM) file. If you receive any other intermediate certificates from your CA, then append them to the PEM file. Next, upload your PEM file to your public web server and make note of the file’s URL, as you’ll need it in the next step.
Step 6 – Add a BIMI TXT Record to Your Domain
Next, you’ll create your BIMI TXT record, which you’ll then add to your DNS in your hosting provider:
- First off, create your BIMI record. You’ll need the PEM file location you wrote down earlier and the location of your SVG logo file. You’ll format your BIMI record as per the example below:
v=BIMI1;l=https://images.yourdomain.com/brand/bimi- logo.svg;a=https://images.yourdomain.com/brand/certificate.pem
- Add your BIMI record as a DNS TXT record with your domain provider. The exact steps will vary depending on your provider, but you’ll be entering the following values:
| Field | Value | Description |
| Type | TXT | DNS record type |
| Host | default._bimi.yourdomain.com | Enter “default._bimi” followed by your root domain |
| Value | v=BIMI1;l=https://images.yourdomain.com/brand/ bimilogo.svg;a=https://images.yourdomain.com/ brand/certificate.pem | Your BIMI record |
| TTL | 1 hour (3600 seconds) | Set to 1 hour |
- Then, allow up to 48 hours for your logo to start being displayed via BIMI. You can also check your BIMI record with the BIMI Group’s tool.
- Confirm your logo is being displayed properly by sending a test email. Then, that’s it! You’re done. Now you know exactly how to get a verified mark certificate. That wasn’t so bad, was it?
Supporting the Evolution of Email
VMCs and BIMI are exciting new innovations that bring fresh changes to the world of email, helping organizations further evolve in the digital world. Now that you know how to get a verified mark certificate (VMC), you can start enjoying the marketing and security benefits that they provide. And when it comes to your VMC, The SSL Store™’s award-winning Customer Experience Team has you covered every step of the way with 24/7 expert support, so you can make the most of those benefits.
Want to Learn More About Mark Certificates?
Verified Mark Certificates are just one type of Mark Certificates. Here are some additional resources to learn more about VMCs, Common Mark Certificates (CMCs):
- Common Mark Certificates Make It Easier to Display Your Logo in Gmail
- BIMI for Gmail: Google Makes Email Identity Indicators Part of Its Security Updates
- Benefits of Using a Verified Mark Certificate
- How Can I Brand My Mail? Use a VMC and BIMI
- Google Announces BIMI and VMC Support for Increased Email Authentication and Brand Trust
- Building an Email Asset Inventory to Improve Email Deliverability & Security — Who Are Your Authorized Senders?


5 Ways to Determine if a Website is Fake, Fraudulent, or a Scam – 2018
in Hashing Out Cyber SecurityHow to Fix ‘ERR_SSL_PROTOCOL_ERROR’ on Google Chrome
in Everything EncryptionRe-Hashed: How to Fix SSL Connection Errors on Android Phones
in Everything EncryptionCloud Security: 5 Serious Emerging Cloud Computing Threats to Avoid
in ssl certificatesThis is what happens when your SSL certificate expires
in Everything EncryptionRe-Hashed: Troubleshoot Firefox’s “Performing TLS Handshake” Message
in Hashing Out Cyber SecurityReport it Right: AMCA got hacked – Not Quest and LabCorp
in Hashing Out Cyber SecurityRe-Hashed: How to clear HSTS settings in Chrome and Firefox
in Everything EncryptionRe-Hashed: The Difference Between SHA-1, SHA-2 and SHA-256 Hash Algorithms
in Everything EncryptionThe Difference Between Root Certificates and Intermediate Certificates
in Everything EncryptionThe difference between Encryption, Hashing and Salting
in Everything EncryptionRe-Hashed: How To Disable Firefox Insecure Password Warnings
in Hashing Out Cyber SecurityCipher Suites: Ciphers, Algorithms and Negotiating Security Settings
in Everything EncryptionThe Ultimate Hacker Movies List for December 2020
in Hashing Out Cyber Security Monthly DigestAnatomy of a Scam: Work from home for Amazon
in Hashing Out Cyber SecurityThe Top 9 Cyber Security Threats That Will Ruin Your Day
in Hashing Out Cyber SecurityHow strong is 256-bit Encryption?
in Everything EncryptionRe-Hashed: How to Trust Manually Installed Root Certificates in iOS 10.3
in Everything EncryptionHow to View SSL Certificate Details in Chrome 56
in Industry LowdownA Call To Let’s Encrypt: Stop Issuing “PayPal” Certificates
in Industry Lowdown