


 (No Ratings Yet)
How to Fix: “This Computer Already Has A More Recent Version of Google Chrome.”
Run Windows Powershell to Fix This Bug and Install Chrome.
This was a rather perplexing bug I came across when trying to install Google Chrome on Windows:
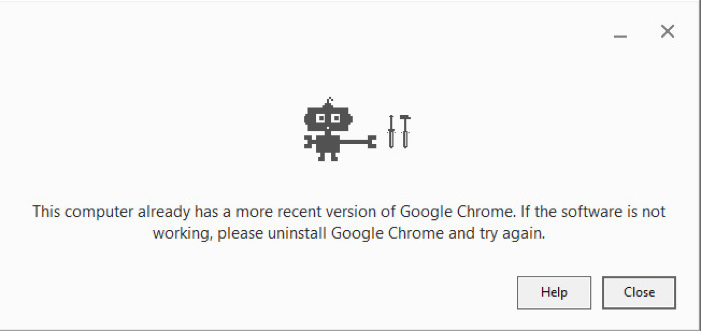
The full error reads: “This computer already has a more recent version of Google Chrome. If the software is not working, please uninstall Google Chrome and try again.”
But I didn’t have Chrome installed. It used to be, but I uninstalled it. Unfortunate, y this error occurred everytime I ran the Chrome installer and there was no way to override it.
Every solution on the internet failed. I tried installing an older version of Chrome, in Safe Mode, with Administrator privileges, using Chrome’s offline installer, deleting registry keys, etc.
I just kept getting the same error: “This computer already has a more recent version of Google Chrome…”
I thought I was stuck, but then I found a solution.
Uninstalling via Powershell:
We are going to use a Powershell command to manually uninstall Chrome and help the installer recognize that there is no existing version of Chrome on your computer. This will work even if you have entirely deleted Chrome and there doesn’t seem to be any trace of the browser left.
Before we start the steps below, we need two things: Chrome’s setup.exe file and along with its file path.
First check if you already have the file on your computer. You need to look in the Program Files folder where you would have originally installed Chrome. This is usually the following path:
C:\Program Files (x86)\Google\Chrome\Application\[yourversion]\Installer\
You are looking for “setup.exe” in that folder.
If it is not there, you can download it from this Github repository we have created. The .exe is unmodified from the file that is included in a Chrome installation and this can be verified by checking that the original digital signature from Google is still valid.
Now that you have Chrome’s setup.exe file, move it to your Desktop. This is just to make the following instructions as simple as possible.
- Click the Windows Start button and type “Powershell” into the search bar and select “Windows PowerShell.”
- We are going to give Powershell the following command.Replace YourUserName in the path below with your Windows account name:C:\Users\YourUserName\Desktop\setup.exe –uninstall –multi-install –chrome –system-level
Note: Powershell won’t accept spaces in a path. If any of the folders in your path contain a space you must put that section of the path in quotation marks. Example: C:\Users\”John Smith”\Desktop
- Copy the command and right-click with your mouse to paste into Powershell (note that Ctrl+V does not work in Powershell).

- Hit enter to execute the command in Powershell. This will open a prompt from Windows to run the setup.exe file. Click yes.
- You can now run the Google Chrome installer you got from Google’s website.Congratulations, you have successfully installed Google Chrome! You are done!


5 Ways to Determine if a Website is Fake, Fraudulent, or a Scam – 2018
in Hashing Out Cyber SecurityHow to Fix ‘ERR_SSL_PROTOCOL_ERROR’ on Google Chrome
in Everything EncryptionRe-Hashed: How to Fix SSL Connection Errors on Android Phones
in Everything EncryptionCloud Security: 5 Serious Emerging Cloud Computing Threats to Avoid
in ssl certificatesThis is what happens when your SSL certificate expires
in Everything EncryptionRe-Hashed: Troubleshoot Firefox’s “Performing TLS Handshake” Message
in Hashing Out Cyber SecurityReport it Right: AMCA got hacked – Not Quest and LabCorp
in Hashing Out Cyber SecurityRe-Hashed: How to clear HSTS settings in Chrome and Firefox
in Everything EncryptionRe-Hashed: The Difference Between SHA-1, SHA-2 and SHA-256 Hash Algorithms
in Everything EncryptionThe Difference Between Root Certificates and Intermediate Certificates
in Everything EncryptionThe difference between Encryption, Hashing and Salting
in Everything EncryptionRe-Hashed: How To Disable Firefox Insecure Password Warnings
in Hashing Out Cyber SecurityCipher Suites: Ciphers, Algorithms and Negotiating Security Settings
in Everything EncryptionThe Ultimate Hacker Movies List for December 2020
in Hashing Out Cyber Security Monthly DigestAnatomy of a Scam: Work from home for Amazon
in Hashing Out Cyber SecurityThe Top 9 Cyber Security Threats That Will Ruin Your Day
in Hashing Out Cyber SecurityHow strong is 256-bit Encryption?
in Everything EncryptionRe-Hashed: How to Trust Manually Installed Root Certificates in iOS 10.3
in Everything EncryptionHow to View SSL Certificate Details in Chrome 56
in Industry LowdownA Call To Let’s Encrypt: Stop Issuing “PayPal” Certificates
in Industry Lowdown