


 (2 votes, average: 5.00 out of 5)
How to Report a Phishing Email in Apple Mail, Gmail, and Microsoft Outlook
This guide will walk you through the process of reporting a phishing email (with screenshots) in the three most popular email clients
Phishing threats plague businesses and consumers globally. Verizon reported in its 2024 Data Breach Investigations Report (DBIR) that 73% of cybersecurity incidents involving social engineering began with phishing (31%) and pretexting (42%). But do you or your employees know how to report these threats?
Our goal here isn’t to tell you how to identify a phishing email or to share a wealth of phishing statistics. We’ve done all of that in previous articles. We’re here to demonstrate how to report a phishing email using the desktop, mobile, and web versions of three popular email clients (Outlook, Gmail, and Apple Mail).
Let’s hash it out.
How to Report a Phishing Email Varies Based on Your Company
Knowing how to report a scam email is important for everyone, and there are multiple ways to do it. You can report phishing and other scam emails internally (to your IT admin), to your email service provider, and externally to law enforcement.
Your organization likely has specific internal policies or processes for reporting a phishing message. If it doesn’t, then your IT admin should provide clear guidelines about what your employees or other network users should do when they receive a suspicious email (as well as other forms of communication).
Another important way to report emails is to report them directly to your email service provider. Of course, different companies may use different email platforms or even customized versions of those environments. So, the way to go about this may be a bit different depending on your situation.
However, if your organization uses the standard versions of the following email clients, then learning how to report a phishing email is a pretty straightforward process. Let’s explore the traditional versions of the three leading email clients’ platforms as well as their web or mobile app options.
Platform #1: How to Report a Phishing Email in Microsoft Outlook
When it comes to reporting suspicious and malicious emails in Microsoft 365 Outlook, you’ve gotta hand it to Microsoft: they make it easy. Reporting a phishing message in Outlook is a straightforward process that’s hard to screw up. They give you the ability to report Junk and Phishing messages separately.
Microsoft 365 Outlook
But what if you want to report something specifically as a phishing email to Microsoft? You can choose to report a phishing email either from your main inbox or in the email itself using the tools in the top navigation bar ribbons.
For example, to report a phishing email when in an email:
- Click on the Message tab at the top of the email.
- Navigate to the Report Message option in the Protection ribbon.
- Select Phishing from the reporting options listed:
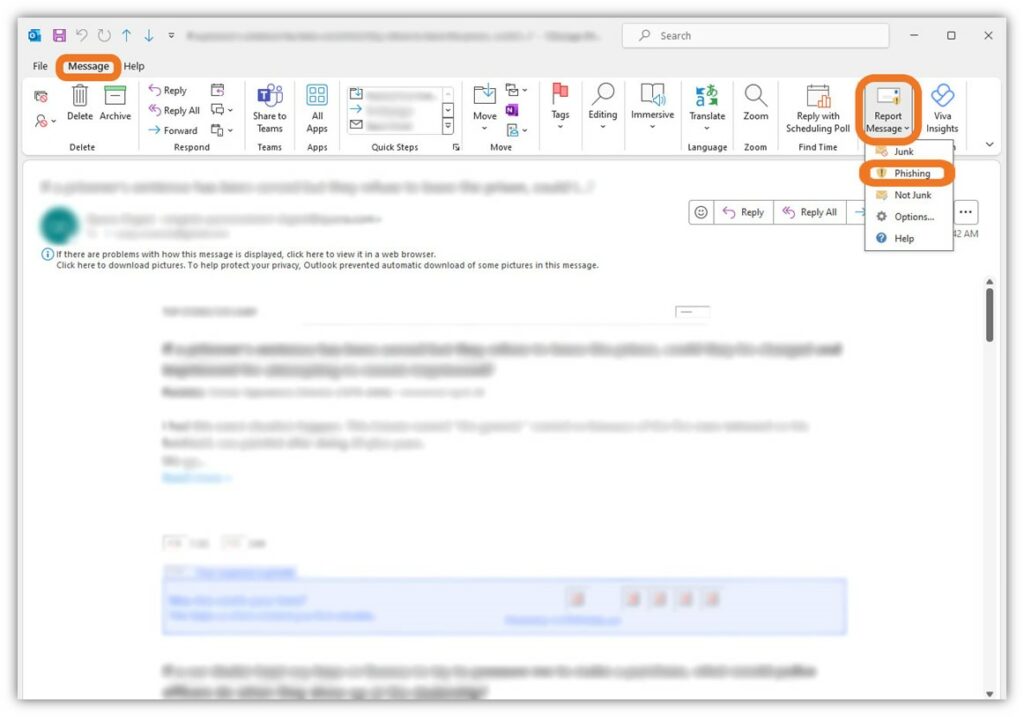
- Next, confirm that you want to report the email as a phishing message by clicking the Report button.

That’s it! This process reports the message as a phish not only to Microsoft but to your IT admin as well through the Microsoft 365 environment. This way, they can review the message and take additional steps as needed.
What If You Don’t See the Report Phishing Option?
If you’re not seeing the Report Message > Phishing option in your top Outlook Ribbon toolbar, don’t worry — we’ll help you add it manually. You can do this by customizing your Outlook Ribbon.
To add the button to your Ribbon:
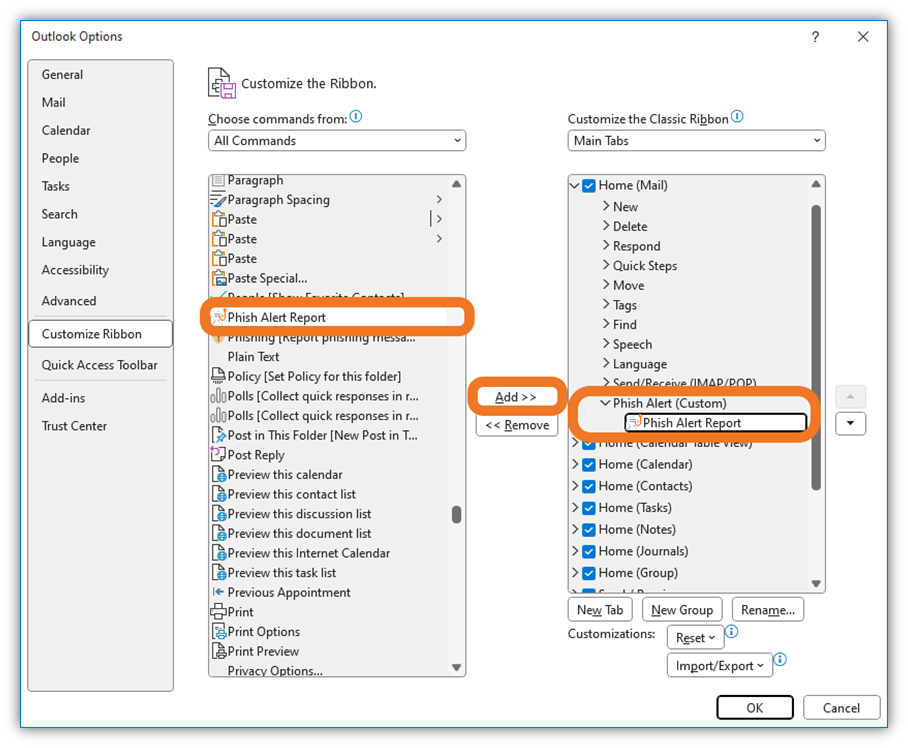
- Right-click in an open area on the right side of your Ribbon bar and select Customize the Ribbon in the pop-up menu. This will bring up the Outlook Options window.

- In the right column of the new window, titled “Customize the Classic Ribbon” (pictured below), select Home and then the New Group button at the bottom. This will create a new group in the list labeled New Group (Custom).

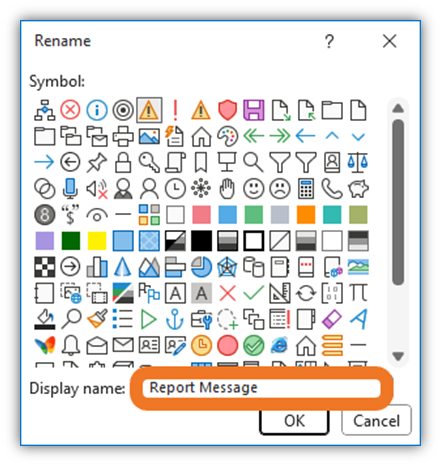
- To rename this group, select the Rename button located to the right of the New Group button. Here, you can add your display name (“Report Message”) and select an icon that will display in your ribbon bar.
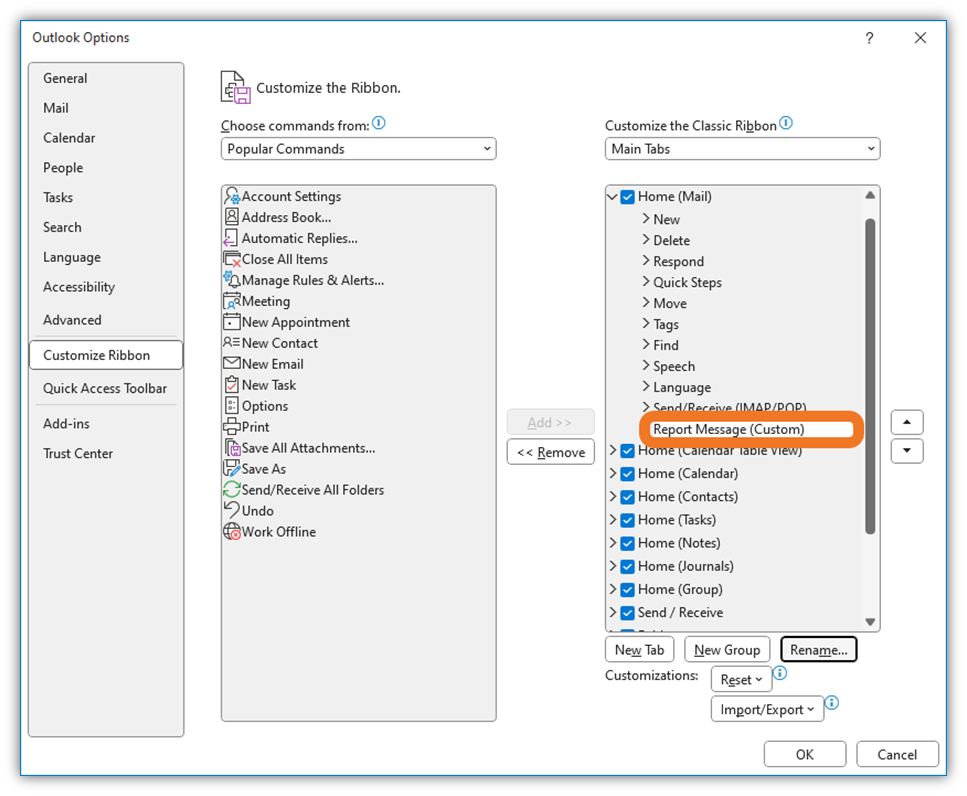
- Hit OK to return to the main Outlook Options window. You should see the new group listed in the right column (as shown below).
- Now, it’s time to add your phishing reporting tool. In the left-hand column labeled “Choose Commands From,” select the drop-down arrow next to the option Popular Commands and choose All Commands.
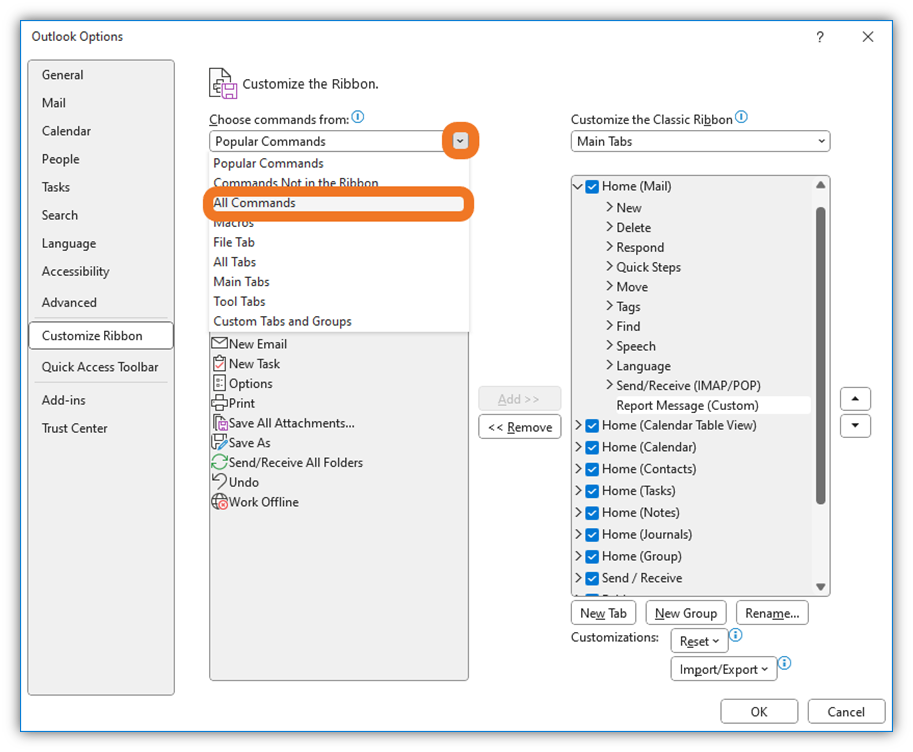
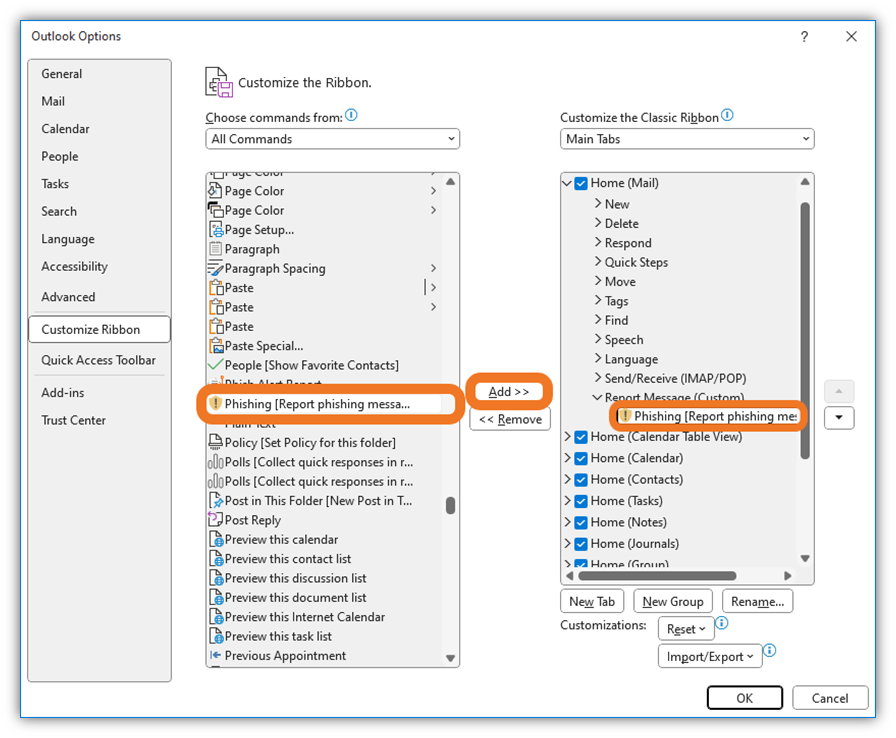
- In this long list of options, scroll down to find Phishing [Report phishing message]. Select Add >> from the buttons listed between the two columns.(NOTE: You can also add other options like Junk and Not Junk to this menu following the same steps.) Now, you should see the Phishing [Report phishing message] tool displayed in the right column under Home (Mail) > Report Message.
- Hit OK to accept the changes and close out of the Outlook Options window to return to your main Outlook screen.
What If You Want to Add KnowBe4’s Phish Alert Button?
Another option is to use the Phish Alert Report button. KnowBe4 offers this free tool that your organization can integrate with several Outlook products. Once deployed, you can customize your Outlook Ribbon to add the feature.
To add the button to your Ribbon, we’re going to follow virtually the same steps as the ones we walked through moments ago:
- Right-click in an open area of your Ribbon bar and select Customize the Ribbon. This will bring up the Outlook Options window.
- In the right column of the Outlook Options window, select Home (Mail) and add a New Group labeled “Phish Alert.” (Remember, you’ll have to select the Rename button to change the default “New Group (Custom)” group name.
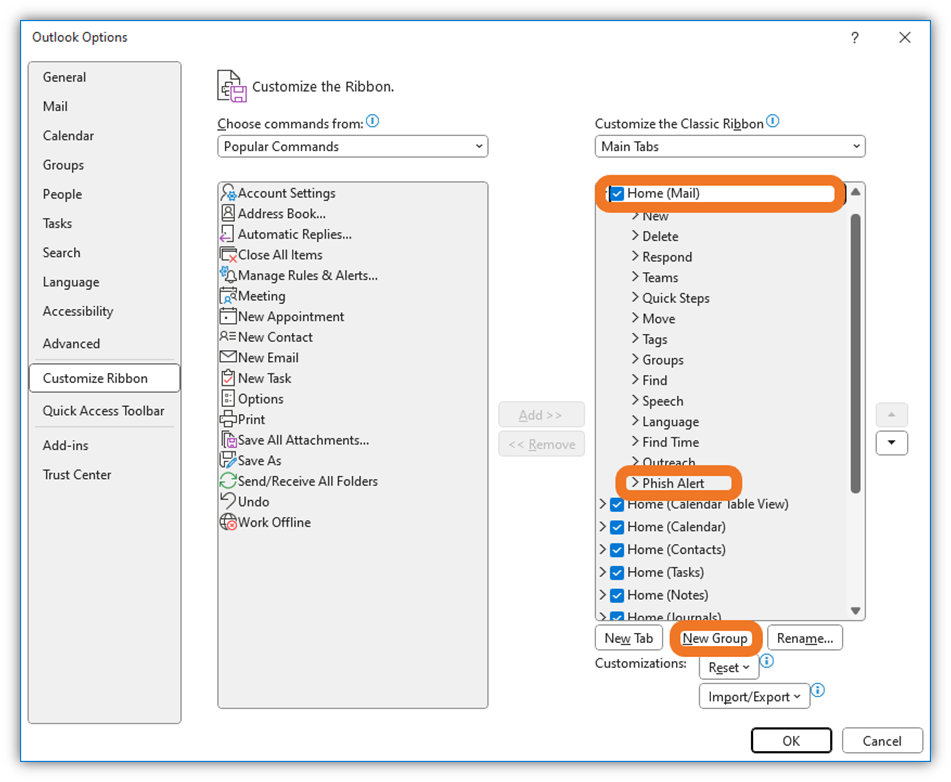
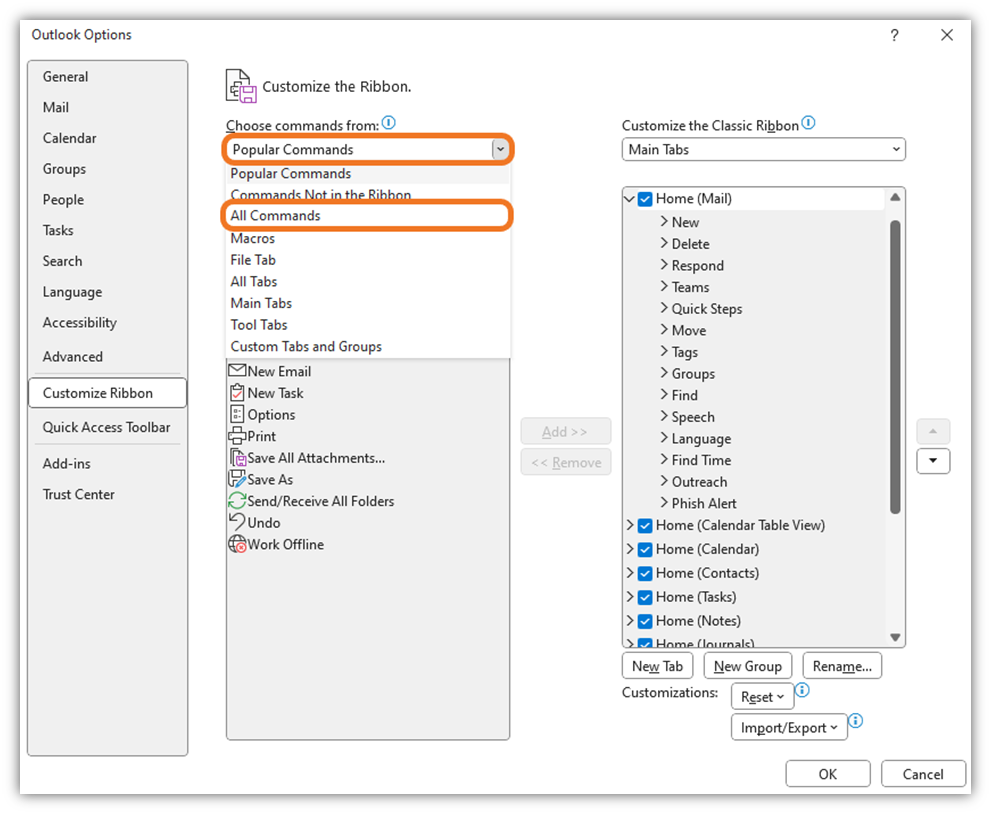
- In the left column, click on the drop-down menu (pre-selected as “Popular Commands”) in the Customize Ribbon section and select All Commands. Scroll down until you find the Phish Alert Report option.
- Once you’ve found it, select it and press the Add >> option between the columns. Once finished, hit OK in the window’s bottom-right corner to save your changes.
That’s it! You’re all set as far as Outlook’s different phishing reporting options are concerned.
Outlook Webmail
Now, it’s time to switch gears and explore how to report a phishing email using Microsoft 365 Outlook Webmail. For this example, we’ll use Firefox to walk you through the process.
If you want to report a phishing email from your inbox without opening the message:
- Right-click on the message you wish to report to bring up a menu.
- Select Report from the list of menu options and click Report Phishing.
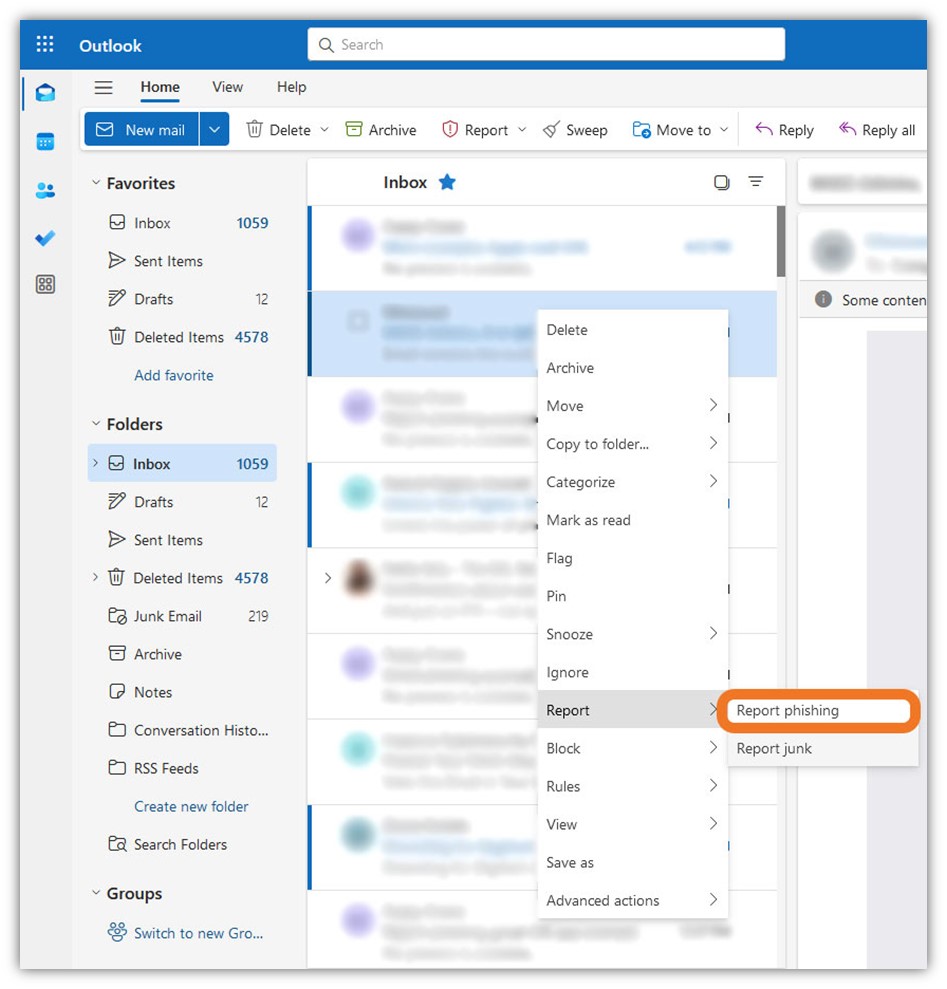
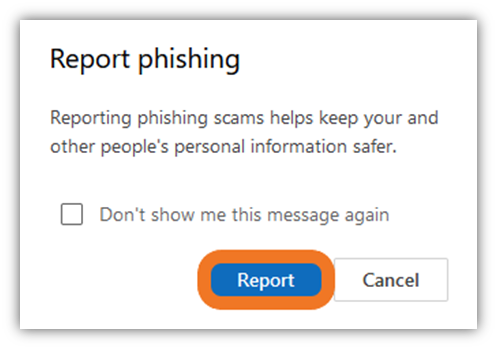
- Once you’ve done this, you’ll see a confirmation request screen. To proceed, select Report.
That’s it!
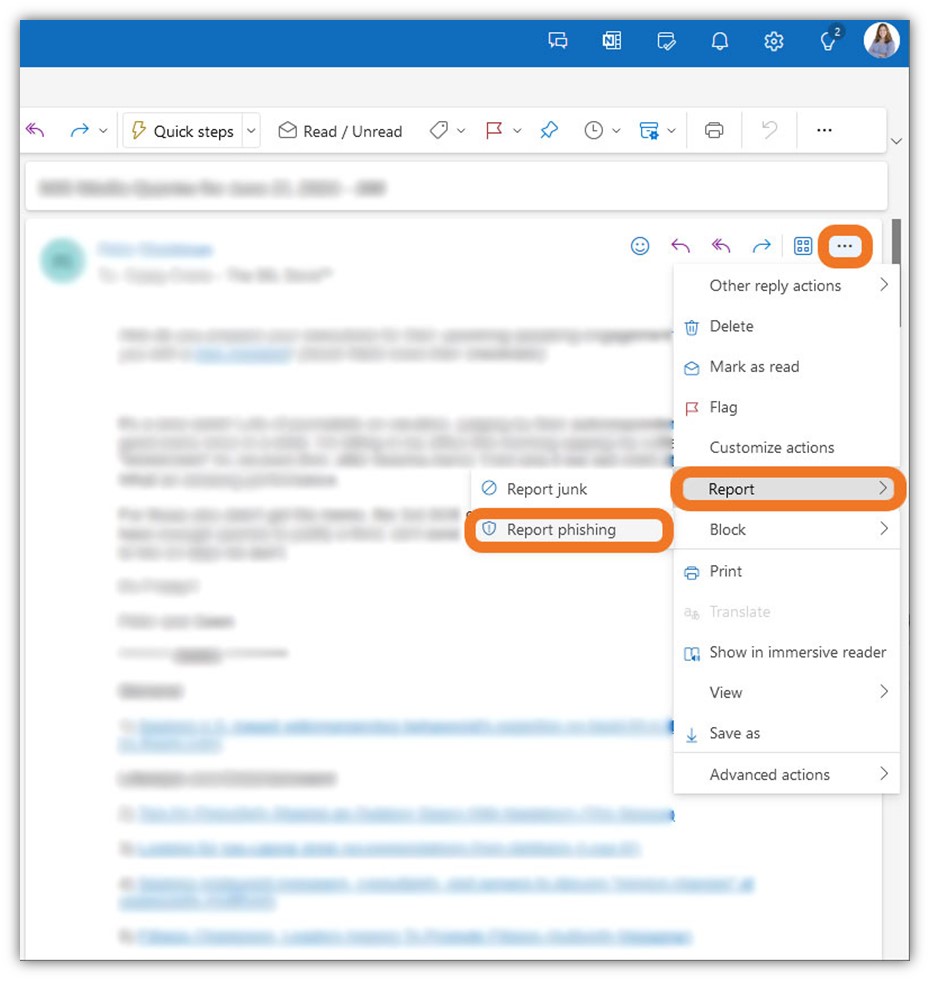
But what if you’ve already opened a suspected phishing message and want to report it? The menu steps are a little different when you’re in the email:
- Click on the ellipses (…) in the top-right corner of the email.
- Select Report from the drop-down menu.
- Press Report Phishing.
Platform #2: How to Report a Phishing Email in Gmail
Gmail (Browser)
Reporting a phishing email in Gmail using a web browser is a quick and painless process. For this example, we’ll use Google Chrome. Once you’ve opened a suspected phishing message:
- Click the three vertical dots located next to the “Reply” arrow. This allows you to access the drop-down menu.
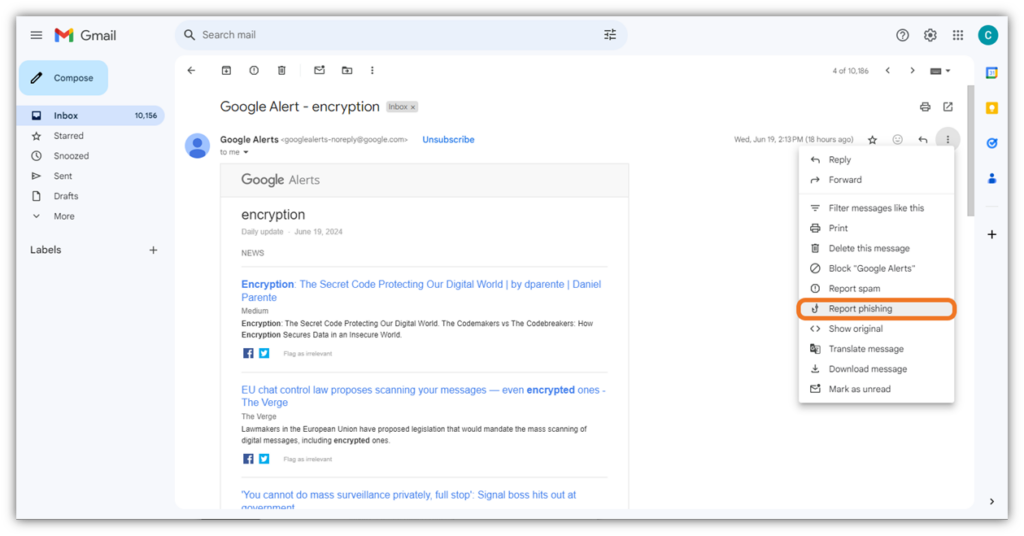
- Select Report Phishing from the menu, as highlighted in the screenshot above.
- Click Report Phishing Message to continue with the reporting process.
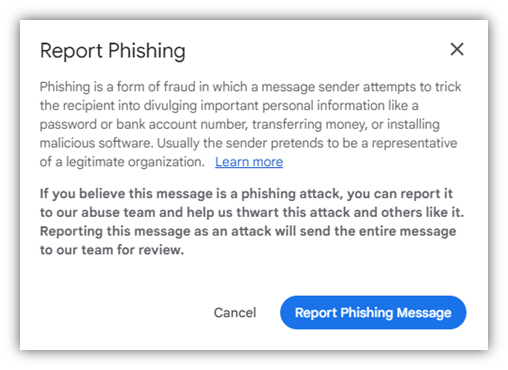
That’s it! Easy as pie. This process will automatically send the phishing message to Google’s abuse team for review.
Gmail Mobile App (iOS)
This process is a bit different, as there isn’t specifically an option listed to report “phishing” in particular. Rather, you have the ability to report junk mail instead. This differs from the in-browser email client reporting method we just described, which offers separate options to Report Spam or Report Phishing.
I’m using an iPhone for this example. So, depending on which mobile device you’re using, things may look a little different.
To report the email as spam in Gmail’s iOS app:
- Click the ellipses (three dots) located next to the mail icon. This allows you to access the drop-down menu.
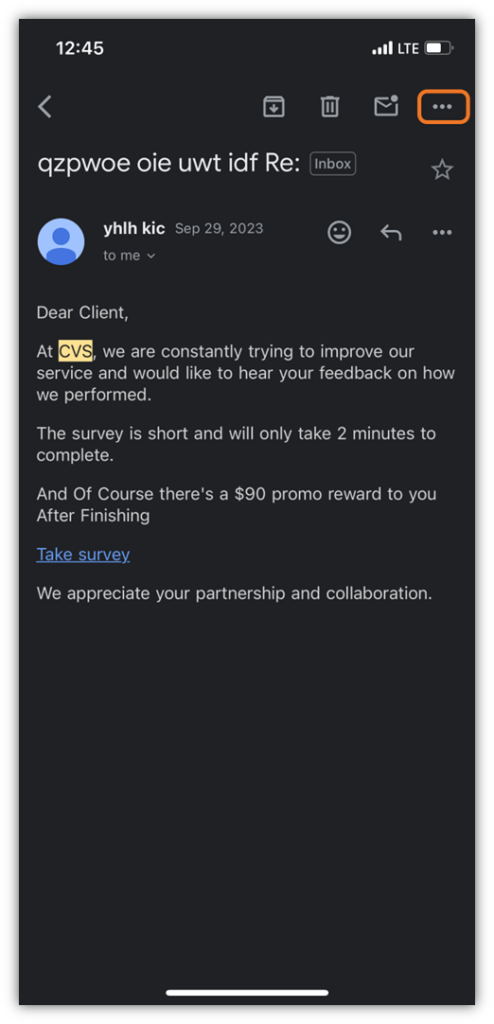
- Select Report Spam from the drop-down menu. The action of reporting the message will bring up a confirmation window.
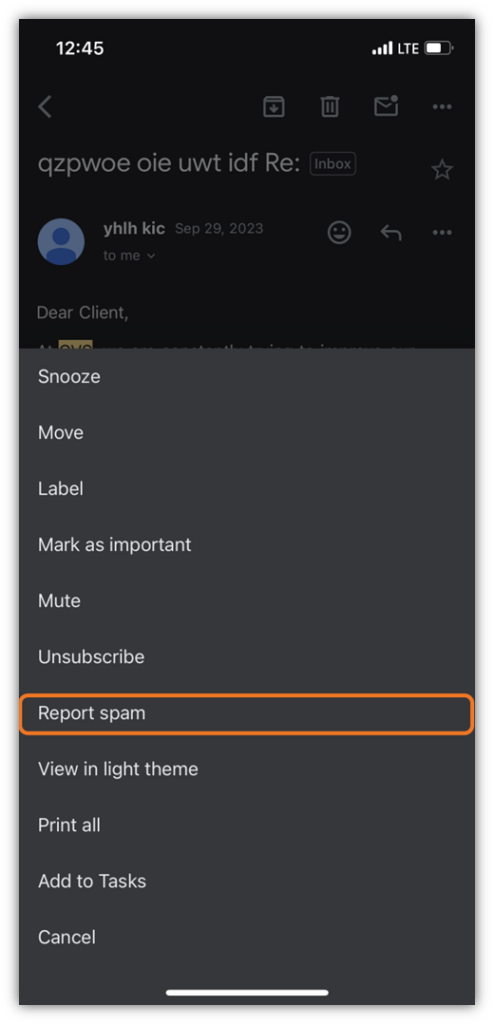
- In the confirmation screen, select Yes, block to proceed with blocking the sender.
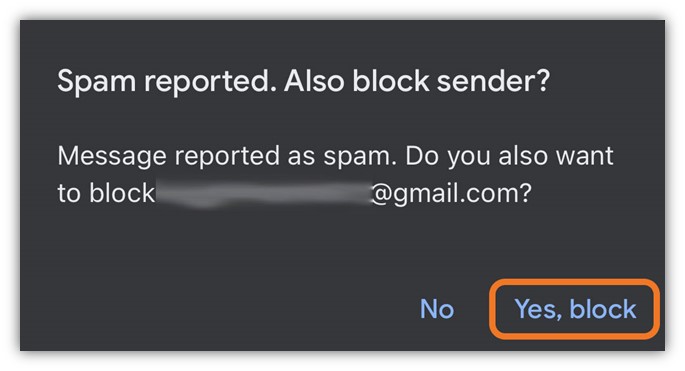
That’s it! You’ve successfully reported the message as spam and blocked the sender from inundating you with unwelcome messages using that same account.
Platform #3: How to Report a Phishing Email in Apple Mail
Last but not least, let’s run through how to report a phishing email in Apple Mail. We’ll start with the approach of reporting messages using your desktop software before doing this from the perspective of an iPhone user.
Apple Mail
Much like the Gmail mobile app, there isn’t a menu option to report a “phishing” email specifically. Rather, you instead must report a message as “Junk” instead.
I know, I know, it’s a bit misleading to say we’re showing you how to report a phishing message… but in this case, we can only work with the options that we’re given. So, the closest thing you’ll get is the “junk” option.
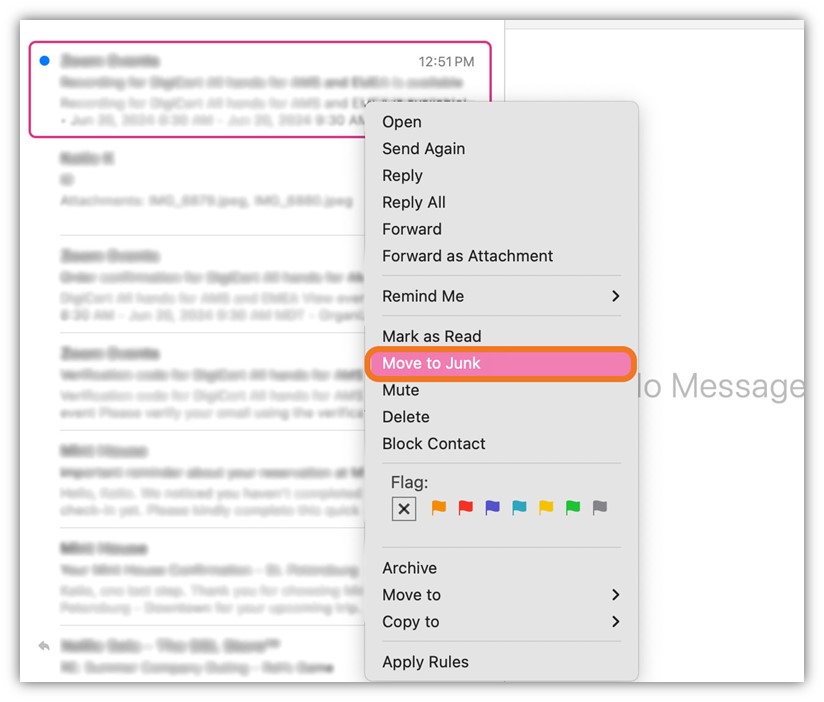
Once in your inbox,
- Right-click on the email that you wish to report. This will generate a menu.
- Select Move to Junk from the list of options. This will move the message to your Junk folder automatically.
However, it’s important to note that simply junking the message won’t block the email sender from sending you more messages. Instead, you must also manually block the sender, too. You can do this by right-clicking on the message in your Junk folder and selecting Block Contact.
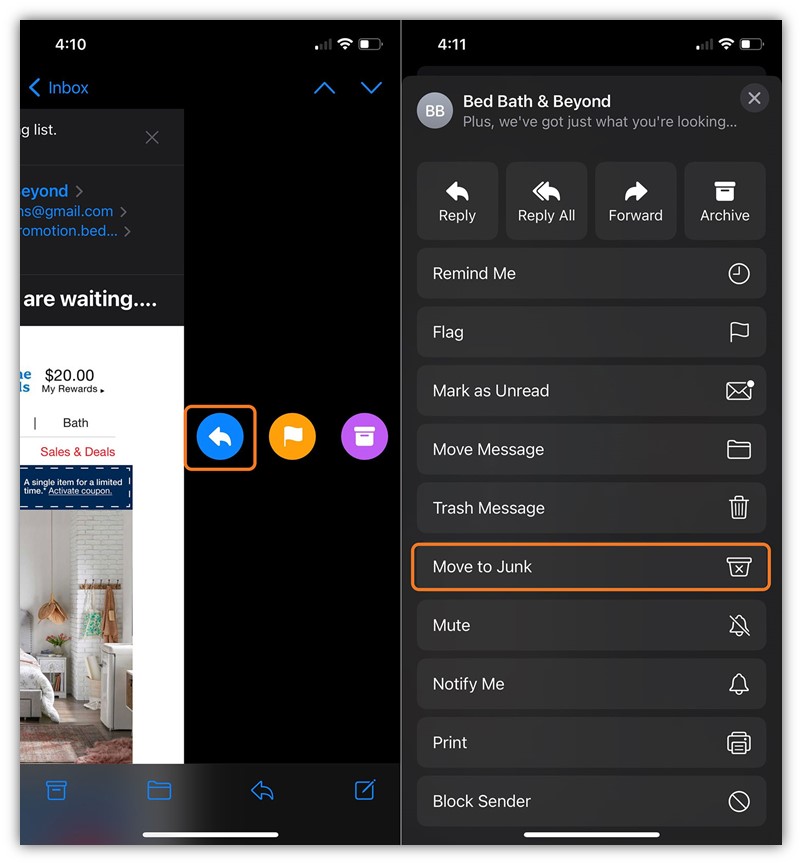
Apple Mail iOS App
Much like its desktop counterpart, Apple’s Mail app on iPhones also doesn’t allow you to report “phishing” specifically. You must report it as “Junk” again instead.
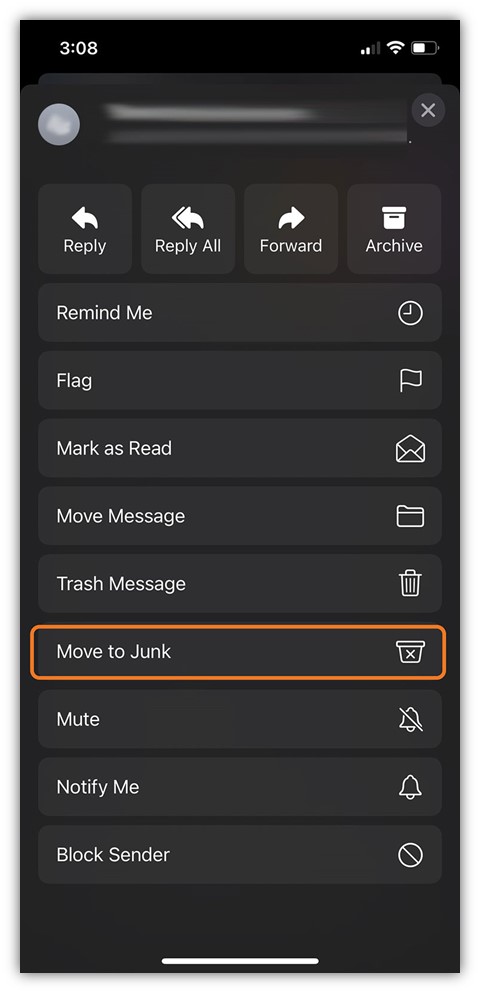
To send an email to your junk folder from your iPhone’s inbox:
- Swipe left on the message you wish to delete.
- Select the More (…) option, as shown below:
- Next, select the Move to Junk option. This will move the email to that folder automatically.
NOTE: Just like with the Apple desktop software, sending the message to your junk folder won’t block the email sender from sending you more messages. You’ll still need to take the extra step by going to your Junk mail folder and manually selecting the option to block the sender.
Here’s a video that quickly walks you through the process of blocking an email sender:
Otherwise, if you’re already in an email, simply swipe left again in the message and select the arrow button. Here, you’ll be able to select the Move to Junk option from the menu, as shown in the two-part screenshot below:
3 Methods to Prevent Your Emails From Being Mistaken as Phish
While you can’t prevent someone from erroneously reporting your message as a phishing email, you can take steps to prevent unauthorized users from spoofing your email address or domain. Ideally, doing this helps prevent bad guys from sending fraudulent messages in your name and your reputation doesn’t take a hit.
Want your customers and other users to easily identify your emails? There are a few key ways to help prevent your emails being reported as phishing messages:
1. Use an Email Signing Certificate
An email signing certificate is a digital certificate that allows you to digitally sign your outbound emails using a cryptographic signature. Furthermore, when sending messages to other certificate users, you can add another layer of security to your communications by encrypting the messages before they leave your mailbox.
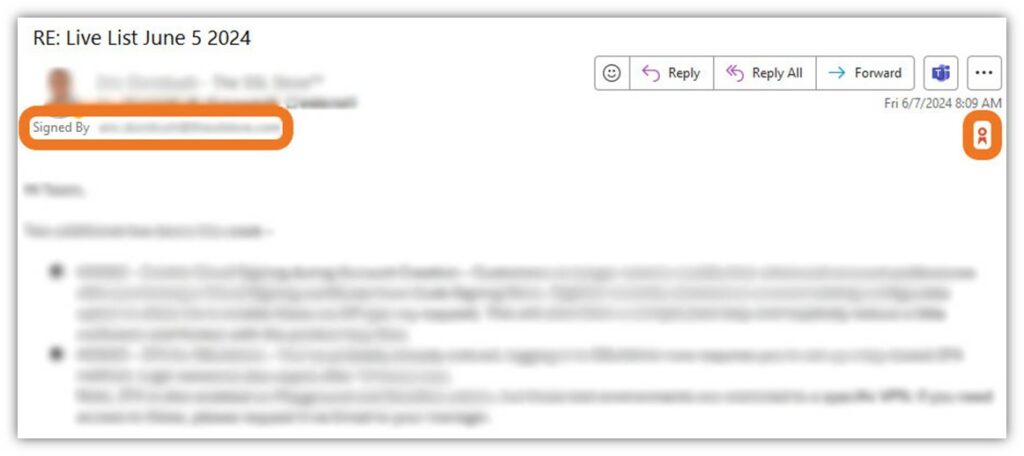
Of course, some S/MIME certificates allow you to do more than just digitally sign and encrypt emails. Some also double as tools for client authentication and document signing!
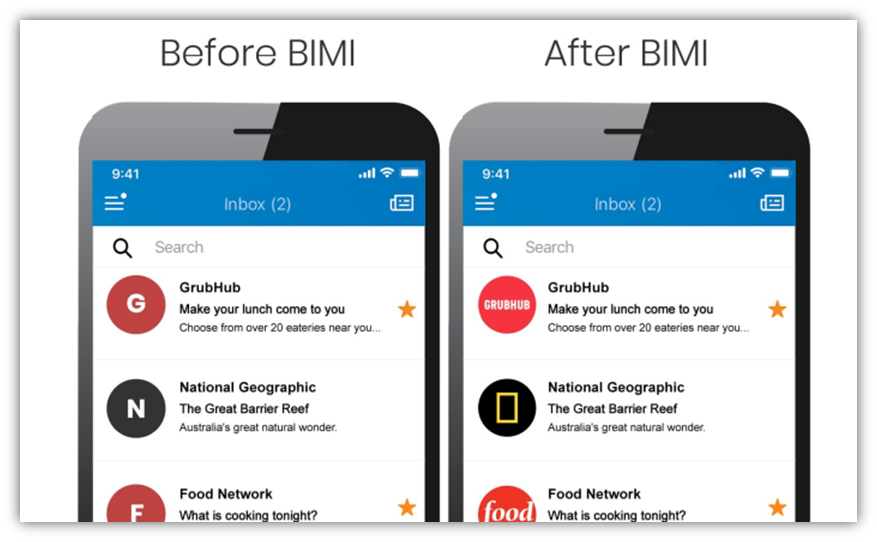
2. Use a Verified Mark Certificate
A verified mark certificate, in combination with brand indicators for message identification (BIMI) is a clever way to identify your emails up front using your verified trademarked brand logo. This powerful combination of tools enables you to display your brand identity in recipients’ inboxes across many mail providers, including Gmail and Yahoo.
3. Implement Email Protocols (SPF, DKIM, and DMARC)
The sender policy framework (SPF) is a great way to keep bad guys from sending spam and phishing emails on behalf of your domain.
Domain keys identified mail (DKIM) is another great authentication protocol. It uses a digital signature that confirms to email recipients’ servers whether an email truly came from your domain.
Domain-based message authentication, reporting, and conformance (DMARC) builds upon SPF and DKIM, using it to provide a clearer picture of the situation so you can respond to it most effectively.
That’s it! We hope you’ve found this article informative and useful. If you have any thoughts or questions, be sure to post them in the comments below.

5 Ways to Determine if a Website is Fake, Fraudulent, or a Scam – 2018
in Hashing Out Cyber SecurityHow to Fix ‘ERR_SSL_PROTOCOL_ERROR’ on Google Chrome
in Everything EncryptionRe-Hashed: How to Fix SSL Connection Errors on Android Phones
in Everything EncryptionCloud Security: 5 Serious Emerging Cloud Computing Threats to Avoid
in ssl certificatesThis is what happens when your SSL certificate expires
in Everything EncryptionRe-Hashed: Troubleshoot Firefox’s “Performing TLS Handshake” Message
in Hashing Out Cyber SecurityReport it Right: AMCA got hacked – Not Quest and LabCorp
in Hashing Out Cyber SecurityRe-Hashed: How to clear HSTS settings in Chrome and Firefox
in Everything EncryptionRe-Hashed: The Difference Between SHA-1, SHA-2 and SHA-256 Hash Algorithms
in Everything EncryptionThe Difference Between Root Certificates and Intermediate Certificates
in Everything EncryptionThe difference between Encryption, Hashing and Salting
in Everything EncryptionRe-Hashed: How To Disable Firefox Insecure Password Warnings
in Hashing Out Cyber SecurityCipher Suites: Ciphers, Algorithms and Negotiating Security Settings
in Everything EncryptionThe Ultimate Hacker Movies List for December 2020
in Hashing Out Cyber Security Monthly DigestAnatomy of a Scam: Work from home for Amazon
in Hashing Out Cyber SecurityThe Top 9 Cyber Security Threats That Will Ruin Your Day
in Hashing Out Cyber SecurityHow strong is 256-bit Encryption?
in Everything EncryptionRe-Hashed: How to Trust Manually Installed Root Certificates in iOS 10.3
in Everything EncryptionHow to View SSL Certificate Details in Chrome 56
in Industry LowdownA Call To Let’s Encrypt: Stop Issuing “PayPal” Certificates
in Industry Lowdown