


 (No Ratings Yet)
Step-By-Step Guide for Installing an SSL Certificate on Cisco ASA 5510
Cisco’s Adaptive Security Appliance (ASA) was introduced in May 2005. It is an effective combination of the functionalities of Cisco PIX, IPS product lines and VPN 3000.
In this post, we have put together a step-by-step guide for installing an SSL certificate on Cisco ASA 5510, one of the many versions from the Cisco ASA 5500 series. This series of security appliances by Cisco is one of the most popular hardware firewalls in the market.
Learn How To Install an SSL Certificate on Cisco ASA 5510
Step 1
Download the intermediate (the CA.crt) and primary certificate (your_domainname_com.crt). Please save them to a location where you wish to keep all of your certificate files.
Step 2
In ASDM, click on Configuration > Device Management
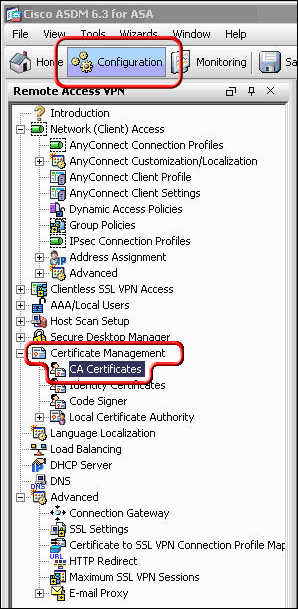
Step 3
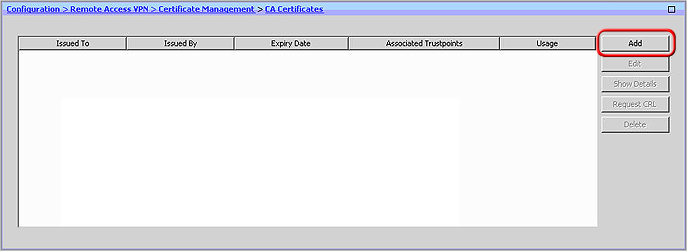
Next, expand the ‘Certification Management’, select ‘CA Certificates’ and click on ‘Add’
Step 4
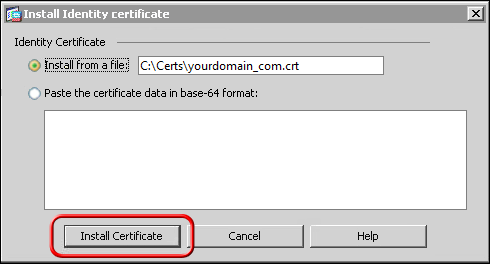
Select the option ‘Install from a file’ and browse to the location where you saved your intermediate certificate (ca.crt). Now, click on the button ‘Install Certificate’, which is at the bottom of the ‘Install Certificate’ window.

With this step your intermediate certificate is now installed.
Step 5
Here you need to repeat step 2. So, once again click on Configuration > Device Management in ASDM.
Step 6
Select ‘Identity Certificates’ after expanding ‘Certificate Management’.
Step 7
Next, choose the appropriate identity certificate from when your Certificate Signing Request (CSR) was created and click on ‘Install’
The ‘Issued by’ field should show as ‘not available’ and the ‘Expiration Date’ should be marked as ‘Pending’
Step 8
Browse to your identity certificate (your_domainname_com.crt) and click on ‘Install Certificate’.
After this step, users will receive a confirmation message that the installation process was successful.
Configure WebVPM with ASDM to use the New SSL Certificate
Step 1
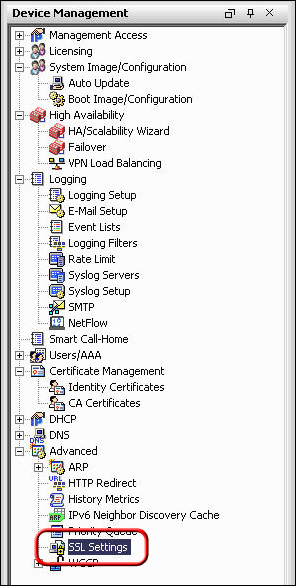
Select Configuration < Device Management> Click on SSL Settings.
Step 2
Next, expand the ‘Certification Management’, select ‘CA Certificates’ and click on ‘Add’
Step 3
Select the option ‘Install from a file’ and browse to the location where you saved your intermediate certificate (ca.crt). Now, click on the button ‘Install Certificate’, which is at the bottom of the ‘Install Certificate’ window. With this step your intermediate certificate is now installed.
Step 4
Here you need to repeat step 2. So, once again click on Configuration > Device Management in ASDM.
Step 5
Select ‘Identity Certificates’ after expanding ‘Certificate Management’.
Step 6
Next, choose the appropriate identity certificate from when your Certificate Signing Request (CSR) was created and click on ‘Install’
The ‘Issued by’ field should show as ‘not available’ and the ‘Expiration Date’ should be marked as ‘Pending’.
Step 7
Browse to your identity certificate (your_domainname_com.crt) and click on ‘Install Certificate’.
After this step, users will receive a confirmation message that the installation process was successful.
How to Configure WebVPM with ASDM to use the New SSL Certificate
Step 1
Select Configuration < Device Management. Step 2
Click on the ‘Advanced’ button and go to ‘SSL Settings’.
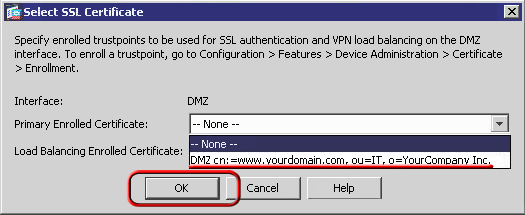
Step 3
Now, from ‘Certificates’, select the interface (used to terminate WebVPN sessions). Now click on ‘Edit’.
From the drop-down menu of ‘Certificates’, choose the newly installed certificate. Click on ‘OK > Apply.
This completes the configuration of your certificate for use with selected kinds of Web VPN sessions.
Steps to Install an SSL Certificate from Cisco ASA Command Line
This is an alternative SSL installation method.
Step 1
Enter the following text from ciscoasa (config)#:crypto ca authenticate my.CA.trustpoint
Here, ‘my.CA.trustpoint’ is the name of the trustpoint, which was created during your certificate request generation.
Step 2
Now, enter the entire body of CA.crt file followed by the word ‘quit’ on a line by itself. The file CA.crt can be opened and edited with a standard text editor.Users need to enter the entire body of that file when prompted.
Step 3
Enter ‘Yes’ when asked to accept the certificate.
Step 4
Next, enter ‘Exit’ when the certificate has been imported successfully.With this step, your intermediate (or chain) certificate is installed. Now you need to install your_domainname_com.crt file.
Step 5
Enter the following line from the ciscoasa (config) #:crypto ca import my.CA.trustpoint certificate
Here, ‘my.CA.trustpoint’ is the name of the trustpoint, which was created during your certificate request generation.
Step 6
Now, enter the entire body of CA.crt file followed by word ‘quit’ on a line by itself. Users can open the your_domainname_com.crt file and edit it with a standard text editor.
Users need to enter the entire body of that file when prompted. You shall soon receive a message that the certificate was imported successfully.
How do I Troubleshoot the Installation Procedure?
Step 1
Please check the status of your newly installed SSL certificate with the help of our SSL Checker tool. However, to access this tool, the website needs to be publicly accessible.
Step 2
Alternately, you can also open the web browser and try visiting your website with secure ‘https’. Experts recommend that users test with both the web browsers, Internet Explorer and Firefox; because Firefox is known to give out a warning if your certificate is not properly installed.
The server may not be listening on port 443 if you receive a browser warning or error message about the website not being available. Or if your website takes a very long time to open and times out eventually, then your firewall may be blocking the traffic on TCP port 443.

5 Ways to Determine if a Website is Fake, Fraudulent, or a Scam – 2018
in Hashing Out Cyber SecurityHow to Fix ‘ERR_SSL_PROTOCOL_ERROR’ on Google Chrome
in Everything EncryptionRe-Hashed: How to Fix SSL Connection Errors on Android Phones
in Everything EncryptionCloud Security: 5 Serious Emerging Cloud Computing Threats to Avoid
in ssl certificatesThis is what happens when your SSL certificate expires
in Everything EncryptionRe-Hashed: Troubleshoot Firefox’s “Performing TLS Handshake” Message
in Hashing Out Cyber SecurityReport it Right: AMCA got hacked – Not Quest and LabCorp
in Hashing Out Cyber SecurityRe-Hashed: How to clear HSTS settings in Chrome and Firefox
in Everything EncryptionRe-Hashed: The Difference Between SHA-1, SHA-2 and SHA-256 Hash Algorithms
in Everything EncryptionThe Difference Between Root Certificates and Intermediate Certificates
in Everything EncryptionThe difference between Encryption, Hashing and Salting
in Everything EncryptionRe-Hashed: How To Disable Firefox Insecure Password Warnings
in Hashing Out Cyber SecurityCipher Suites: Ciphers, Algorithms and Negotiating Security Settings
in Everything EncryptionThe Ultimate Hacker Movies List for December 2020
in Hashing Out Cyber Security Monthly DigestAnatomy of a Scam: Work from home for Amazon
in Hashing Out Cyber SecurityThe Top 9 Cyber Security Threats That Will Ruin Your Day
in Hashing Out Cyber SecurityHow strong is 256-bit Encryption?
in Everything EncryptionRe-Hashed: How to Trust Manually Installed Root Certificates in iOS 10.3
in Everything EncryptionHow to View SSL Certificate Details in Chrome 56
in Industry LowdownA Call To Let’s Encrypt: Stop Issuing “PayPal” Certificates
in Industry Lowdown