


 (No Ratings Yet)
Email Series: Bonus Post – S/MIME Certificates for Apple Users
You may have thought this email series had finished. Psyche!
The first post on this series delved into the importance of signing certificates to establish a trust and validity typically for, but not exclusive to, working or business relationships. Proving that you are who you say you are with the assistance of the bevy of certificate authorities available is a proven method of establishing trust and security through encryption when needed.
RELATED: 1 out of every 101 emails sent is malicious
That original post had a set of instructions. Those instructions assumed a few things including possession of an S/MIME certificate (which, any of our experienced and friendly members at thesslstore.com would be happy to assist you in obtaining), Outlook and a Windows OS (7 or higher).
There has been such a high demand (3, possibly even four requests; high demand is relative, I suppose) for instructions for Mac users that I thought I would follow up with some clean instructions for how to apply an S/MIME certificate to Outlook 2016 on an Apple machine.
And, here they are…
Instructions for Implementing an S/MIME Certificate on Outlook 2016 for Mac
Assumptions:
- OS X version 10.5.8 or later (this includes any macOS version)
- Outlook 2016 for Mac
- Possession of a proper security certificate file (.p12)
*(Need help with last one? Click here and go for a chat)
Execution Steps:
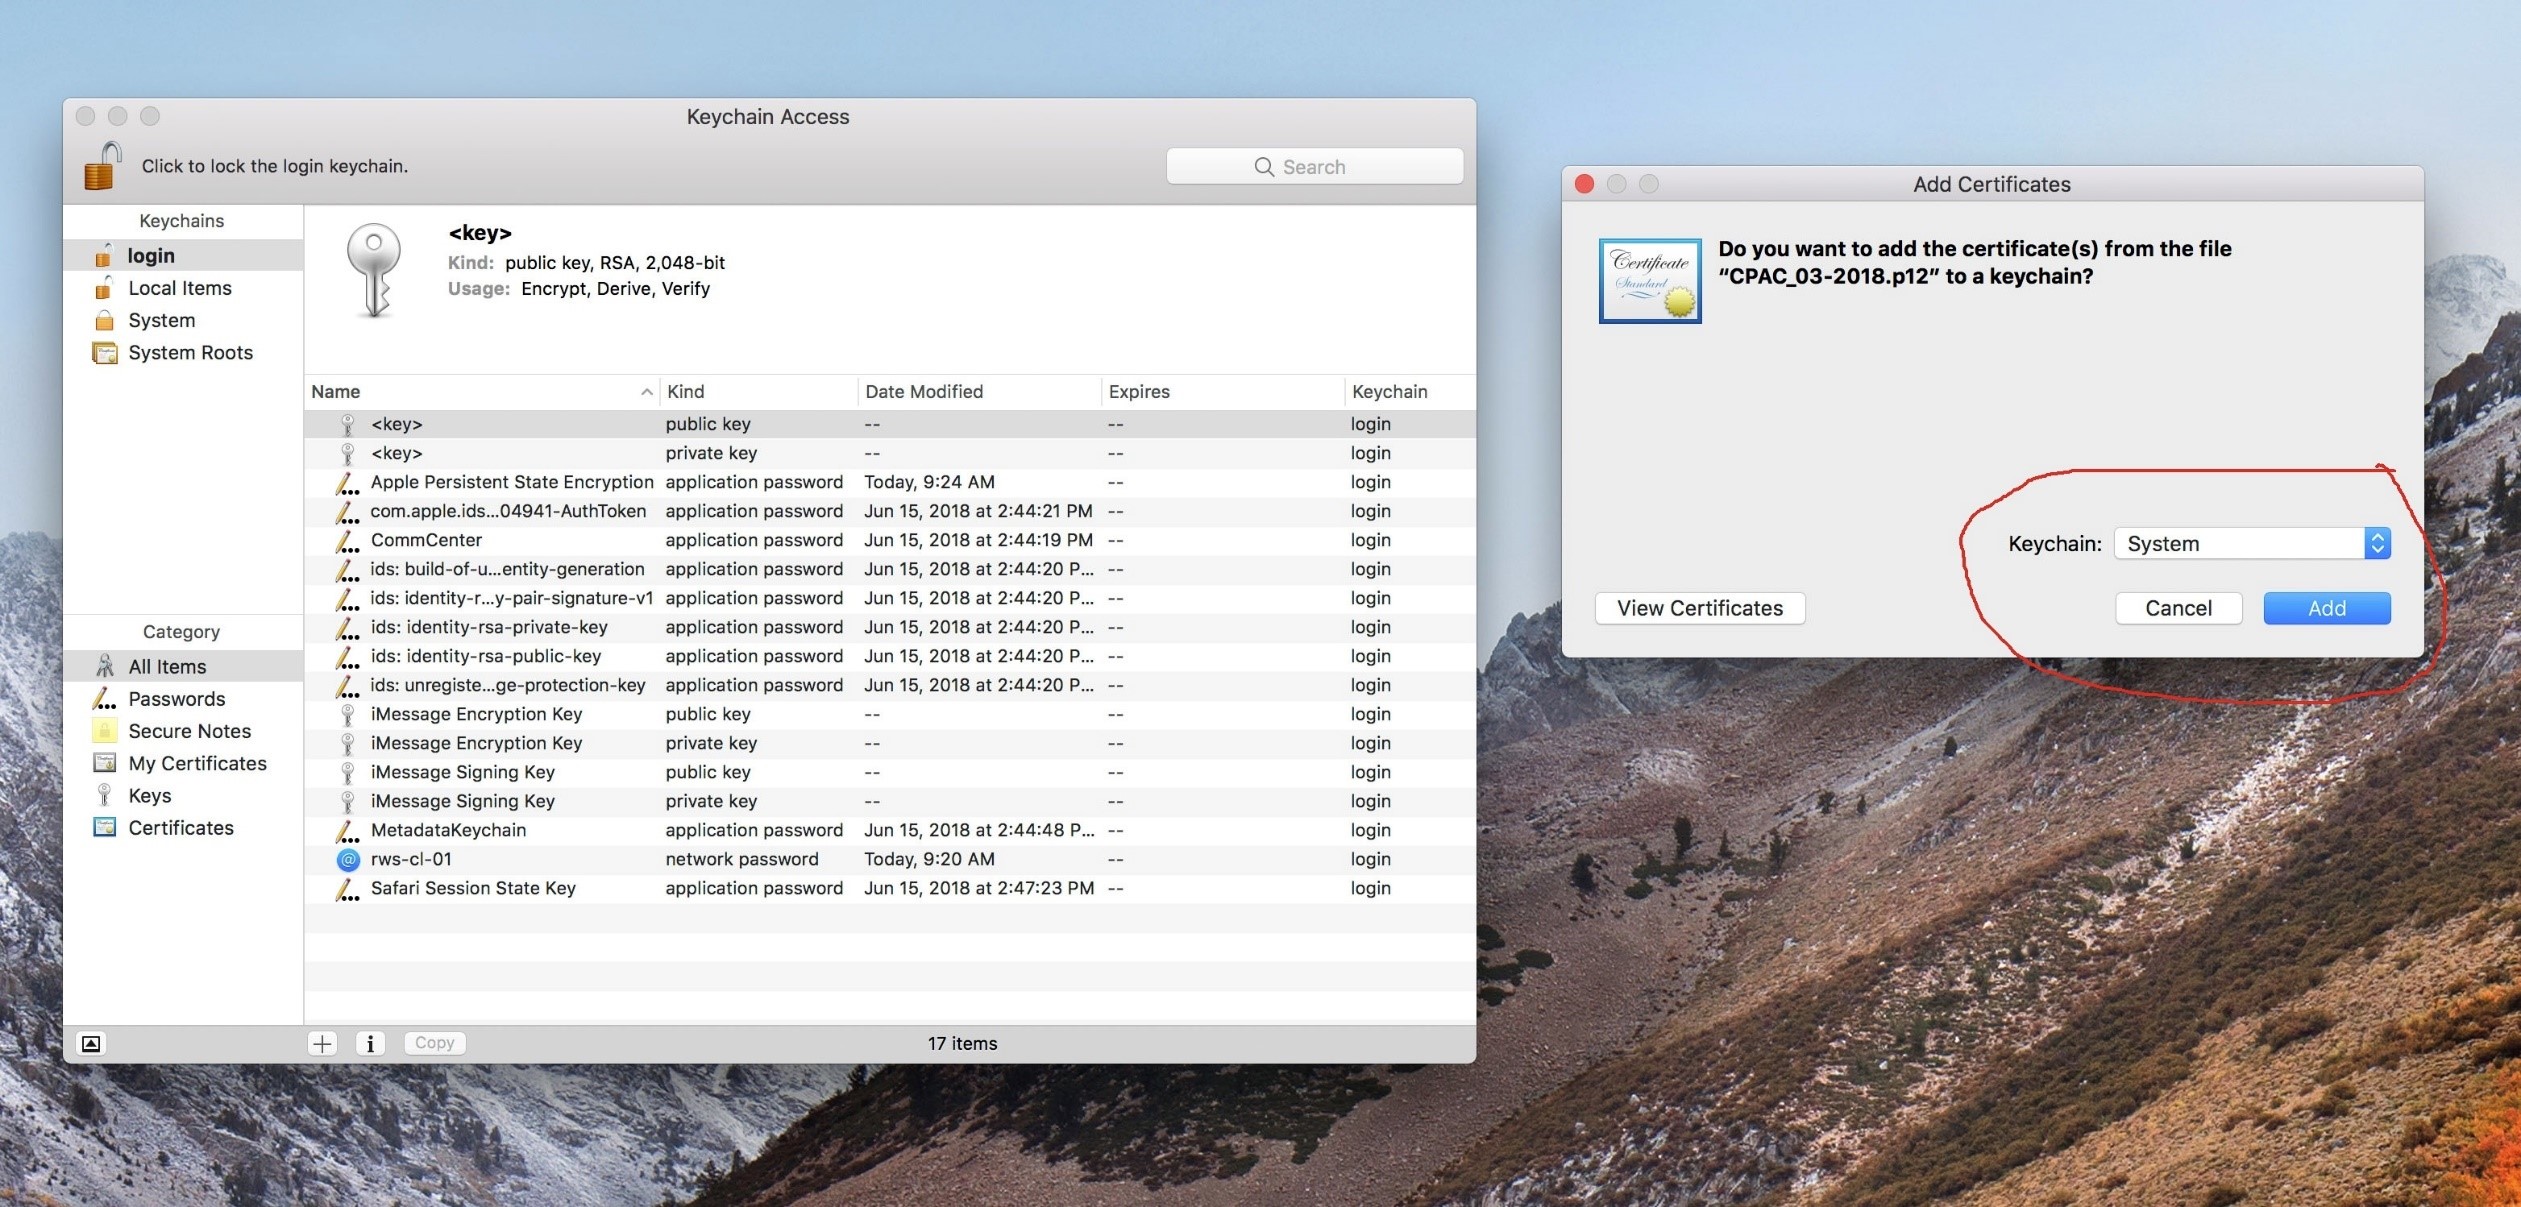
- Double click your .p12 certificate to add to ‘Keychain Access’
- There will be a prompt to ‘Add Certificates’
- Keychain = ‘System’
- Click ‘Add’
Note: You may have to enter admin credentials to add certificates to ‘System’ keychain
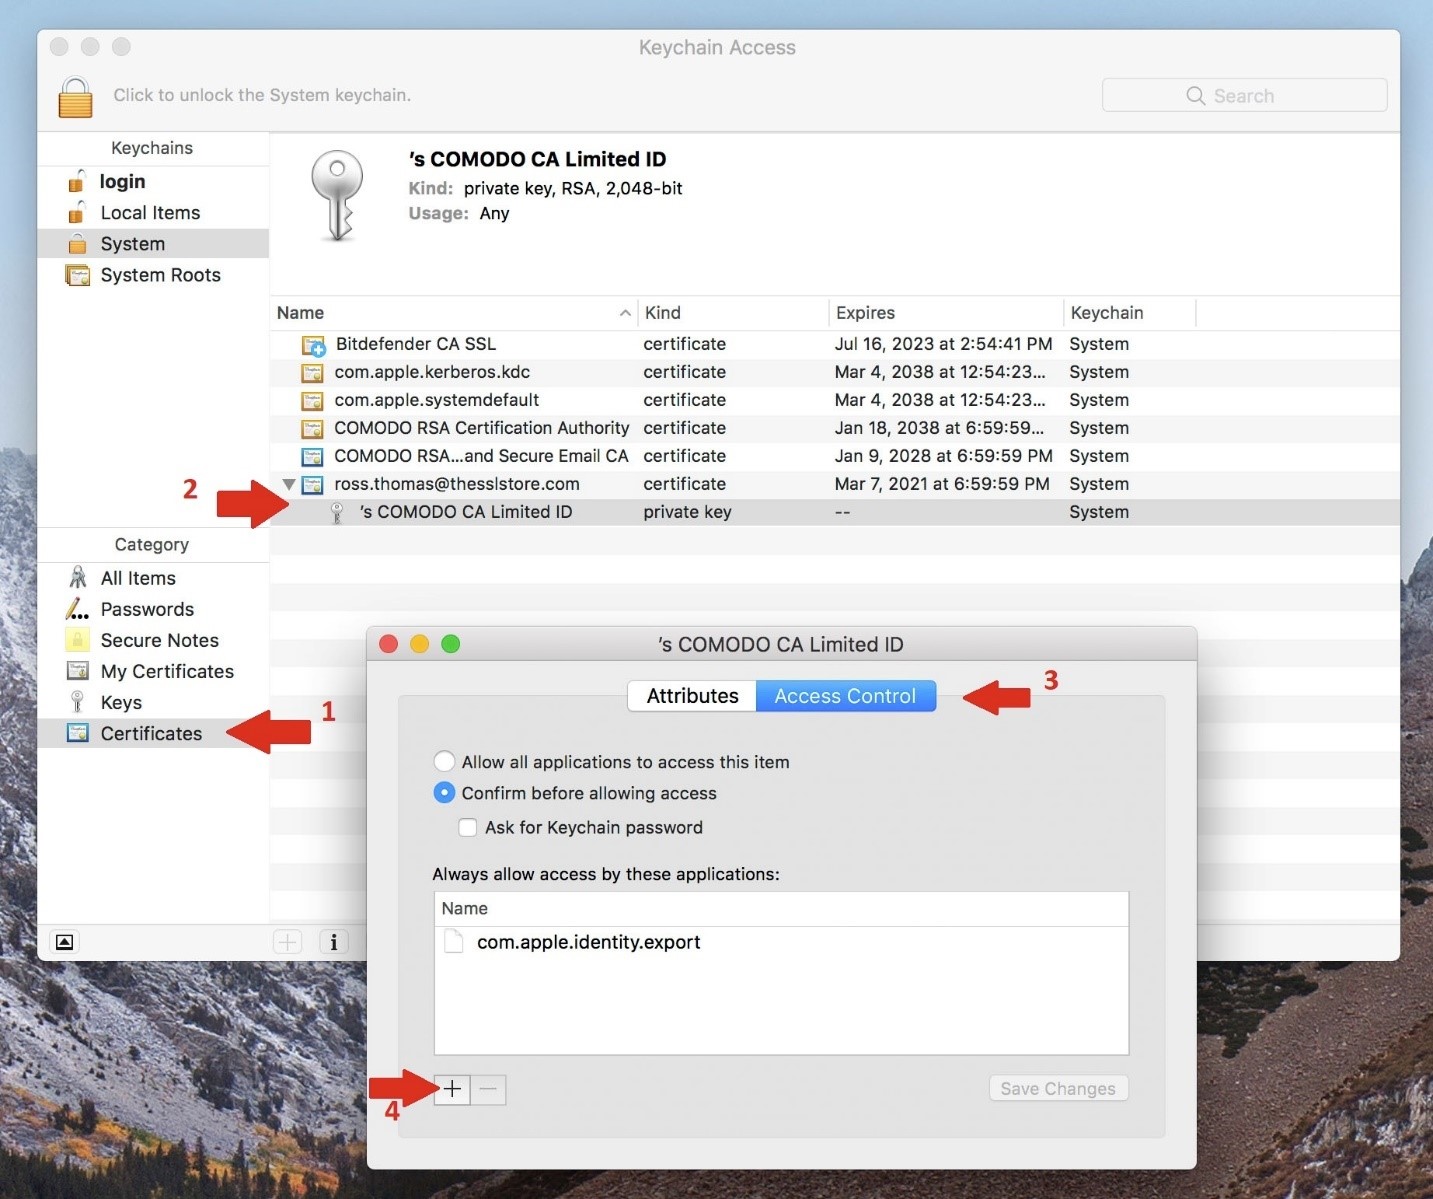
- Under ‘Category’, click on ‘Certificates’ to populate the current certificates in the view pane
- Expand the certificate that was just added, and double click the ‘Private Key’ associated
- Select the ‘Access Control’ tab to show what applications are allows to have access to the key
- Ensure that the radio button is selected for ‘Confirm before allowing access’
Note: Optionally, you can select ‘Ask for keychain password’ for a little further security
- Click the ‘+’ button to add an application
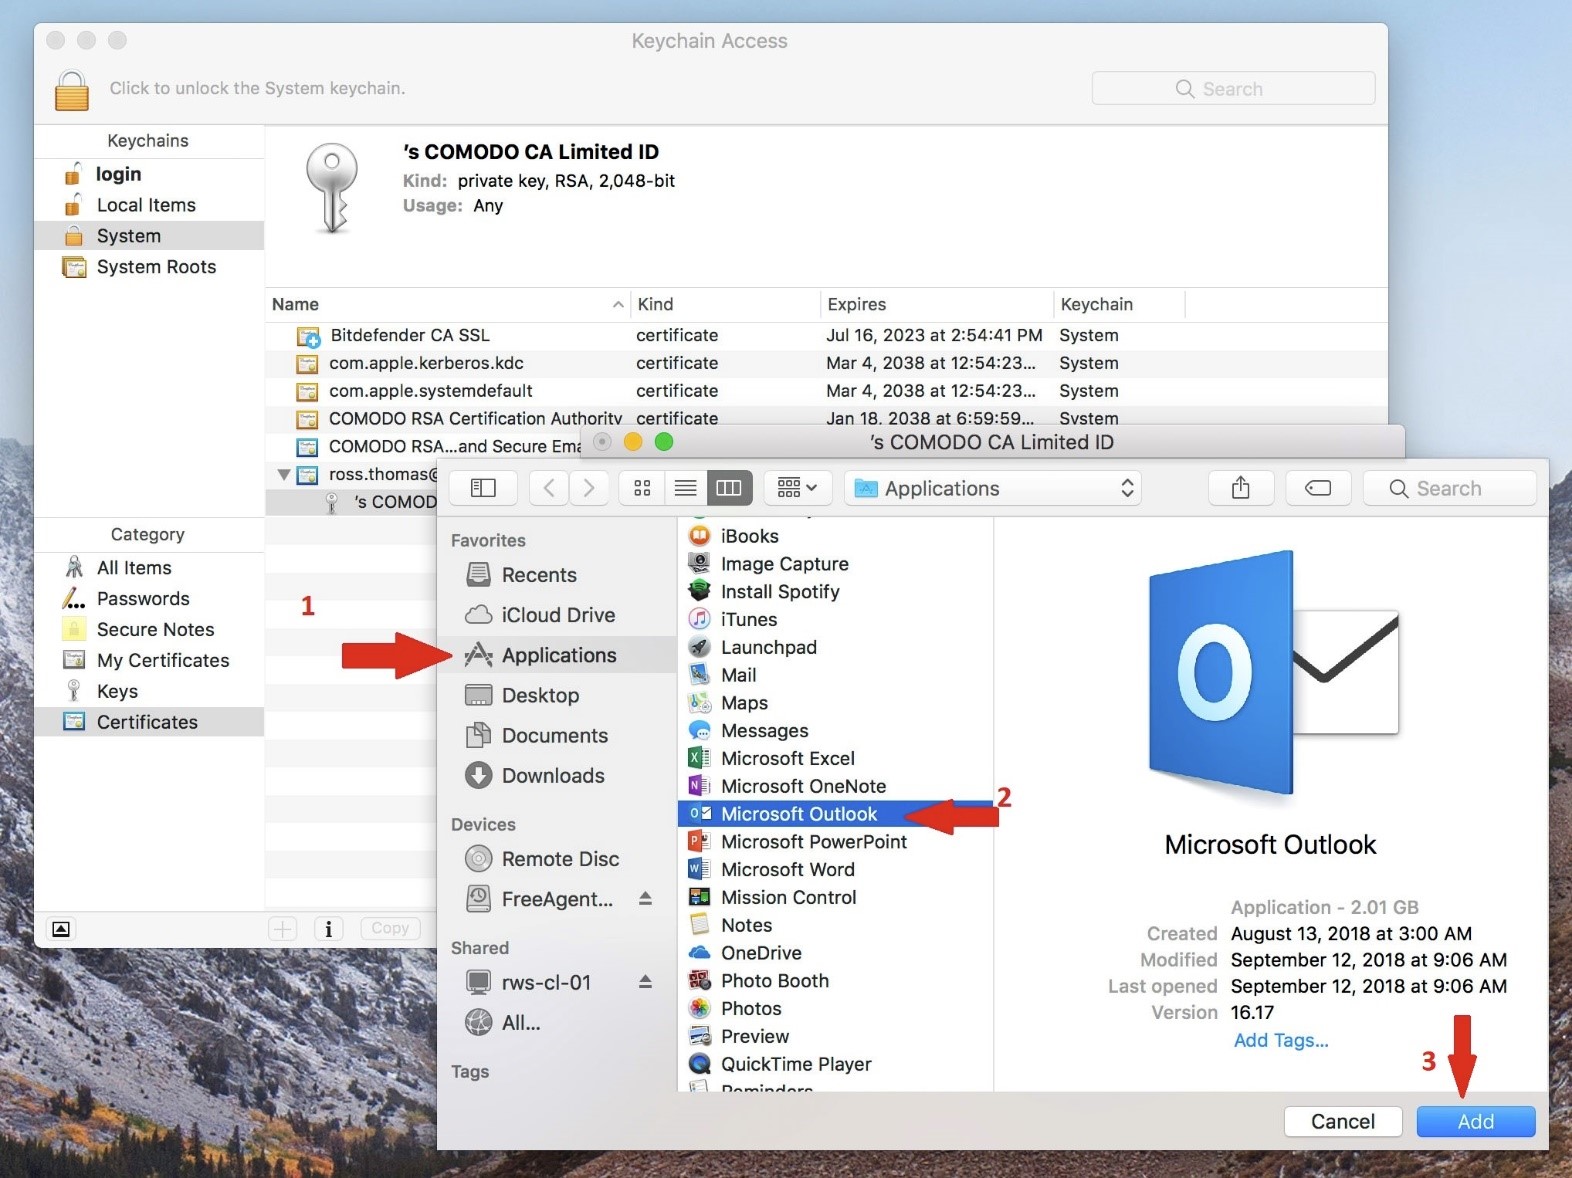
- There will be a prompt to associate the private key to
- Select ‘Applications’ to get a list of the computer’s applications
- Select ‘Microsoft Outlook’ to allow access to the certificate
- Select ‘Add’
- In Outlook, select the ‘Tools’ tab up top
- Click on ‘Accounts’ and make sure the correct account is selected
- Click the ‘Advanced’ button in the lower right of the pane

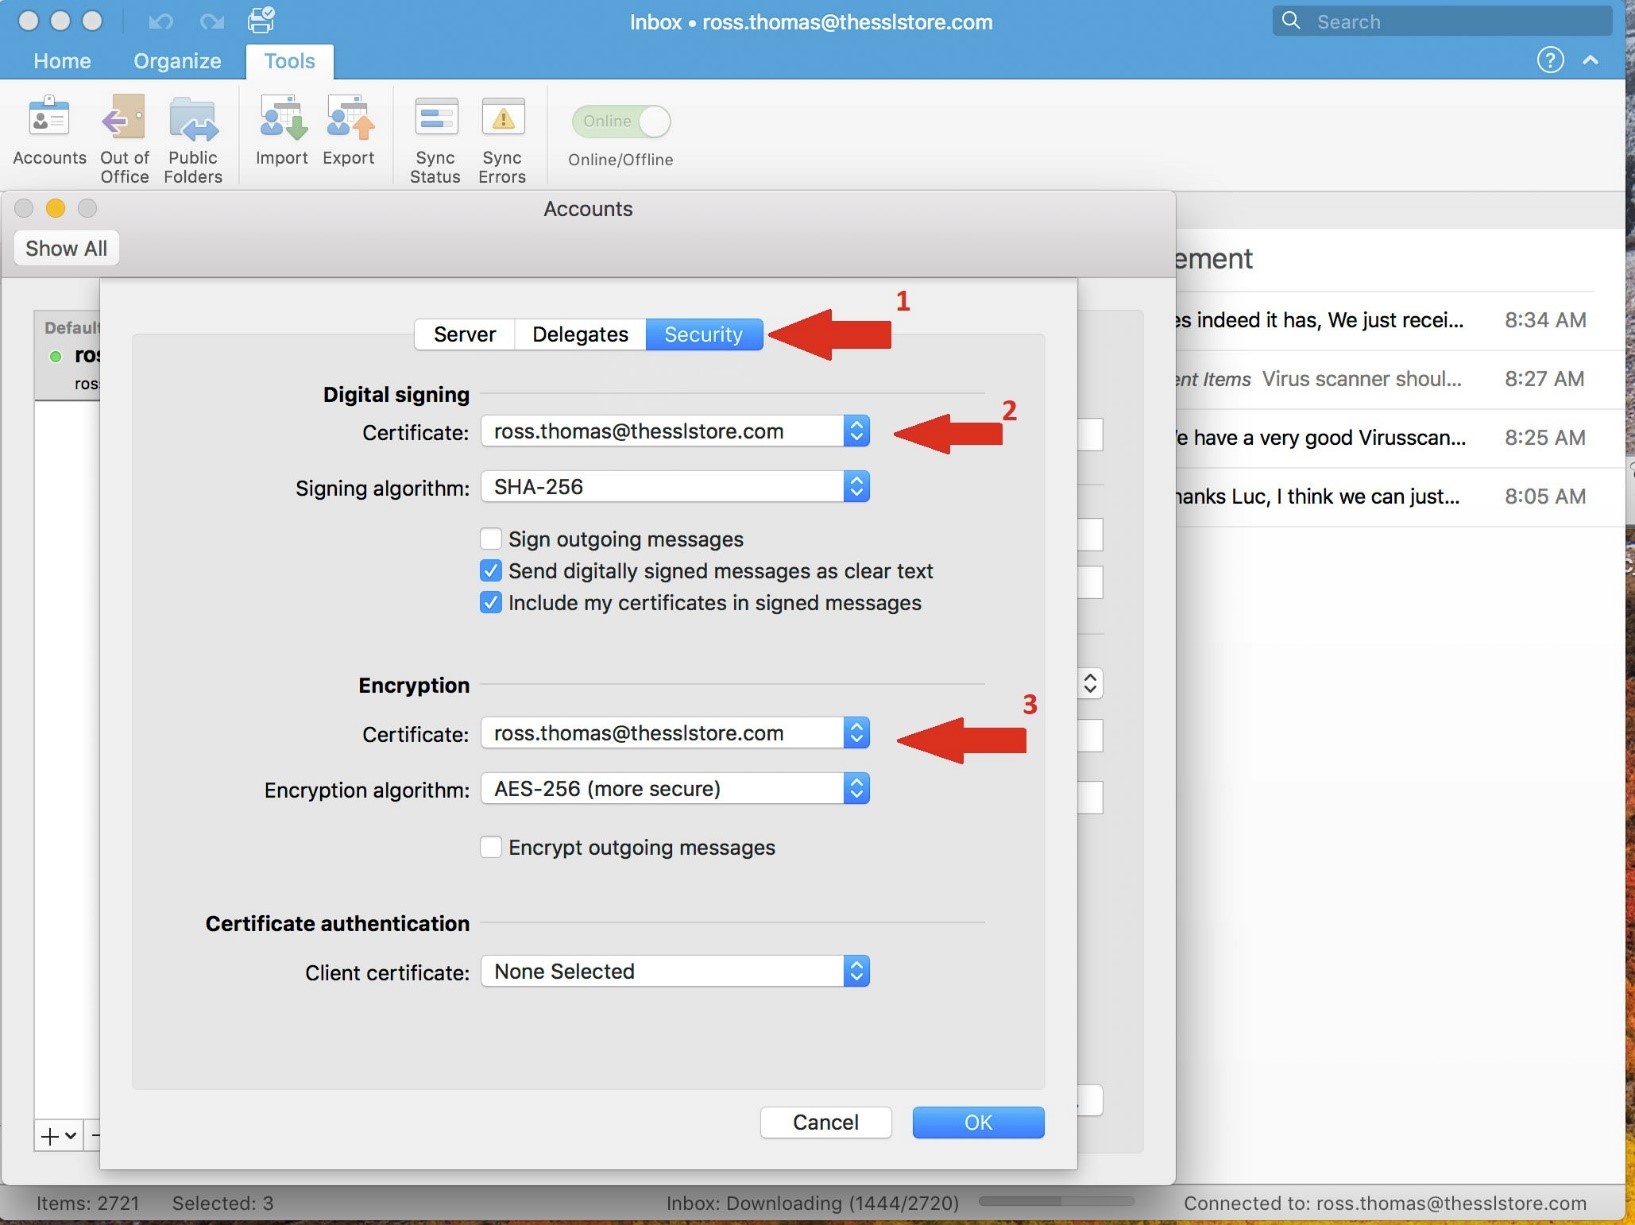
- Click on the ‘Security’ tab in the ‘Advanced’ window pane
- Under ‘Digital Signing’ -> ‘Certificate’, select the dropdown and pick the correct certificate (which the private key is associated to)
Note: Optionally, you can check the box to automatically ‘Sign outgoing messages’, ‘Send digitally signed messages as clear text’ and ‘Include my certificates in signed messages’
Advice: I would recommend all 3 check boxes to be active
- Under ‘Digital Signing’ -> ‘Certificate’, select the dropdown and pick the correct certificate (which the private key is associated to)
- Under ‘Encryption’ -> ‘Certificate’, select the dropdown and pick the correct certificate (which the private key is associated to)
- Note: Optionally, you can check the box to automatically ‘Encrypt outgoing messages’
Advice: I would NOT recommend this check box - Note: Optionally, you can set the certificate for ‘Certificate Authentication’
Advice: Likely not necessary unless your Admin calls for it
- Note: Optionally, you can check the box to automatically ‘Encrypt outgoing messages’
There you have it. You now will have certificate functionally just as you would on a Windows based machine in Outlook 2016. People love the security of a good certificate and they are not very expensive, so, make your recipients feel safe and secure by showing them that you paid the CAs to validate your identity and vouch for your trustworthiness.
Stay safe and happy scrutinizing!
Check out the rest of the Hashed Out Email Security series:

5 Ways to Determine if a Website is Fake, Fraudulent, or a Scam – 2018
in Hashing Out Cyber SecurityHow to Fix ‘ERR_SSL_PROTOCOL_ERROR’ on Google Chrome
in Everything EncryptionRe-Hashed: How to Fix SSL Connection Errors on Android Phones
in Everything EncryptionCloud Security: 5 Serious Emerging Cloud Computing Threats to Avoid
in ssl certificatesThis is what happens when your SSL certificate expires
in Everything EncryptionRe-Hashed: Troubleshoot Firefox’s “Performing TLS Handshake” Message
in Hashing Out Cyber SecurityReport it Right: AMCA got hacked – Not Quest and LabCorp
in Hashing Out Cyber SecurityRe-Hashed: How to clear HSTS settings in Chrome and Firefox
in Everything EncryptionRe-Hashed: The Difference Between SHA-1, SHA-2 and SHA-256 Hash Algorithms
in Everything EncryptionThe Difference Between Root Certificates and Intermediate Certificates
in Everything EncryptionThe difference between Encryption, Hashing and Salting
in Everything EncryptionRe-Hashed: How To Disable Firefox Insecure Password Warnings
in Hashing Out Cyber SecurityCipher Suites: Ciphers, Algorithms and Negotiating Security Settings
in Everything EncryptionThe Ultimate Hacker Movies List for December 2020
in Hashing Out Cyber Security Monthly DigestAnatomy of a Scam: Work from home for Amazon
in Hashing Out Cyber SecurityThe Top 9 Cyber Security Threats That Will Ruin Your Day
in Hashing Out Cyber SecurityHow strong is 256-bit Encryption?
in Everything EncryptionRe-Hashed: How to Trust Manually Installed Root Certificates in iOS 10.3
in Everything EncryptionHow to View SSL Certificate Details in Chrome 56
in Industry LowdownA Call To Let’s Encrypt: Stop Issuing “PayPal” Certificates
in Industry Lowdown