


 (10 votes, average: 3.90 out of 5, rated)
How Does HTTPS Work?
We all know that HTTPS = secure. But do you know how HTTPS works under the hood? Let’s take a look at how HTTPS works to make the internet safer for all of us…
95% of webpages viewed in the US are viewed using HTTPS. (That’s according to Google Chrome user data via the Google Transparency report.) Other countries also overwhelmingly use HTTPS URLs — 93% in Germany, 85% in Japan, and 85% in India. HTTPS has been adopted worldwide as the preferred protocol for most websites. But just how does HTTPS work and what does it do?
If you’re reading this article, you probably already know that the “S” in HTTPS means secure. You’ve likely looked for https:// (or a padlock icon) at the beginning of a URL to confirm it was secure before entering your credit card details online.
But what does HTTPS do for the average internet user? And how does HTTPS work in a more technical sense?
Let’s hash it out.
How HTTPS works is actually a pretty big topic, so we’ll break it down into several sections–starting with the basics. If you’re already somewhat familiar with HTTPS and want to skip around, you can use this table of contents to jump to the part that interests you.
What we’re hashing out…
- We all know that HTTPS = secure. But do you know how HTTPS works under the hood? Let’s take a look at how HTTPS works to make the internet safer for all of us…
- How HTTPS Works 101: The Two Things HTTPS Does to Make the Internet Safer
- How HTTPS Works 201: The Technical Details
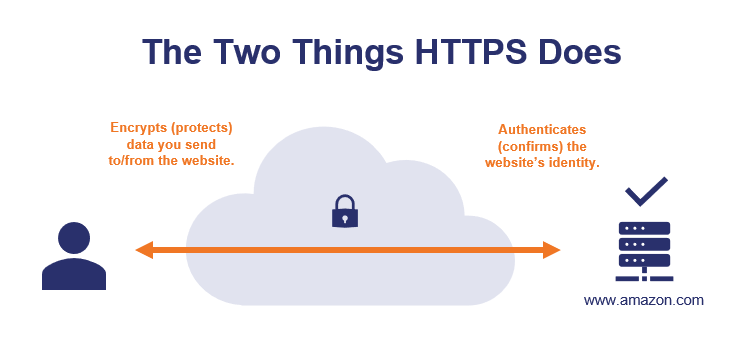
How HTTPS Works 101: The Two Things HTTPS Does to Make the Internet Safer
When you go to a website that starts with https://, that tells you two very specific things:
- A third party has authenticated the website. The website has been authenticated to verify it is the website it claims to be — if your browser bar says https://www.amazon.com, you can be confident that you’re actually on amazon.com.
- The site uses encryption. Data you send to/from the website is encrypted so other parties can’t see/steal it—you can submit credit card numbers or other sensitive data and know that nobody can intercept your info while it’s making the trip to amazon.com.
Important note about terminology: you’ll hear the terms “SSL” and “TLS” used in conjunction with HTTPS. A few quick facts will make these terms easier to keep straight:
- Secure sockets layer (SSL) and transport layer security (TLS) refer to the type of secure connection that HTTPS uses for communication between a web browser and web server.
- Technically speaking, SSL is an older technology that was deprecated and replaced with TLS.
- Practically speaking, most people use the terms interchangeably. That’s why you’ll sometimes see us use “SSL/TLS” or “SSL/TLS Certificate.”
- SSL/TLS and HTTPS go together like dirt and grass. You can’t grow grass without dirt, and you can’t have HTTPS without SSL/TLS.
Let’s dig a little deeper into how HTTPS works to provide these two security benefits…
HTTPS Authentication Ensures You’re Connected to the Correct Website (And That’s More Important Than It Sounds)
As mentioned, the first thing that HTTPS does is authenticate the website to verify that your browser is connected to the correct website. If you typed in amazon.com, your browser uses HTTPS to ensure that the website you’re connected to is the real amazon.com (not a fake website run by a hacker in a back alley in San Fransokyo).
Why HTTPS Authentication Is Important
Now, you may be wondering why this is necessary — “can’t I just look at the URL in my browser’s address bar?”
If it says amazon.com and it looks like amazon.com, it must be amazon.com, right? Not necessarily.
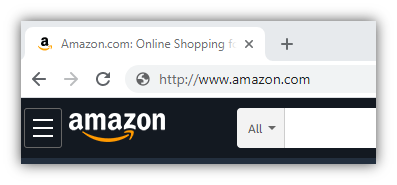
Your browser’s address bar is always a good place to check, but it’s not foolproof — it’s possible that you could type http://www.amazon.com into your browser’s address bar and get a website that looks like Amazon.com… but is actually a fake website run by a hacker.
Hackers can use DNS poisoning, malware, or other attack methods so your browser invisibly connects to the wrong website server. So while it looks like you’re connecting to a legitimate URL in your browser bar, you’re actually on a fake website run by a hacker.
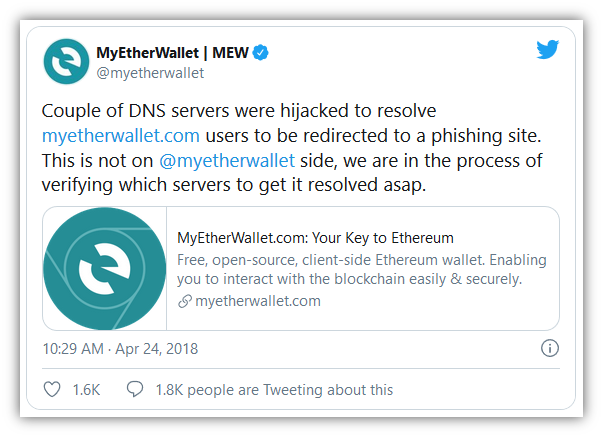
Let’s consider a real-life example. Hackers used DNS poisoning to take a legitimate domain name and point visitors to a fake website where they stole $150K from MyEtherWallet users.
How Do DNS Attacks Like This Work?
First of all, we need to briefly discuss how your computer actually connects to websites. When you type in amazon.com, your computer doesn’t actually understand “amazon.com” as an address it can connect to. Amazon.com is the human-readable address, the actual address your computer connects to is the IP address (which looks like this: 176.32.103.205). Your computer needs to lookup amazon.com’s IP address using the DNS system before it can connect to the amazon.com web server.
Here’s a simplified representation of the process:
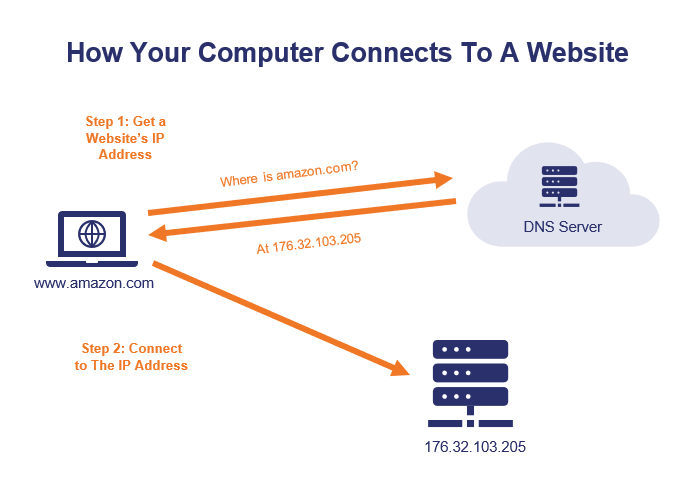
When you visit a website, your computer uses the DNS system to get the IP address of the website you’re trying to visit. Your computer is actually connecting to an IP address, not to an address like amazon.com. In a DNS poisoning attack, your computer is given an incorrect IP address, which means that your computer connects you to the wrong server. Your computer thinks it’s amazon.com and you think it’s amazon.com, but it’s not.
Want to read further? If you’d like to read the in-depth version of how DNS poisoning attacks work, read our guide on DNS Poisoning Attacks.
The good news is that HTTPS is an effective defense against hacker tricks like DNS poisoning. How? Let’s dive into how HTTPS works to ensure that you’re on the correct website.
How HTTPS Authentication Works
So, how does HTTPS ensure that you’re connected to the correct website?
Your browser uses an SSL/TLS certificate and the certificate authority that issued it to authenticate each HTTPS website that you visit. Here’s how it works…
Step 1: Getting a Certificate
First, the website needs to have an SSL certificate issued by a publicly trusted certificate authority. An SSL certificate is a lot like a passport — but it’s for websites, not people. An SSL certificate includes details such as:
- The website’s URL(s),
- A public key (which is linked to a private key only possessed by the website),
- The certificate authority that issued the certificate,
- The certificate’s expiration date, and
- The legal organization that runs the website (optional).
To get a valid SSL certificate, the website owner will have to go through a few steps:
- Generate a public key and a private key (more on how they’re use later).
- Go through a specific process to prove to the certificate authority that they’re the actual owner of the website.
- In the case of OV and EV SSL certificates, the website owner also has to prove that they’re an actual, legally registered organization.
Once those steps are completed, the certificate authority issues an SSL certificate to the website owner. This certificate is installed on the web server and is automatically provided every time someone visits the website via an https:// URL.
Step 2: “Passport, Please!”
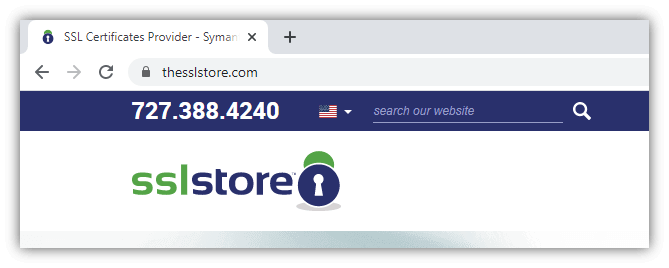
When you visit an HTTPS website, the website sends its SSL/TLS certificate to your web browser. Let’s use our website as an example. If you click on the padlock in your browser, then click to view certificate details, you can see our website’s certificate and the information it includes.
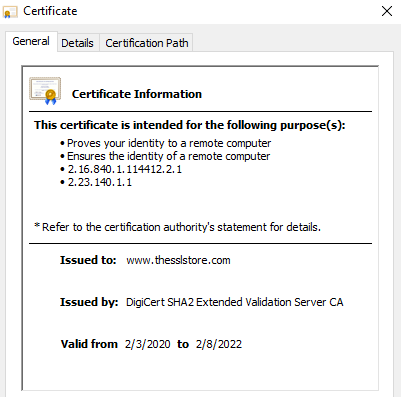
If you open the Details tab, you’ll see more information about the website and the organization that runs it, like this:
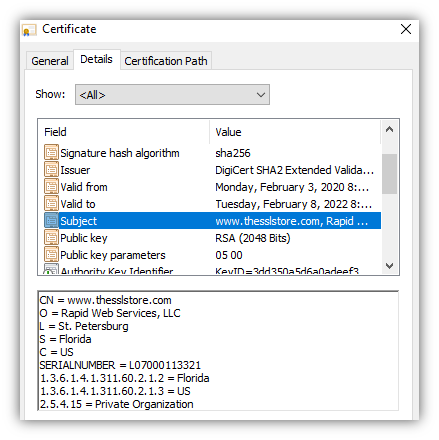
Some websites (like ours) have certificates that also show their company details (such as company name, location, etc.). These are called organization validation (OV) or extended validation (EV) certificates. The company details are also verified, so you can be 100% confident you know exactly who is running the website you’re on.
Step 3: Verifying the Certificate
Now we come to the critical step — verifying the website’s SSL certificate. Just because the website presents an SSL certificate doesn’t mean that your browser should trust it. After all, as Albert Einstein famously said:

Fortunately, your browser has a way it can verify the website’s SSL certificate to ensure it’s accurate and not a fake. Specifically, your browser will verify whether:
- The website’s SSL certificate was issued by a certificate authority on the browser’s trusted list. (The browser uses the certificate authority’s digital signature to instantly confirm that the certificate authority issued the website’s certificate.)
- The SSL certificate is valid for the website domain/URL you’re visiting.
- The SSL certificate is currently valid and has not expired or been revoked.
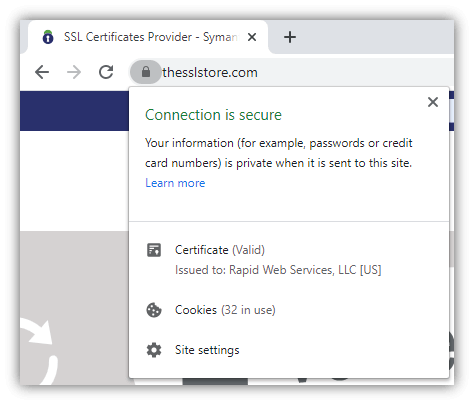
If the certificate passes those checks, your browser will display the website, along with https:// and a padlock next to the URL.
If you look at our website’s certificate, you’ll see that it is issued by DigiCert. Our website’s certificate includes a digital signature from DigiCert that your browser can use to verify the certificate is a valid and was issued by DigiCert.
We’ll dive into more technical details later, but the main point for now is: your browser checks each website’s HTTPS credentials, just like airport authorities check your passport before you can board an airplane.
HTTPS Encryption Ensures Others Can’t Spy on Your Communications
The second thing that HTTPS does is encrypt all information that’s sent between you and the website you’re visiting. This ensures that nobody (other than you and the website you’re connected to) can read your data as it’s sent across the internet.
Let’s use amazon.com again as an example. Say, you’re shopping for a lovely Nicholas Cage sequin pillow:

You want to place your order online, but security and privacy are very important to you. You don’t want anyone to steal your credit card details, and perhaps more importantly you don’t want anyone to know that you sleep with a Nicholas Cage pillow on your bed. (I won’t judge you!)
Because amazon.com uses HTTPS, that means all data sent to/from amazon.com is encrypted before being sent. Let’s a take a brief look at how HTTPS works on the encryption side…
How HTTPS Encryption Works
In order to buy that Nicholas Cage pillow, you need to enter your credit card details:
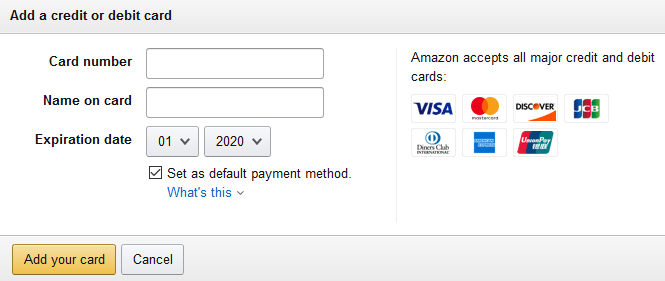
When you enter your credit card numbers in the above field and click “Add your card,” your credit card details are submitted to Amazon.com. But first, your browser will encrypt the data.
This means that:
- The data is encrypted using an encryption key so only Amazon can unlock (decrypt) the data, and
- Your credit card (and other data) will look like gibberish to anyone who doesn’t have the decryption key.
The data will travel across the internet in its encrypted (unreadable) state. Once it reaches amazon.com, Amazon would decrypt the data so it can read your credit card number to process your payment:

You might be wondering — what exactly is encrypted text (aka ciphertext)? Here’s an example, showing actual encrypted data (as you can see, it’s gibberish unless you have the decryption key to read it):
| Data you enter: | Encrypted data (ciphertext) that is sent over the internet: | After Amazon decrypts the data: |
| 1234123412341243 | MHecmaRMbHdU8KRzY0h+n7n9 A3yR1ZJOBbY6PuEYRH0= | 1234123412341243 |
Encryption makes it safe to send encrypted data across the internet.
What HTTPS Encryption Doesn’t Do
Here’s one important distinction to make — HTTPS encryption only protects your data while it’s traveling to the website (i.e. amazon.com in this case). Once the data reaches the website, it’ll be decrypted and then it’s up to the website owner what happens to your data from that point onward. That’s why it’s so important to only shop on websites you trust to protect your data after they receive it.
This is an advantage of OV/EV SSL certificates. Because these certificates contain information about the organization that runs the website, it’s easier for you to know exactly who you’re sending your information to.
But Wait… How/Why Would Anyone Be Spying on My Communications?
You might be wondering how anyone would spy on the data you’re sending over the internet. If I’m submitting something to amazon.com, how would anyone else even have the opportunity to see that? I’m sending it directly to amazon.com, right?
Actually, no…you’re not.
Most people think that sending information online works something like this:

“I’m talking directly to the other party, and there’s nobody else around to hear…right?” Not quite.
In reality, sending data over the internet is more like a game of telephone, where each party whispers the message to the next until it reaches your intended recipient. You have no idea how many people heard your message along the way or what they’re doing with it.

When you send data across the internet, it’s routed through dozens of DNS servers, routers, and waypoints… each controlled by different governments, ISPs, and other companies.
This graphic shows the actual route data took when sent between Harvard researchers in Ghana and Mongolia:
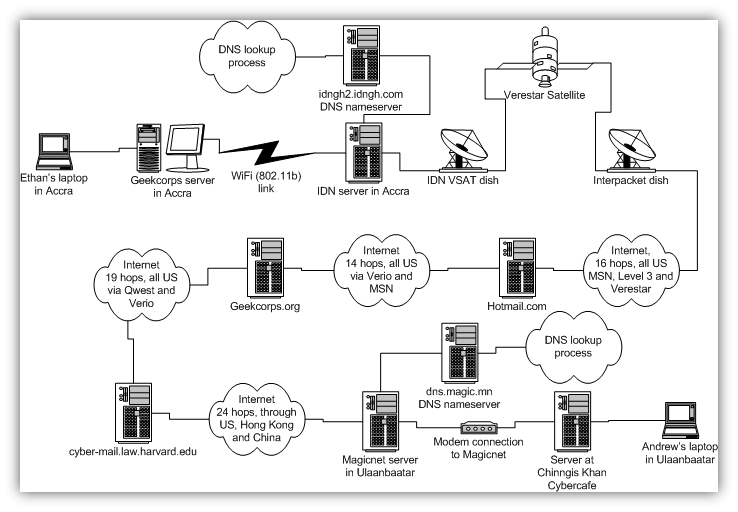
As one of the researchers pointed out, that’s more than 70 different computers owned by “dozens and dozens of organizations, from Internet architects to ISPs, located in at least 20 different legal jurisdictions.” It’s pretty likely that there’s one or more “leaks” along that route. For example:
- One or more of those organizations has a computer that’s been compromised by a hacker.
- One or more of the ISPs is collecting data for ad targeting and/or selling to data aggregator companies.
- One of more of the countries has a spy/intelligence program that collects data sent via the internet.
- One or more of the organizations has an insider threat (employee that’s collecting/selling data).
Fortunately, HTTPS encryption keeps your data safe, no matter who owns those 70+ computers along the way or what they try to do with the data that passes through. If your data is encrypted, those computers can’t see or read the actual data you’re sending.
How HTTPS Works 201: The Technical Details
So, we’ve covered what HTTPS does and how HTTPS works at a high level — now it’s time to dive into the nitty-gritty details of how HTTPS works.
HTTP vs. HTTPS
As we alluded to before, HTTPS is simply the secure version of HTTP. You can think of it as HTTP communication that’s done over a secure channel. If you’re familiar with how HTTP works, the fundamentals work the same with HTTPS:
- Request methods such as GET, POST, etc.
- HTTP status codes such as 200 (OK), 404 (File Not Found), etc.
- Request headers such as User-Agent, Accept, etc.
One key difference to be aware of is that HTTP/2 (a newer, faster version of HTTP) only works over HTTPS.
How HTTPS Works Under the Hood: HTTPS Runs on PKI
Before we can dive deeper into how HTTPS works, we need to go over a few technical details of the system that HTTPS, SSL, and TLS are all built on top of — public key infrastructure, or PKI. Just like your car runs on an internal combustion engine, HTTPS and TLS/SSL run using PKI.
PKI is a system made up of five main components, including:
- Digital certificates (i.e. SSL certificates).
- Public & private key pairs.
- Certificate authorities.
- Digital signatures.
- Root stores.
Let’s briefly cover how each of these work, so you can better understand how HTTPS works.
Digital Certificates
We already covered these — they’re like passports for organizations/websites.
Public Keys & Private Keys
First, quick review: when we encrypt data, we use an encryption key to turn readable text into unreadable text (called ciphertext), like this:
Hello! >>> Encrypted with key “mykey” >>> HgPpAhtl
We can do the same in reverse to decrypt the ciphertext:
HgPpAhtl >>> Decrypted with key “mykey” >>> Hello!
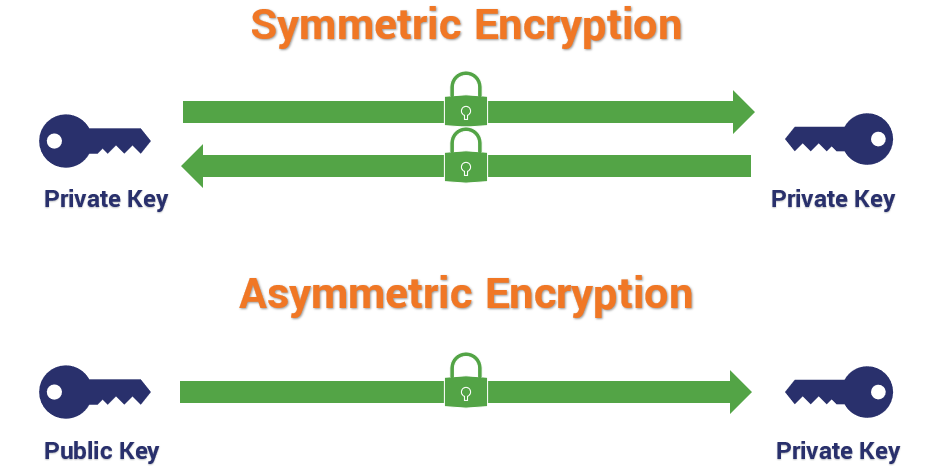
Notice that we’re using the same key to encrypt and decrypt the text? That’s called symmetric encryption. Asymmetric encryption is a bit different—it uses two different keys, one for encryption and one for decryption:
- The public key (used for encryption) is given out freely for anyone to use to send you an encrypted message.
- You keep the private key (used for decryption) so you’re the only one who can read the encrypted messages.
Symmetric encryption uses the same private key for encryption and decryption, whereas asymmetric encryption uses a public/private key pair:
That’s critical for SSL/TLS to work. If you have amazon.com’s certificate and public key, you can send a message that only amazon.com can read. (This, by extension, also means that you can easily confirm that the server you’re talking to is actually amazon.com. If they can understand a message encrypted with amazon.com’s public key, that means they have amazon.com’s private key…which must mean they are amazon.com!)
To learn more check out our blog post on asymmetric and symmetric encryption.
Certificate Authorities
We already covered these above — remember, certificate authorities are companies that are trusted to issue SSL certificates.
Digital Signatures
Digital signatures are a way of proving who/where a piece of software or document came from. If you have an author’s public key, you can verify anything they signed with their private key.
This is critical, because this is how your browser can tell which certificate authority really issued an SSL certificate.
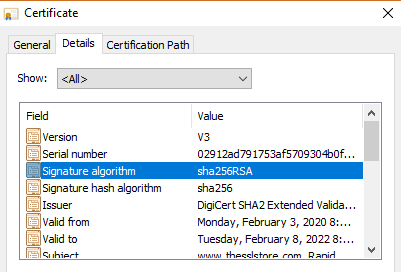
Let’s go back to the SSL certificate for our website, thesslstore.com. That certificate was issued by DigiCert, so it has DigiCert’s digital signature on the SSL certificate:
If your browser has DigiCert’s public key, it can verify that our certificate really was issued by DigiCert.
Of course, this raises an important question… does your browser have DigiCert’s public key?
Root Stores
In order to verify a website’s SSL certificate, your browser will need the certificate authority’s public key. Fortunately, there’s a system setup for that — root stores.
Every device has what’s called a root store or trust store. The root store contains the digital certificates and associated public keys of every certificate authority that it trusts. Every device comes with a default list of certificate authorities that it trusts — you can modify this list if you want, but very few people do.
Let’s look at the certification path for our SSL certificate. Note that there are three certificates:
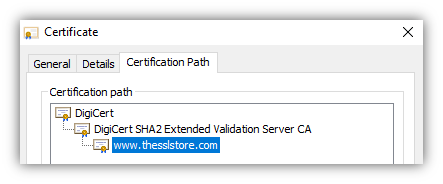
- The top certificate, “DigiCert” is the root certificate. That certificate should be pre-loaded on your computer, in your device’s root store.
- The middle certificate is called the intermediate certificate—it’s digitally signed by the “DigiCert” root certificate so your browser will also trust it. Your browser can verify the signature using the DigiCert’s public key, which is pre-loaded on your computer as part of the root certificate.
- The bottom certificate “www.thesslstore.com” is our website’s SSL certificate — our web server sent it to your browser when you connected. Your browser can verify it using the intermediate certificate’s digital signature.
These three certificates together are called the “chain of trust” and are how your browser can verify any website’s SSL certificate to ensure it is valid and trusted.
How HTTPS Works for Website Owners: How to Enable HTTPS on Your Website
OK, so know you understand the basic components of PKI, and you want to enable HTTPS on your website. Let’s cover how you can do that.
All popular web servers (such as Apache, NGINX, and IIS) and website control panels (such as cPanel or Plesk) include support for HTTPS, so you don’t need to build or install custom software to handle HTTPS communication. You just need to install an SSL certificate for your website then update your site settings to use HTTPS.
Step 1: Acquire an SSL/TLS Certificate
Your SSL certificate proves that your website (let’s say yoursite.com) is the real yoursite.com. You need to get an SSL certificate issued by a trusted certificate authority. If you acquire a certificate from a certificate authority that your website visitor’s browser doesn’t automatically trust, they’ll see a warning message like this.
Tip: All of the SSL certificates sold on thesslstore.com are trusted by all modern browsers, operating systems, and devices.
There are a few steps you’ll need to complete to get your SSL certificate. Fortunately, these can be done in as little as a few minutes:
Generate a certificate signing request (CSR). You can usually do this in your web hosting control panel. This also generates the public key and private key that are required for HTTPS to work. Tip: our knowledgebase provides CSR generation guides for 20+ different hosting platforms and server types. This screenshot shows what the CSR generation form looks like in cPanel:
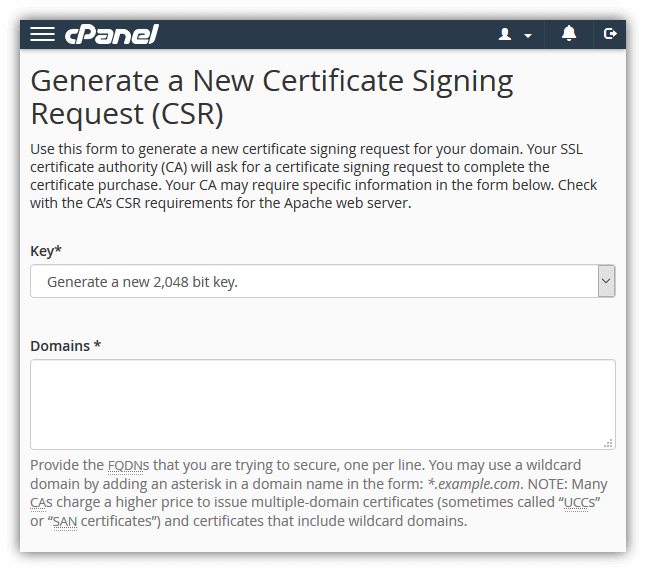
Submit the certificate signing request to your SSL provider / certificate authority. Once you submit the CSR, the certificate authority will begin the process required to issue an SSL certificate.
Complete the certificate authority’s validation process. This will vary depending on the type of certificate you’ve purchased, but at minimum you’ll need to prove that you own/manage your domain. See our SSL validation guide for more details.
Once you’ve completed those steps, the certificate authority will send your SSL certificate to you.
Step 2: Install the SSL Certificate on Your Website
Now that you have your SSL certificate, you’ll need to install it on your website. Again, you can usually do this using your web hosting control panel. Here’s what the installation form looks like for cPanel:
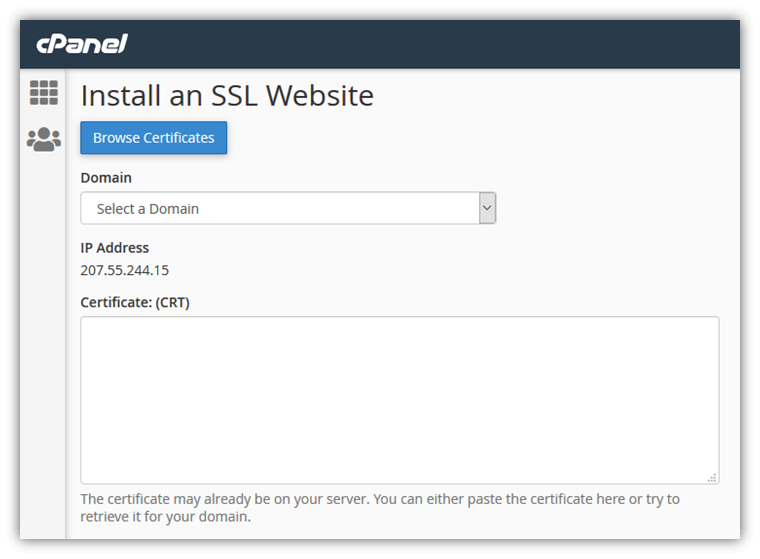
Tip: See our knowledgebase for installation guides for 20+ server and web hosting platforms.
Step 3: Change Your Site Settings to Use HTTPS
You’ve installed the SSL certificate on your website, so your website is now capable of using HTTPS. Now you just need to tell your website that you want it to use HTTPS every time (not HTTP).
How to do this will depend on how your website is set up, but you need to do three things:
- Change your website CMS to use https:// for all pages.
- Setup 301 redirects pointing http:// URLs to the same URL on https://.
- Be sure that all images, CSS files, Javascript files, etc. are loaded with https:// URLs.
Now that you’ve setup HTTPS on your website, visitors to your website will be able to enjoy the benefits of HTTPS: authentication and encryption. But how does HTTPS work to do that at the technical level? Let’s dive in deeper, but first…
How HTTPS Works for Website Users: The TLS Handshake
As we covered in the first part of this article, when you visit an HTTPS website, your browser is authenticating the website and encrypting the data sent to and from the client:
To do that, your browser and the website server need to create a secure connection to communicate through. Setting up the secure connection is a process called the SSL/TLS handshake.
Creating a Secure Connection with the SSL/TLS Handshake
So, you’ve typed https://www.amazon.com into your browser bar — how does your browser setup a secure HTTPS connection to amazon.com? Technically speaking, HTTPS is the same as HTTP except the communication happens over a secure SSL/TLS connection. To set up that secure SSL/TLS connection, your browser and the server need to go through what is called the SSL/TLS handshake process.
Note: In this article, we’ll be covering the basics of the TLS 1.2 handshake process (it’s the most commonly used). If you want a more detailed coverage, including how the newer (and faster) TLS 1.3 handshake works, check out our article Taking a Closer Look at the SSL/TLS Handshake.
The following illustration shows all of the steps of the TLS handshake (how your browser and server setup a secure connection). The client (your browser) is on the left, and the web server is on the right:
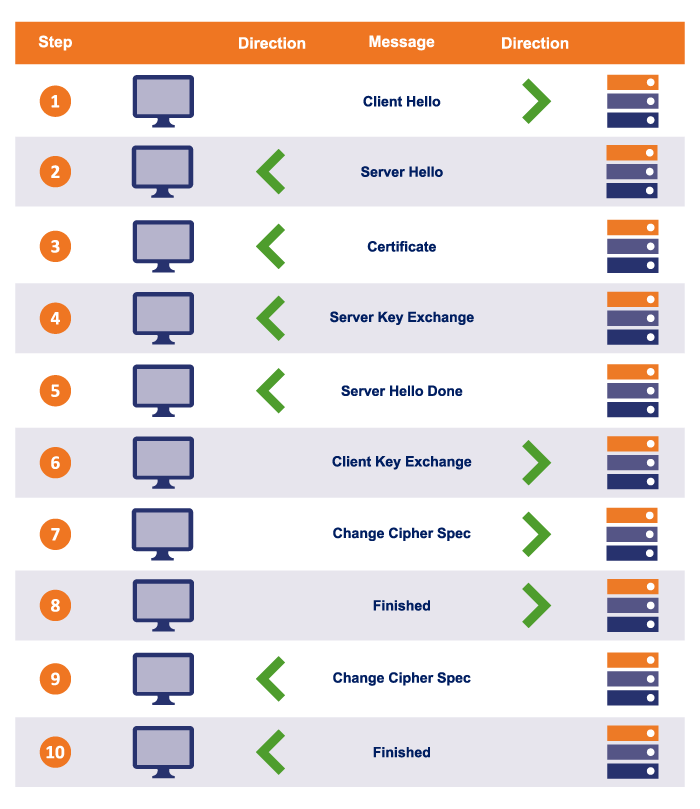
Let’s go over what happens in these steps:
Steps 1-2: Hello & Cipher Suites!
The browser and server say hello and agree on which cipher suite (encryption algorithm) to use. (HTTPS/SSL/TLS supports multiple cipher suites.)
Fun fact: Some browsers (such as Firefox) let you easily see what cipher suite your connection to a specific website uses. In Firefox, click the padlock, then click the “>”, then click “More Information” to see information like this:
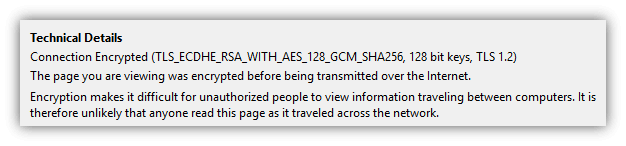
If you want to know how to interpret what that info means, check out our article on Cipher Suites: Ciphers, Algorithms and Negotiating Security Settings.
Steps 3-5: Certificate & Key Exchange
The server sends its SSL certificate and intermediate certificate, along with the associated public keys, to the browser. As covered above in the “PKI” section, the browser will verify the SSL certificate based on its digital signature and the root certificates the browser trusts. If any of the checks fail, the connection will abort and an error message will display.
Provided that none of the checks fail, at this point, we technically have a secure communication channel:
- The browser has verified the web server’s SSL certificate, so the web server has been authenticated.
- The browser now has the server’s public key, so the browser can encrypt messages that can only be read by the server.
But the connection can only be used securely one way (browser –> server), so we’re not done yet…
Steps 6-10: Setting Up Symmetric Encryption
It turns out that symmetric encryption (using the same key for encryption and decryption) is actually more efficient, so the browser and server will now create a new, shared encryption key that they can use for encryption and decryption moving forward. (Exactly how the browser and server create a shared session key depends on the cipher suite [encryption methods] being used.)
Once the session key is generated, the TLS handshake process completes. Your browser and the server will use the session key to encrypt and decrypt all data that they exchange.
Congratulations, your browser now has a two-way secure communication channel for secure HTTPS communication with the web server. You can send and receive data securely, without worrying about someone in-route spying on your info.
Handy HTTPS Usage Tips For Users
Now you know about what HTTPS does and even the technical details of how HTTPS works. Here are a few practical tips and things to keep in mind when visiting HTTPS websites.
Google Chrome Hides the HTTPS
If you’re using Chrome as your browser, keep in mind that Google actually hides the https:// part of the URL. Here are three quick ways you can verify if a webpage is HTTPS:
Look for the padlock:
Double click on the URL to see the https://:

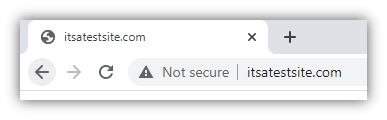
Make sure there isn’t a “Not Secure” label:
You Can Verify Company Details Using Their SSL Certificate
As we alluded to earlier, some websites’ SSL certificates contain verified company details so you can identify the exact company that runs the website. This can be useful to avoid scam websites or simply to have greater transparency on who you’re dealing with online. (With so many companies having dozens of websites out there, sometimes it’s hard to figure out which ones are official websites and which ones aren’t.)
If the website has an EV SSL certificate, you can view the company details by just clicking on the padlock:
If the website has an OV SSL certificate, you’ll need to open up the SSL certificate details and view the subject field:

This information has been verified by the certificate authority, so it can’t be faked. This is why it’s crucial for businesses that handle sensitive data to use SSL/TLS certificates with organizational validation as a minimum.
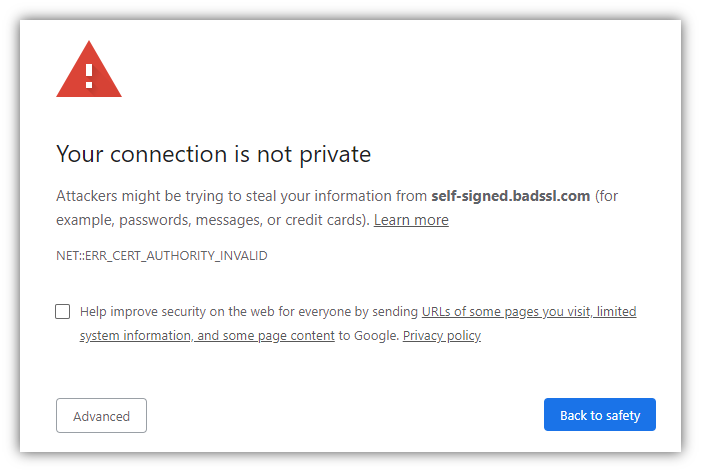
Be Very Careful Proceeding Past an HTTPS Warning
If you visit a website and see a warning like this, it may be tempting to just click past the warning to get to the website you’re trying to visit. But be very careful doing this — it can trigger warnings like this when a hacker is performing a man-in-the-middle (MitM) attack on your connection. (For example, showing you a fake website that looks like the real website you’re trying to visit.)
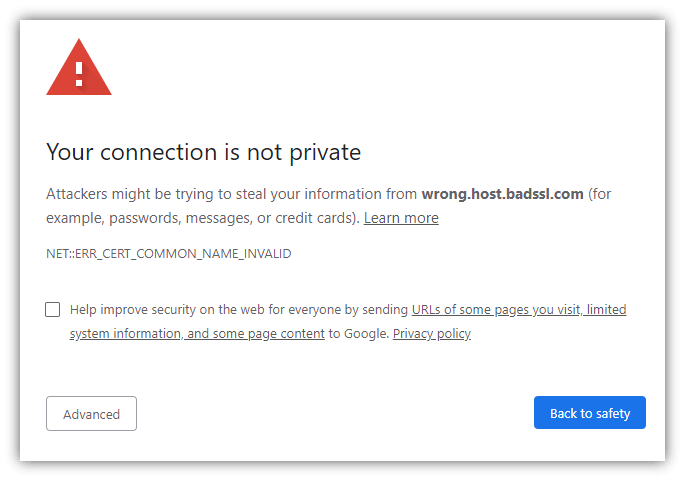
In many cases, these errors are triggered due to the website letting its certificate expire or not configuring their server correctly. But occasionally they’re for a more sinister reason — a hacker is trying to spy on your connection or trick you!
So…That’s How HTTPS Works
I hope you’ve found this article useful. There are a ton of details we could cover on how HTTPS works, we tried to make this article accessible and easy to understand, while still covering the important details. Hopefully, you found the level of detail “just right” (like Goldilocks’ porridge)!
Still have more questions about “how does HTTPS work?” Or do you have suggestions for additional details we should include or points we can further clarify? Drop a note in the comments!


5 Ways to Determine if a Website is Fake, Fraudulent, or a Scam – 2018
in Hashing Out Cyber SecurityHow to Fix ‘ERR_SSL_PROTOCOL_ERROR’ on Google Chrome
in Everything EncryptionRe-Hashed: How to Fix SSL Connection Errors on Android Phones
in Everything EncryptionCloud Security: 5 Serious Emerging Cloud Computing Threats to Avoid
in ssl certificatesThis is what happens when your SSL certificate expires
in Everything EncryptionRe-Hashed: Troubleshoot Firefox’s “Performing TLS Handshake” Message
in Hashing Out Cyber SecurityReport it Right: AMCA got hacked – Not Quest and LabCorp
in Hashing Out Cyber SecurityRe-Hashed: How to clear HSTS settings in Chrome and Firefox
in Everything EncryptionRe-Hashed: The Difference Between SHA-1, SHA-2 and SHA-256 Hash Algorithms
in Everything EncryptionThe Difference Between Root Certificates and Intermediate Certificates
in Everything EncryptionThe difference between Encryption, Hashing and Salting
in Everything EncryptionRe-Hashed: How To Disable Firefox Insecure Password Warnings
in Hashing Out Cyber SecurityCipher Suites: Ciphers, Algorithms and Negotiating Security Settings
in Everything EncryptionThe Ultimate Hacker Movies List for December 2020
in Hashing Out Cyber Security Monthly DigestAnatomy of a Scam: Work from home for Amazon
in Hashing Out Cyber SecurityThe Top 9 Cyber Security Threats That Will Ruin Your Day
in Hashing Out Cyber SecurityHow strong is 256-bit Encryption?
in Everything EncryptionRe-Hashed: How to Trust Manually Installed Root Certificates in iOS 10.3
in Everything EncryptionHow to View SSL Certificate Details in Chrome 56
in Industry LowdownA Call To Let’s Encrypt: Stop Issuing “PayPal” Certificates
in Industry Lowdown